Every advanced and professional photographer today needs to learn how to use exposure in photography. By understanding how to expose an image properly, you will be able to capture photographs of the ideal brightness, including high levels of detail in both the shadows and highlight areas. You’ll also be able to maximize a photo’s image quality. This article explains exposure in detail, as well as helping you understand the three most important camera settings: shutter speed, aperture, and ISO.
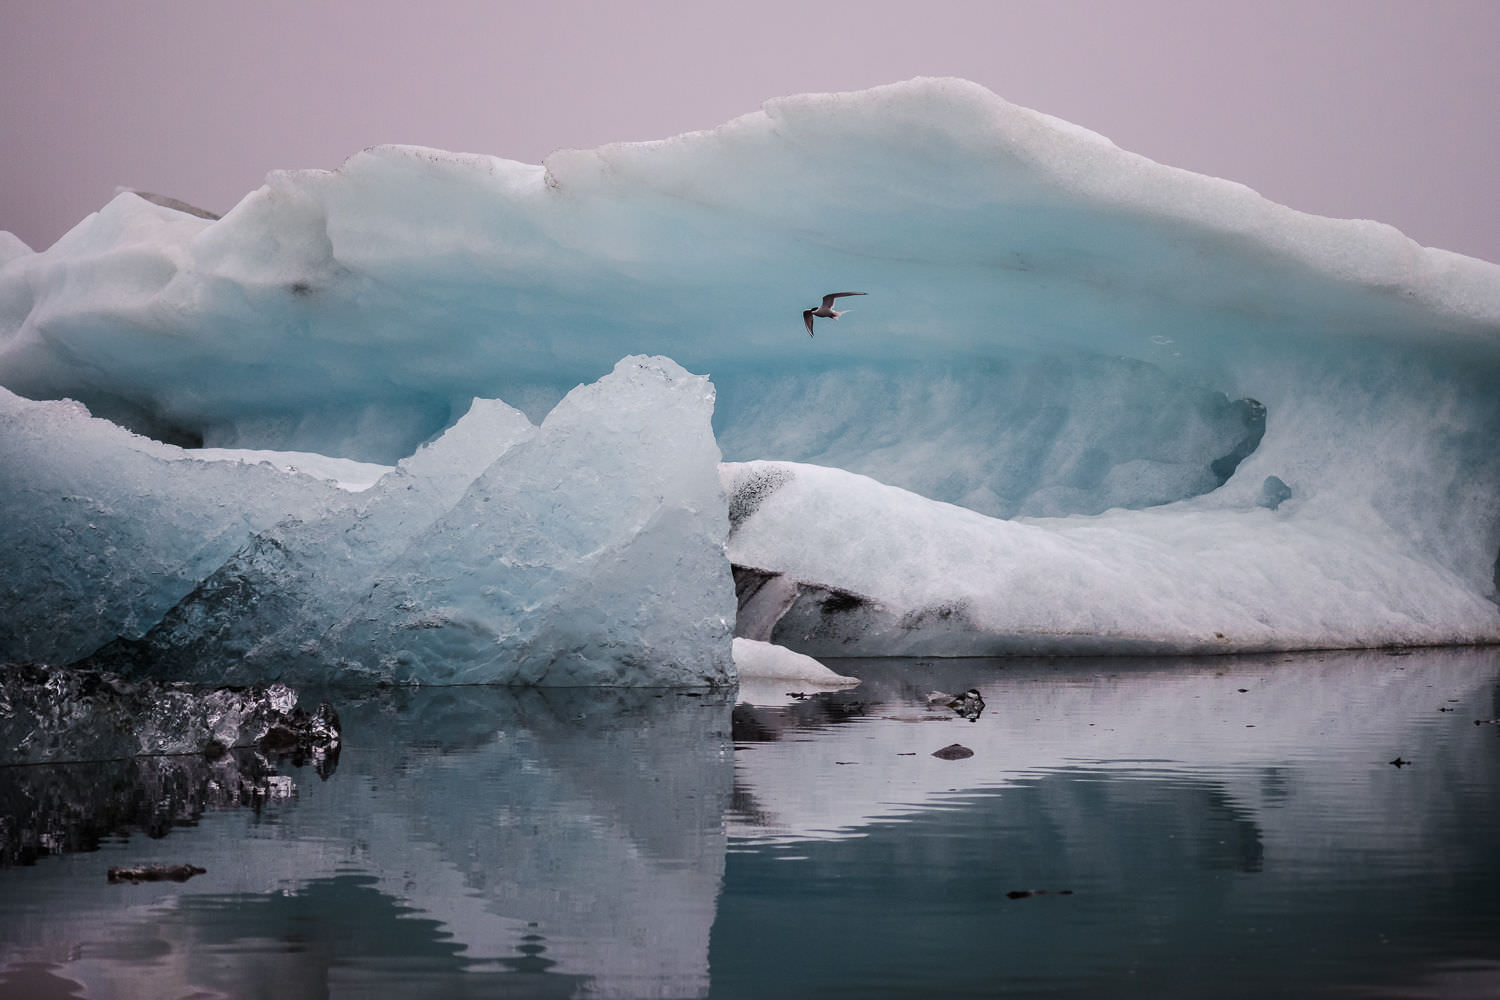 Amazing conditions mean that you have to be very careful with your camera settings, especially exposure.
1/800 second, f/2.8, ISO 800.
Table of Contents
What Is Exposure in Photography?
In photography, exposure is the amount of light that reaches your camera sensor or film. It is a crucial part of how bright or dark your pictures appear.
There are only two camera settings that affect how much light you capture (apart from your flash): shutter speed and aperture. The third setting, your ISO, doesn’t technically change how much light you capture, but it still affects the brightness of your photos. It is equally important to understand. Also, you can brighten or darken a photo by editing it in software on your computer, or by changing the amount of light in the scene in front of you.
It sounds basic, but exposure is a topic which confuses even advanced photographers. The reason is simple: For every scene, a wide range of shutter speed, aperture, and ISO settings will result in a photo of the proper brightness. You haven’t “mastered exposure” once you can take a photo that’s the right brightness. Even your camera’s Auto mode will do that most of the time. Instead, getting the proper exposure for a photo is about balancing those three settings so the rest of the photo looks good, from depth of field to sharpness.
Finally, if you really want to master exposure, reading about it isn’t enough. You also need to go out into the field and practice what you’ve learned. There’s no quick-and-dirty way to pick up a skill like this. But if you can lay a solid groundwork, you’ll be at a huge advantage when you go out and practice it for yourself. The goal of this comprehensive article is to teach you all the basics that you need to know about exposure.
Shutter speed
We’ll start with shutter speed, which is highly important yet relatively easy to understand. Shutter speed is just the amount of time your camera spends taking a picture. This could be 1/100th of a second, 1/10th of a second, three seconds, five minutes, or anything else. Some people build custom cameras that take decades to capture a single photo.
Your camera won’t let you take a decades-long photo. Instead, the longest allowable shutter speed tends to be around 30 seconds, although it does depend upon your camera. For example, on the Nikon D850, you can shoot any shutter speed from 1/8000 second to 30 seconds, and there’s also a timer mode for even longer exposures. Other cameras generally allow similar settings.
So, why does shutter speed really matter? There are two main reasons:
First, as you would expect, a long shutter speed (several seconds) lets in a large amount of light. If you take a normal daytime photo with a 30-second shutter speed, you will capture an image that is completely white. The opposite is true, too; a quick shutter speed only lets in a small amount of light. If you take a photo at night with a 1/8000-second shutter speed, the photo will be completely black.
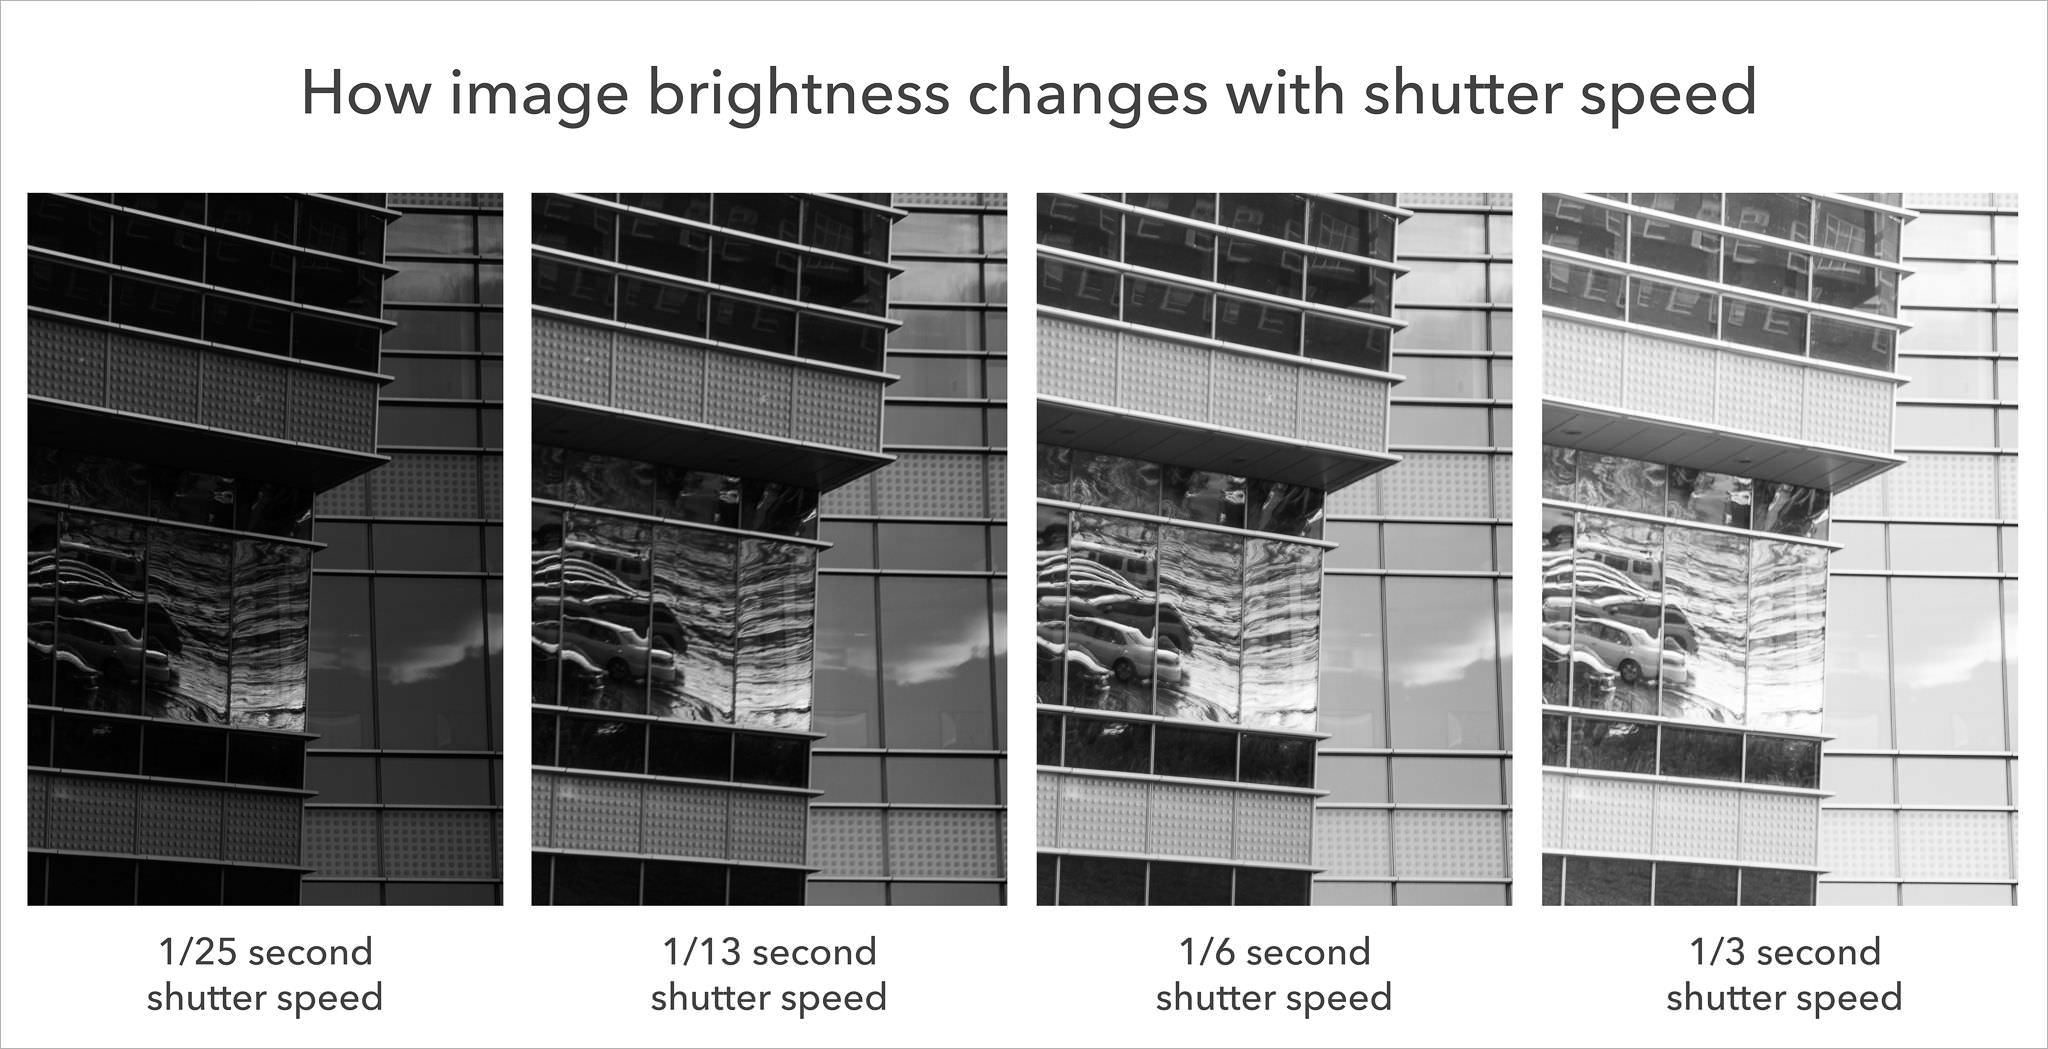
Take a look at the series of examples below. Here, 1/25 second was too dark (“underexposed”), and 1/3 second was too bright (“overexposed”). This should give you an idea of the brightness differences with shutter speed:
Second, the other big effect of shutter speed is the motion blur in your images. Not surprisingly, a long shutter speed (such as five seconds) captures anything that moves during the exposure. If a person walks by, they might appear as a featureless streak across the image, since they aren’t in one place long enough for the long exposure to capture them sharply. That’s called motion blur.
By comparison, a quick shutter speed (such as 1/1000 second) does a much better job freezing motion in your photo — even something moving quickly. You can photograph a waterfall at 1/1000 second and see individual droplets frozen in midair. Without a camera, they might have been invisible.
Take a look at the images below. Here, I was taking pictures on a windy day. The foreground grass and the waves behind them were all moving quickly. As you can see, depending upon my shutter speed, there was a major difference in motion blur:
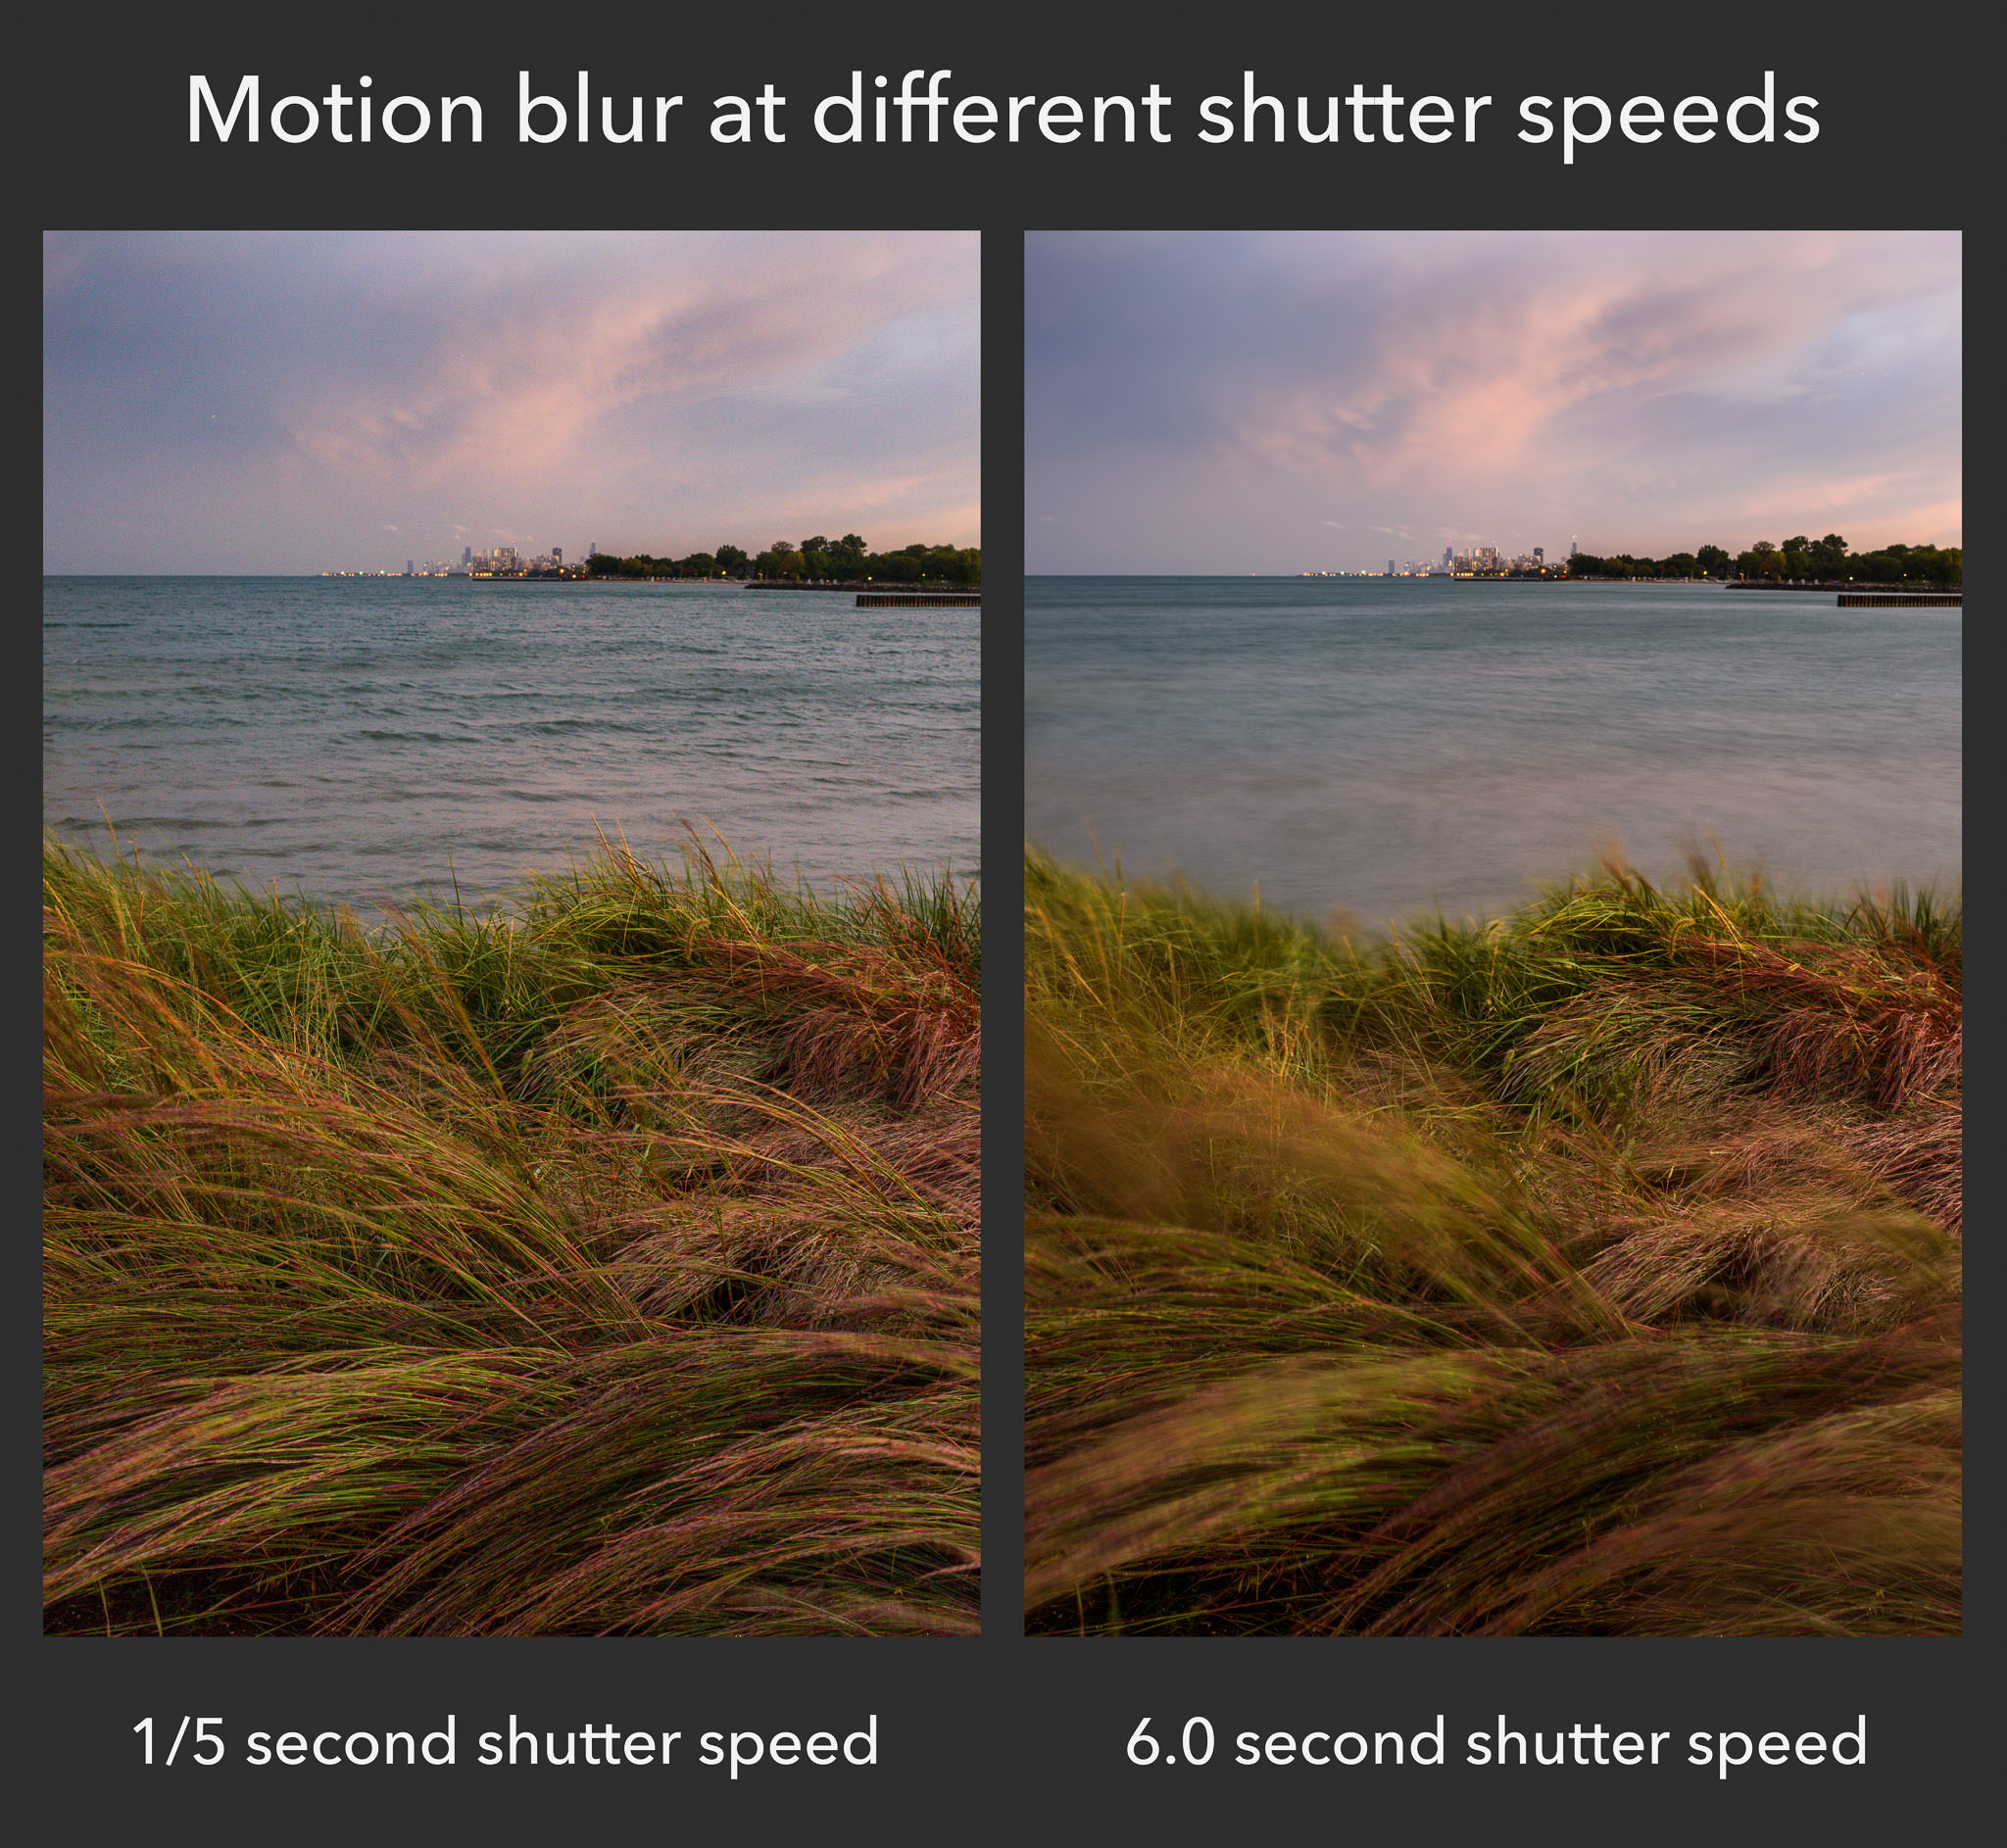 I equalized the brightness of these photos using other camera settings (aperture and ISO). Otherwise, the six second exposure would be much brighter.
There are two types of motion blur that you may encounter due to your shutter speed: camera blur and subject blur.
If you’re doing handheld photography, camera blur could be very significant. It’s impossible to hold your camera perfectly still while you’re taking a picture, and even slight shake can lead to very blurry photos. That’s one reason why many photographers end up using tripods! (There are other benefits of tripods, too.)
However, although a tripod protects against camera movement, it does nothing to prevent scene movement. For example, if you’re taking landscape photos on a windy day – even with a tripod – you might end up with areas of blurriness, as in the image above. This is called subject blur.
Sometimes, you can use camera or subject blur artistically, and it looks good. For example, if you’re photographing clouds as they pass through a valley, a long shutter speed might be a nice touch:
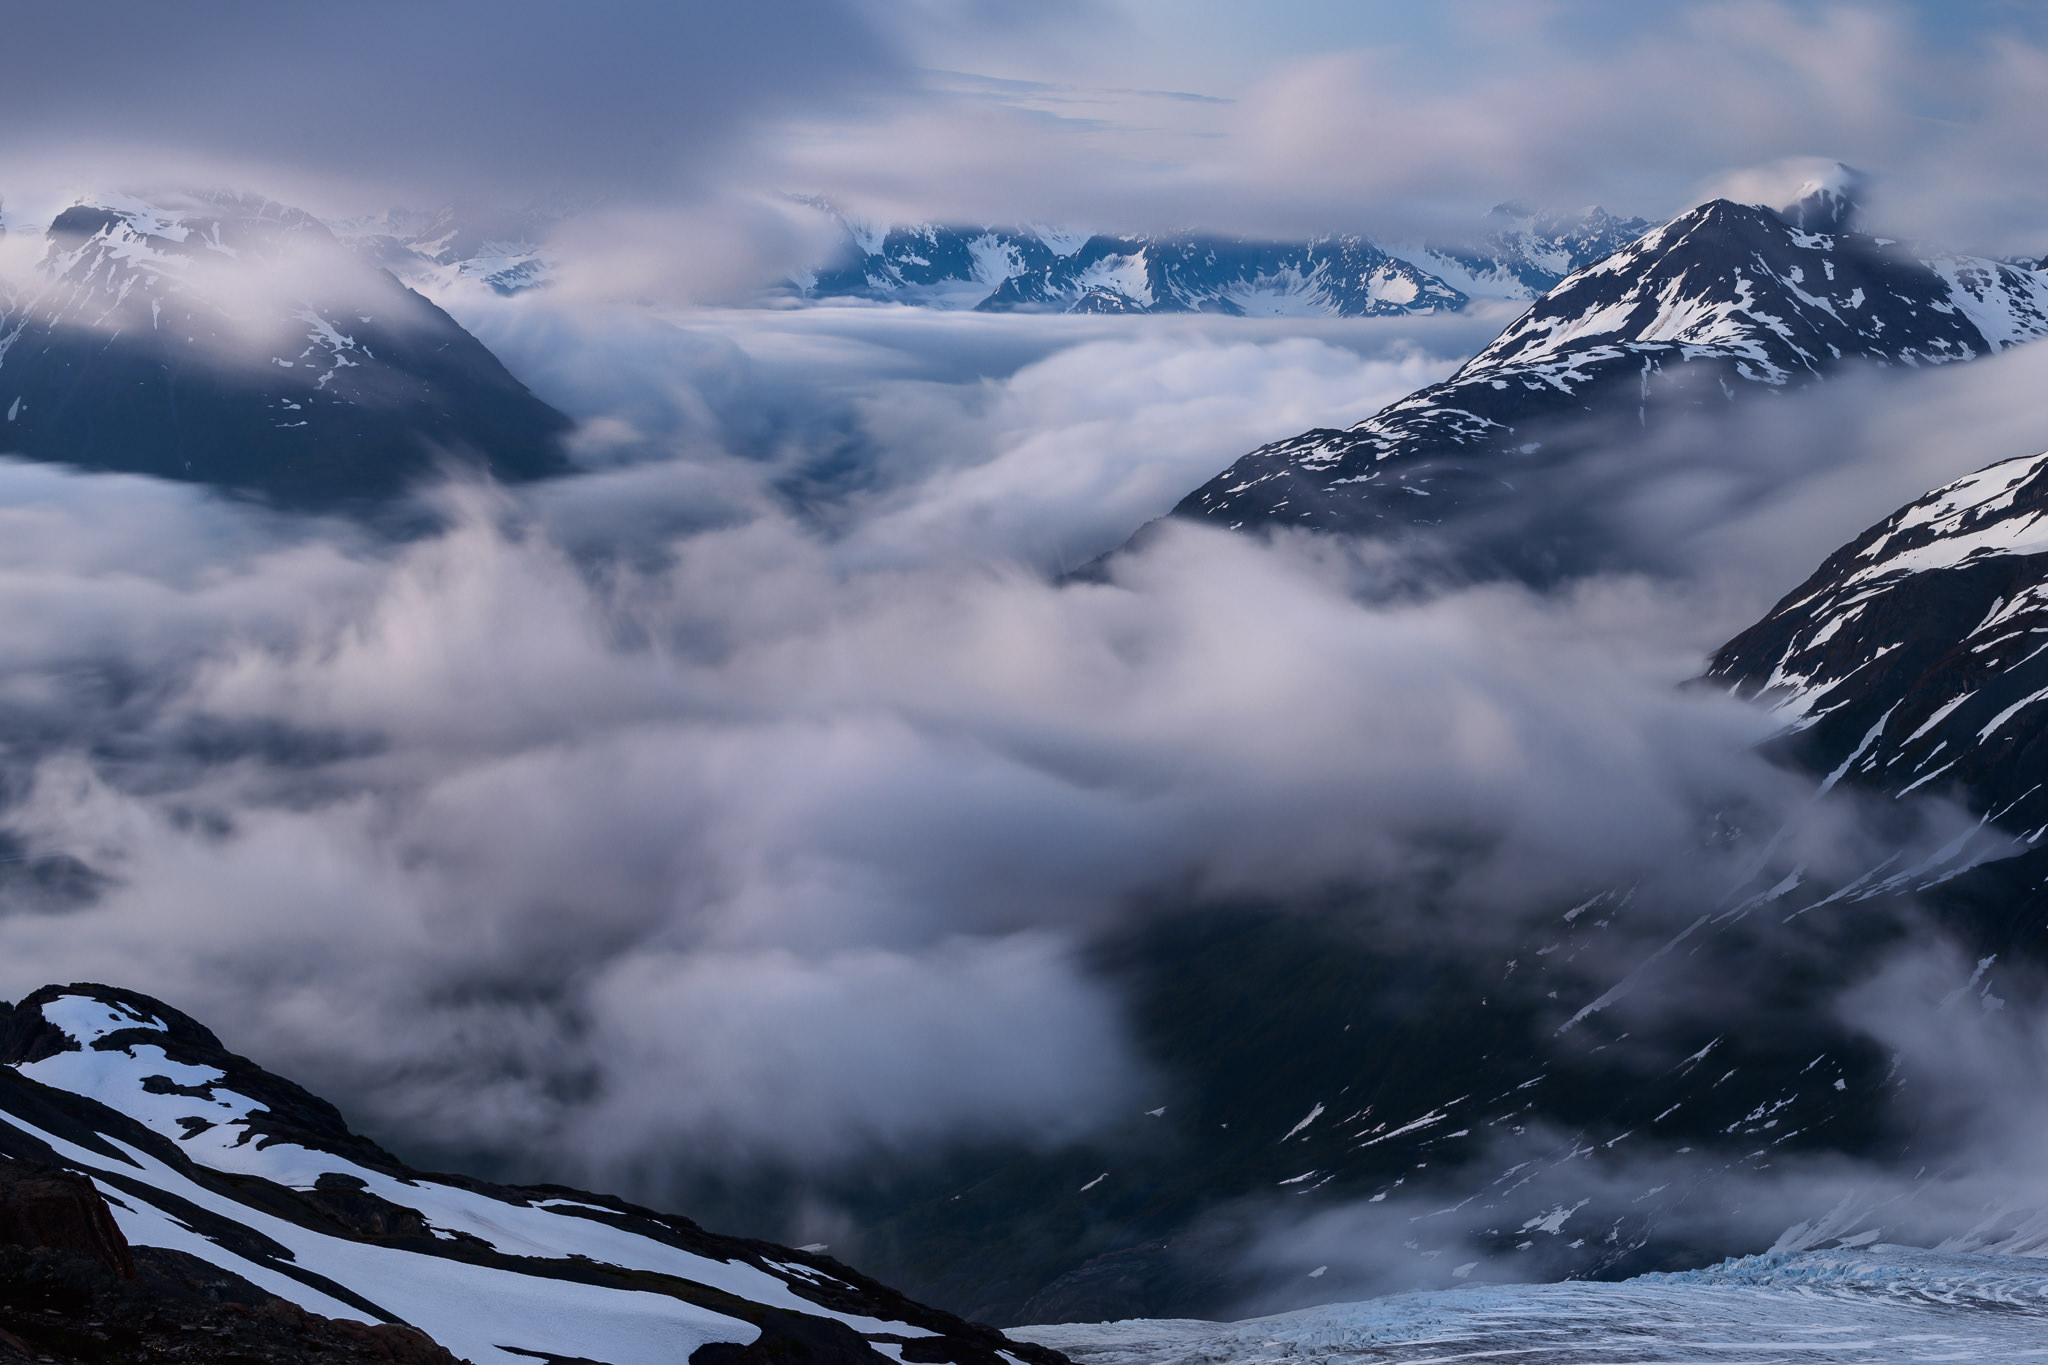 The clouds were moving fairly quickly during this exposure. A 20-second shutter speed emphasizes the motion.
However, in many cases, you probably will want to eliminate motion blur so that your entire photo is sharp. If that’s your goal, you need to pick a shutter speed that is quick enough to freeze any movement. So, what shutter speed should you use? Is there a good range that tends to provide sharp photos of moving subject?
Not really, because it all depends upon some outside factors – most importantly, the amount of movement in your scene. If your subject is moving very quickly, you’ll need a fast shutter speed. If your subject is standing still, or only moving very slowly, you can get away with a longer shutter speed.
Also, the farther you zoom in (i.e., the longer your “focal length”), the more you’ll magnify motion blur. So, you’ll find that you generally need quicker shutter speeds to freeze motion properly when you’re using something like a telephoto lens.
The best route to learn all of this is just to keep practicing. Over time, you’ll build a good mental picture of the shutter speeds you can use in a particular environment without risking motion blur. Whether that’s 1/250 second, 1/10 second, or 20 seconds, it’ll be second nature. Also, after you’ve taken a picture in the field, review it and see if there is any blur when you zoom in. If so, you’ll need a quicker shutter speed.
Want a quick-and-dirty guideline? Use 1/500 second or faster for sports and wildlife action. Use 1/100 second or faster for telephoto portrait images. Use 1/50 second or faster for wider-angle portrait or travel photos where your subject isn’t moving too much. If your subject is completely still, and you have a tripod, use any shutter speed you want.
These are very general suggestions, but they are a good place to start. However, your goal should be to outgrow these tips and develop your own mental model instead. Shutter speed is one of the most intuitive aspects of exposure, and a bit of practice will be enough to help your photographs improve significantly.
Aperture
Aperture is very similar to the “pupil” of your camera lens. Just like the pupil in your eye, it can open or shrink to change the amount of light that passes through. This is how the aperture blades look on a typical lens:
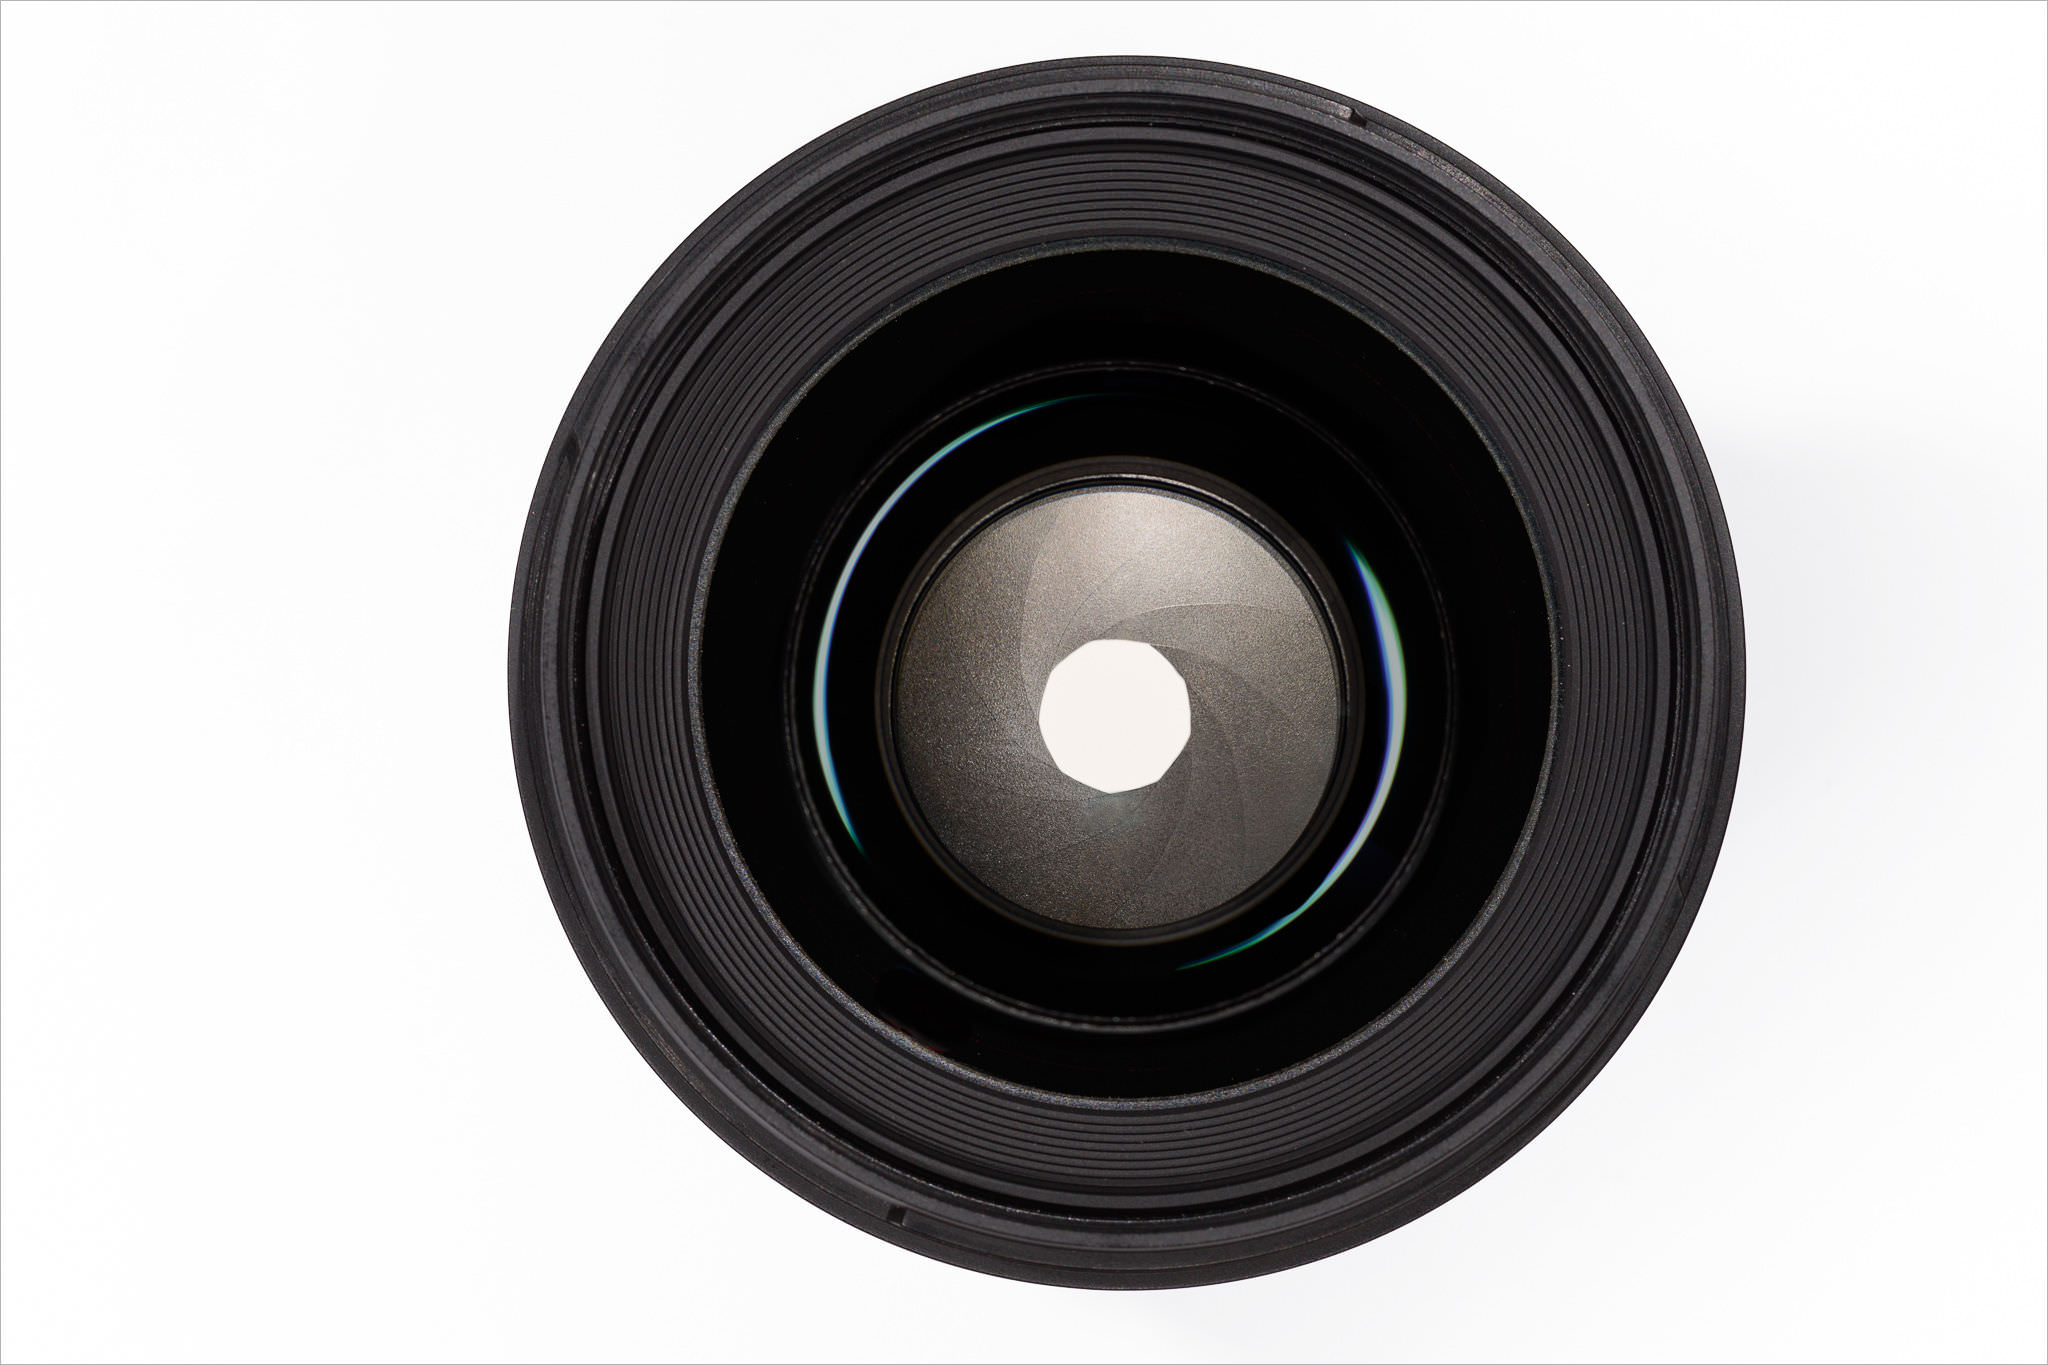 Aperture blades inside a lens.
Your lens probably looks something like this. The shape in the middle is called the aperture. It is made up of several blades – nine of them in this case, but your lens may differ.
Aperture blades work a lot like the pupil in your eyes. At night, your pupils dilate so you can see things more easily. The same is true for aperture. When it is dark, you can open the aperture blades in your lens and let in more light. Aperture is written as f/Number. For example, you can have an aperture of f/2, or f/8, or f/16, and so on.
It is very important to remember that aperture is a fraction. This is the biggest mistake beginners make when they talk about aperture. If you get this wrong, it will be difficult to remember how aperture works or use it yourself to capture the right exposure in the field.
Understanding aperture:
Which aperture is larger – f/2 or f/16?
Because aperture is a fraction, all you need to do is remember some elementary math. 1/2 is bigger than 1/16, which means that f/2 is the larger aperture.
Typically, the largest aperture you can set will be something like f/1.4, f/1.8, f/2, f/2.8, f/3.5, f/4, or f/5.6. It changes from lens to lens. The smallest aperture on most lenses is something like f/16, f/22, or f/32. This diagram demonstrates the relative sizes of various aperture settings:
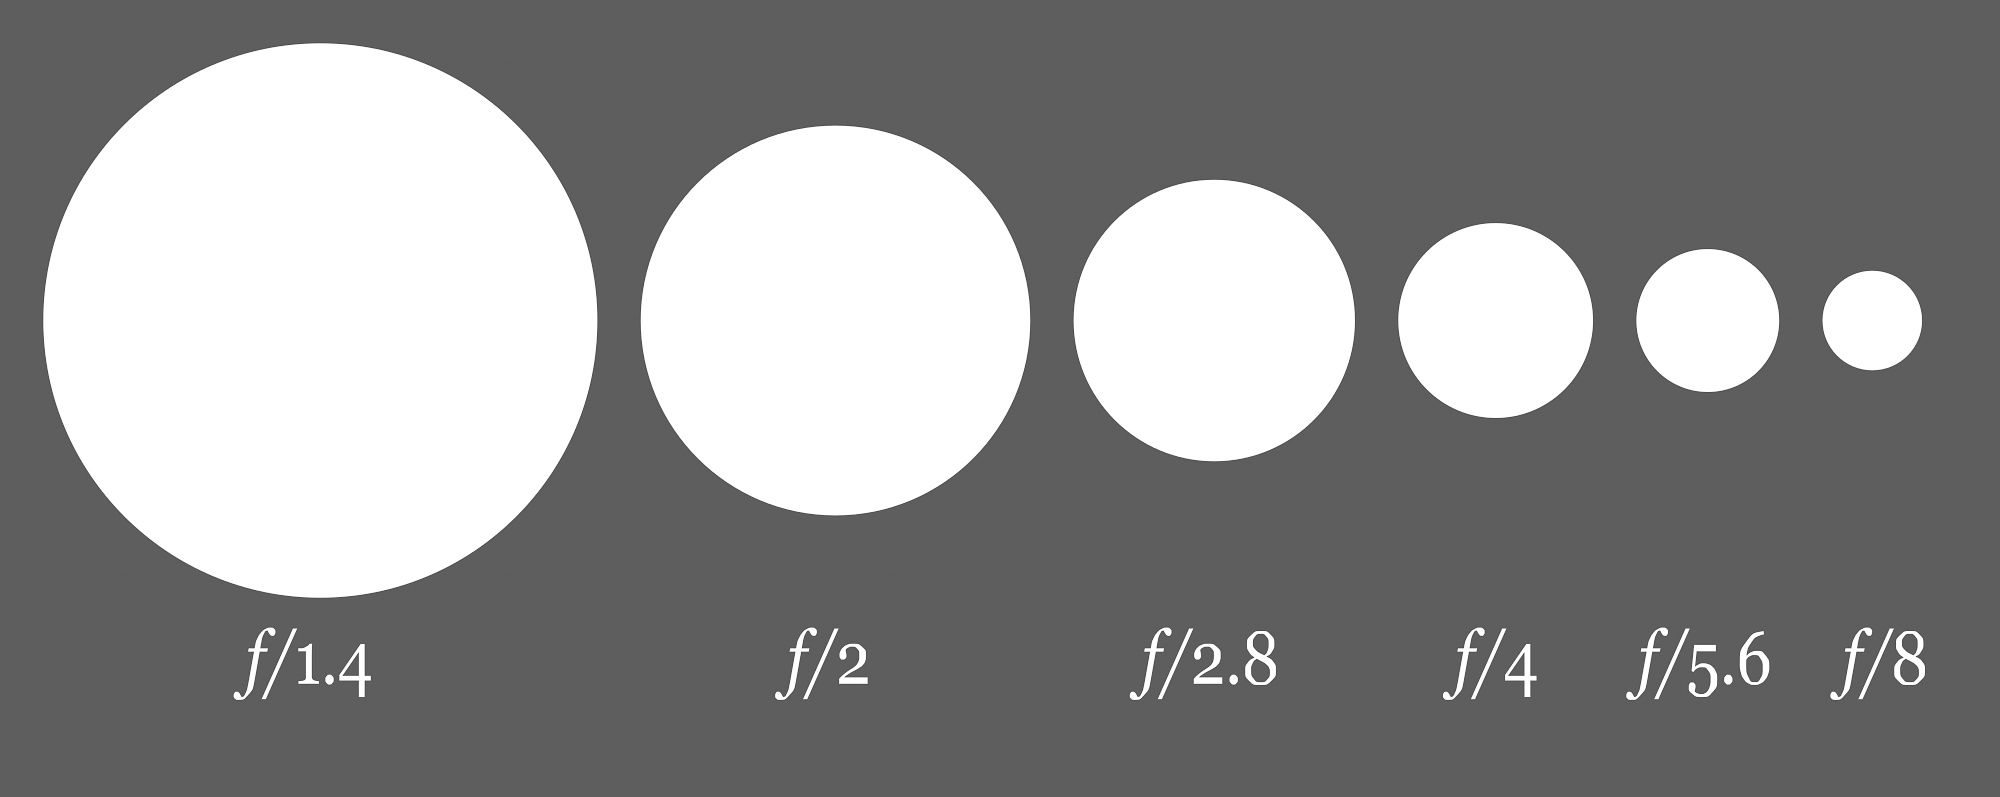 (Image courtesy Wikipedia, public domain.)
So, which aperture setting is best for photography and capturing the proper in-camera exposure? It depends upon the photo. Aperture influences many parts of an image, but it has two effects that are more important than anything else: exposure and depth of field.
Aperture and Exposure
The larger your aperture, the brighter your photo – the more light you capture. Again, your pupils work just like this, too; they open or close to let in different amounts of light. So, when you are trying to expose a photo properly, it is crucial to pay attention to your aperture setting.
A large aperture lets in more light. Apertures like f/1.4 and f/2 practically let you see in the dark. On the flip side, a small aperture like f/16 (with nearly closed aperture blades) lets in far less light. If you try to photograph Milky Way at f/16, your final image will be essentially black.
By changing your aperture and shutter speed settings, you can capture exactly the amount of light you want – resulting in a photo with the proper exposure. That is what makes aperture so powerful.
 For this photo, I used an aperture of f/1.8 — the largest aperture on my lens. With a smaller aperture, you wouldn’t see so much detail in the Milky Way. The photo would be much darker.
Aperture and Depth of Field
The other important effect of aperture is on depth of field.
Depth of field is the amount of your scene, from front to back, that appears sharp. In a landscape photo, your depth of field might be huge, stretching from the foreground to the horizon. In a portrait photo, your depth of field might be so thin that only your subject’s eyes are sharp.
Aperture changes your depth of field, which makes a big difference if you want to capture the best possible photographs. Changing the depth of field in an image will alter the way it looks completely.
To be specific, small apertures (like f/11 or f/16) give you a large depth of field. If you want everything from front to back to appear sharp, those are good settings to use. Large apertures (like f/1.4 or f/2.8) capture a much thinner depth of field, with a shallow focus effect. They are ideal if you are trying to isolate just a small part of your subject, making everything else blurred.
Here is a sample comparison:
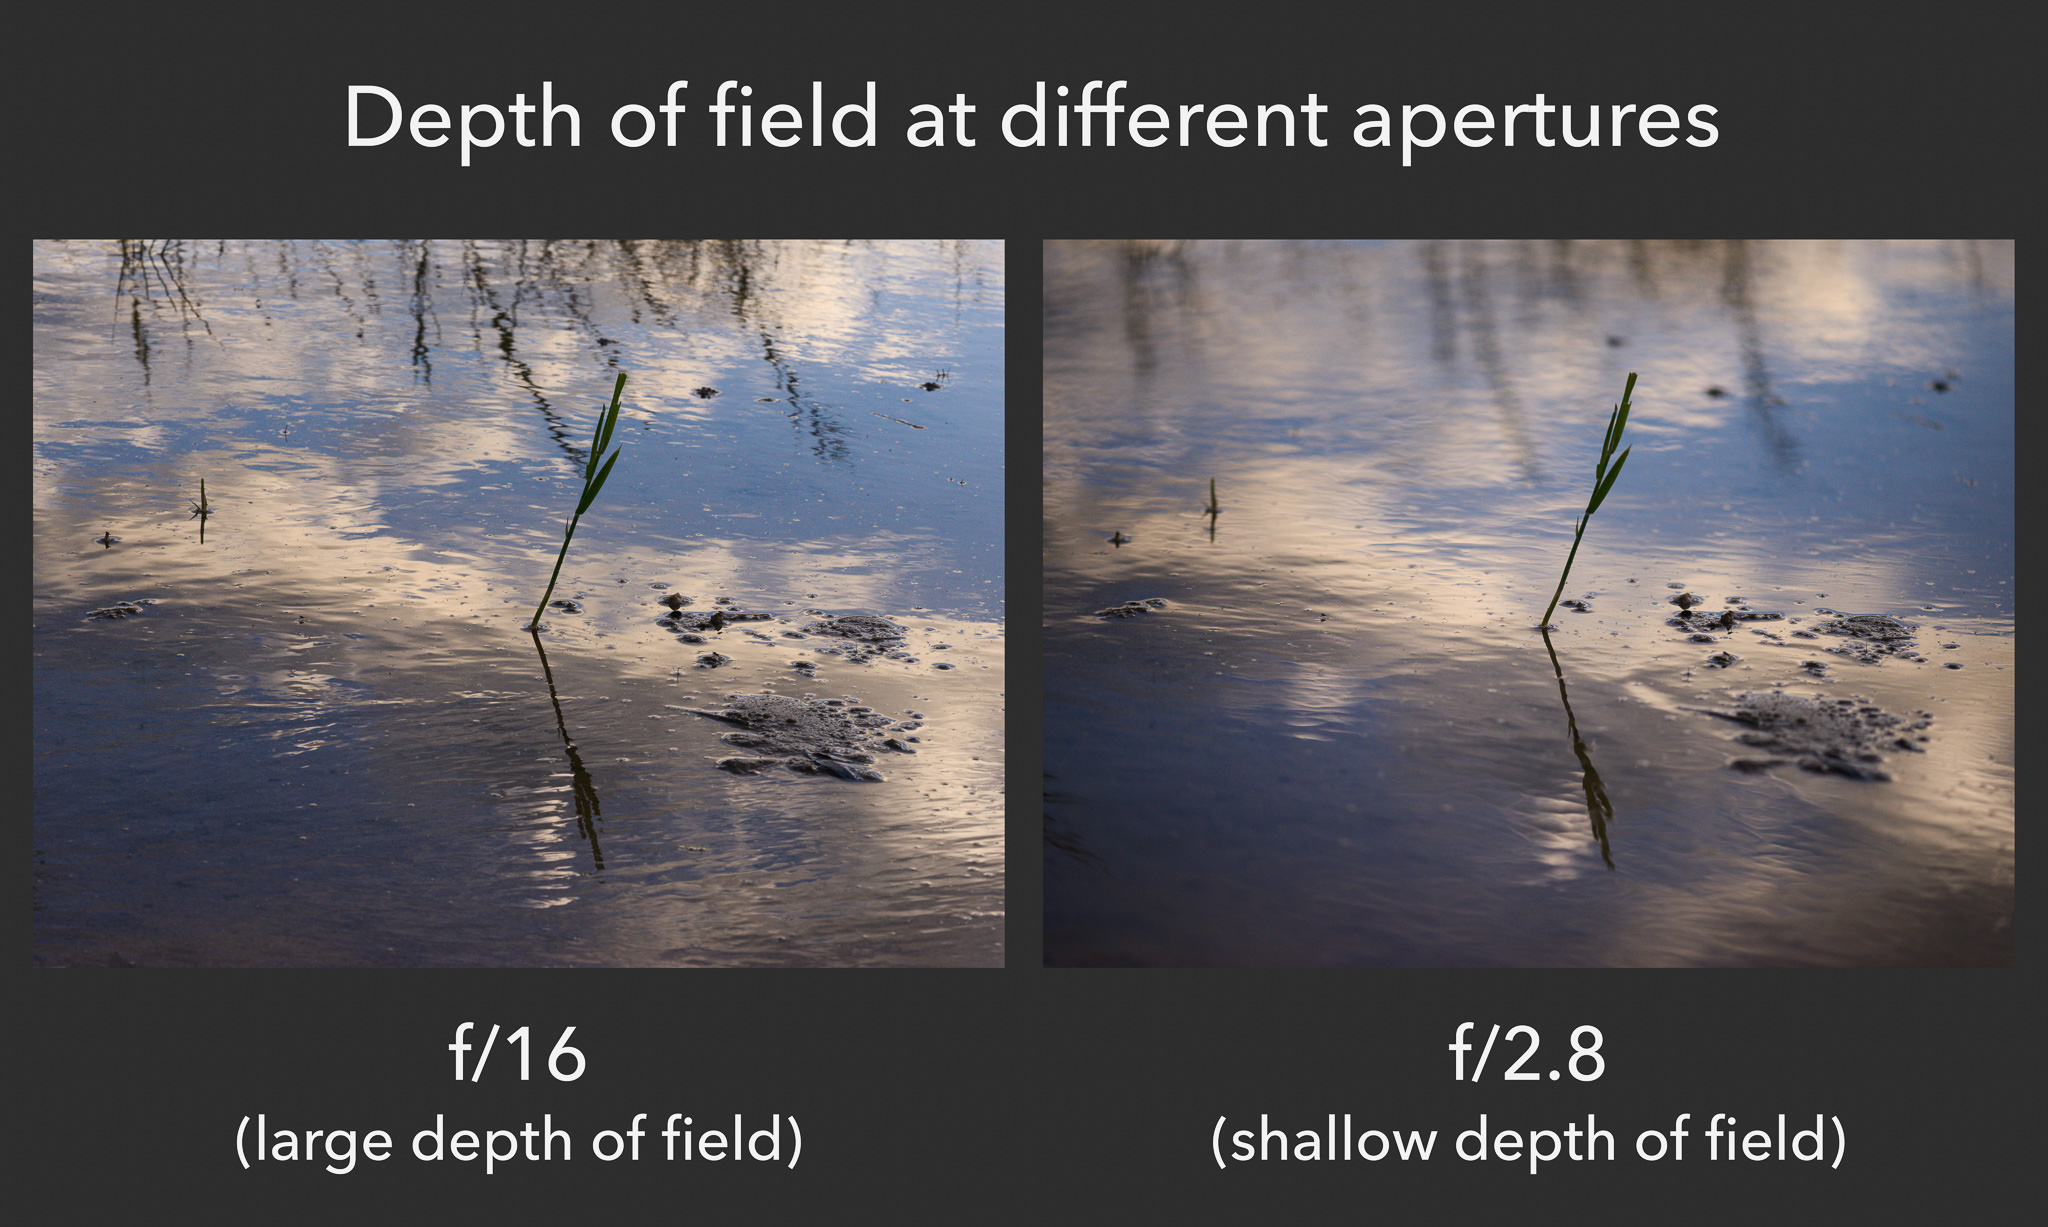 I equalized these two exposures by adjusting my shutter speed. Otherwise, the f/2.8 photo would be way brighter.
As you can see, that is a significant difference. The photograph on the left has a larger depth of field, which means that more of the scene appears sharp from front to back. However, the f/2.8 photo on the right has a pleasant shallow focus effect. In this case, it is arguably the better image. You will save yourself a lot of difficulties if you simply memorize this relationship.
In practice, the effects are quite clear. As your aperture gets smaller and smaller, your exposure will grow darker and darker, and your depth of field will increase. (Remember, too, that you can expose the photo back to normal by using a longer shutter speed.) The more photos you take, the less you will have to think about these effects. They will become second nature.
The Aperture Scale
The shutter speed scale is easy to remember. An exposure of 1/100 second lets in twice as much light as an exposure of 1/200 second, because it is twice as long. Unfortunately, aperture is not as intuitive. This is the scale it follows instead:
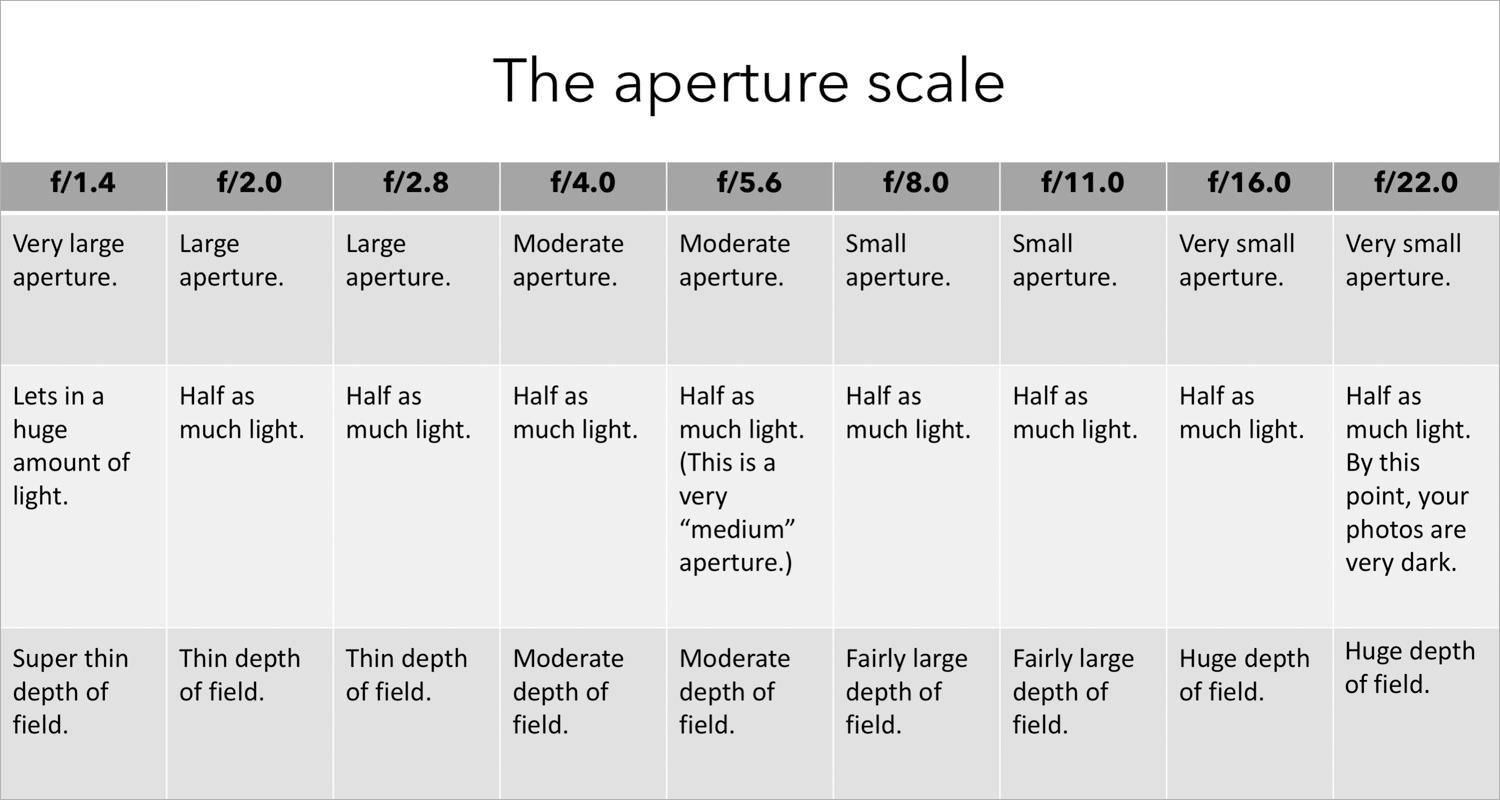
From f/1.4 to f/2.0 (or any other one-stop jump) you will capture half as much light. You also will increase your depth of field. Also, keep in mind that you might be able to set values beyond this chart, like f/32, as well as apertures between these stops, like f/6.3, depending upon your lens.
Typically, the sharpest apertures will be somewhere in the middle of the range. On most lenses, f/4, f/5.6, and f/8 are three of the sharpest apertures. However, this varies from lens to lens. In addition, sharpness should not be your main concern. It is better to have a photo with the proper depth of field, even if it means that some low-level pixels have a bit less detail.
If you want to learn more about this topic, take a look at Photography Life’s detailed articles about aperture and f-stop. Along with that, we have another article that explains every single effect of aperture, although it is a bit advanced, and it assumes you have a decent foundation already.
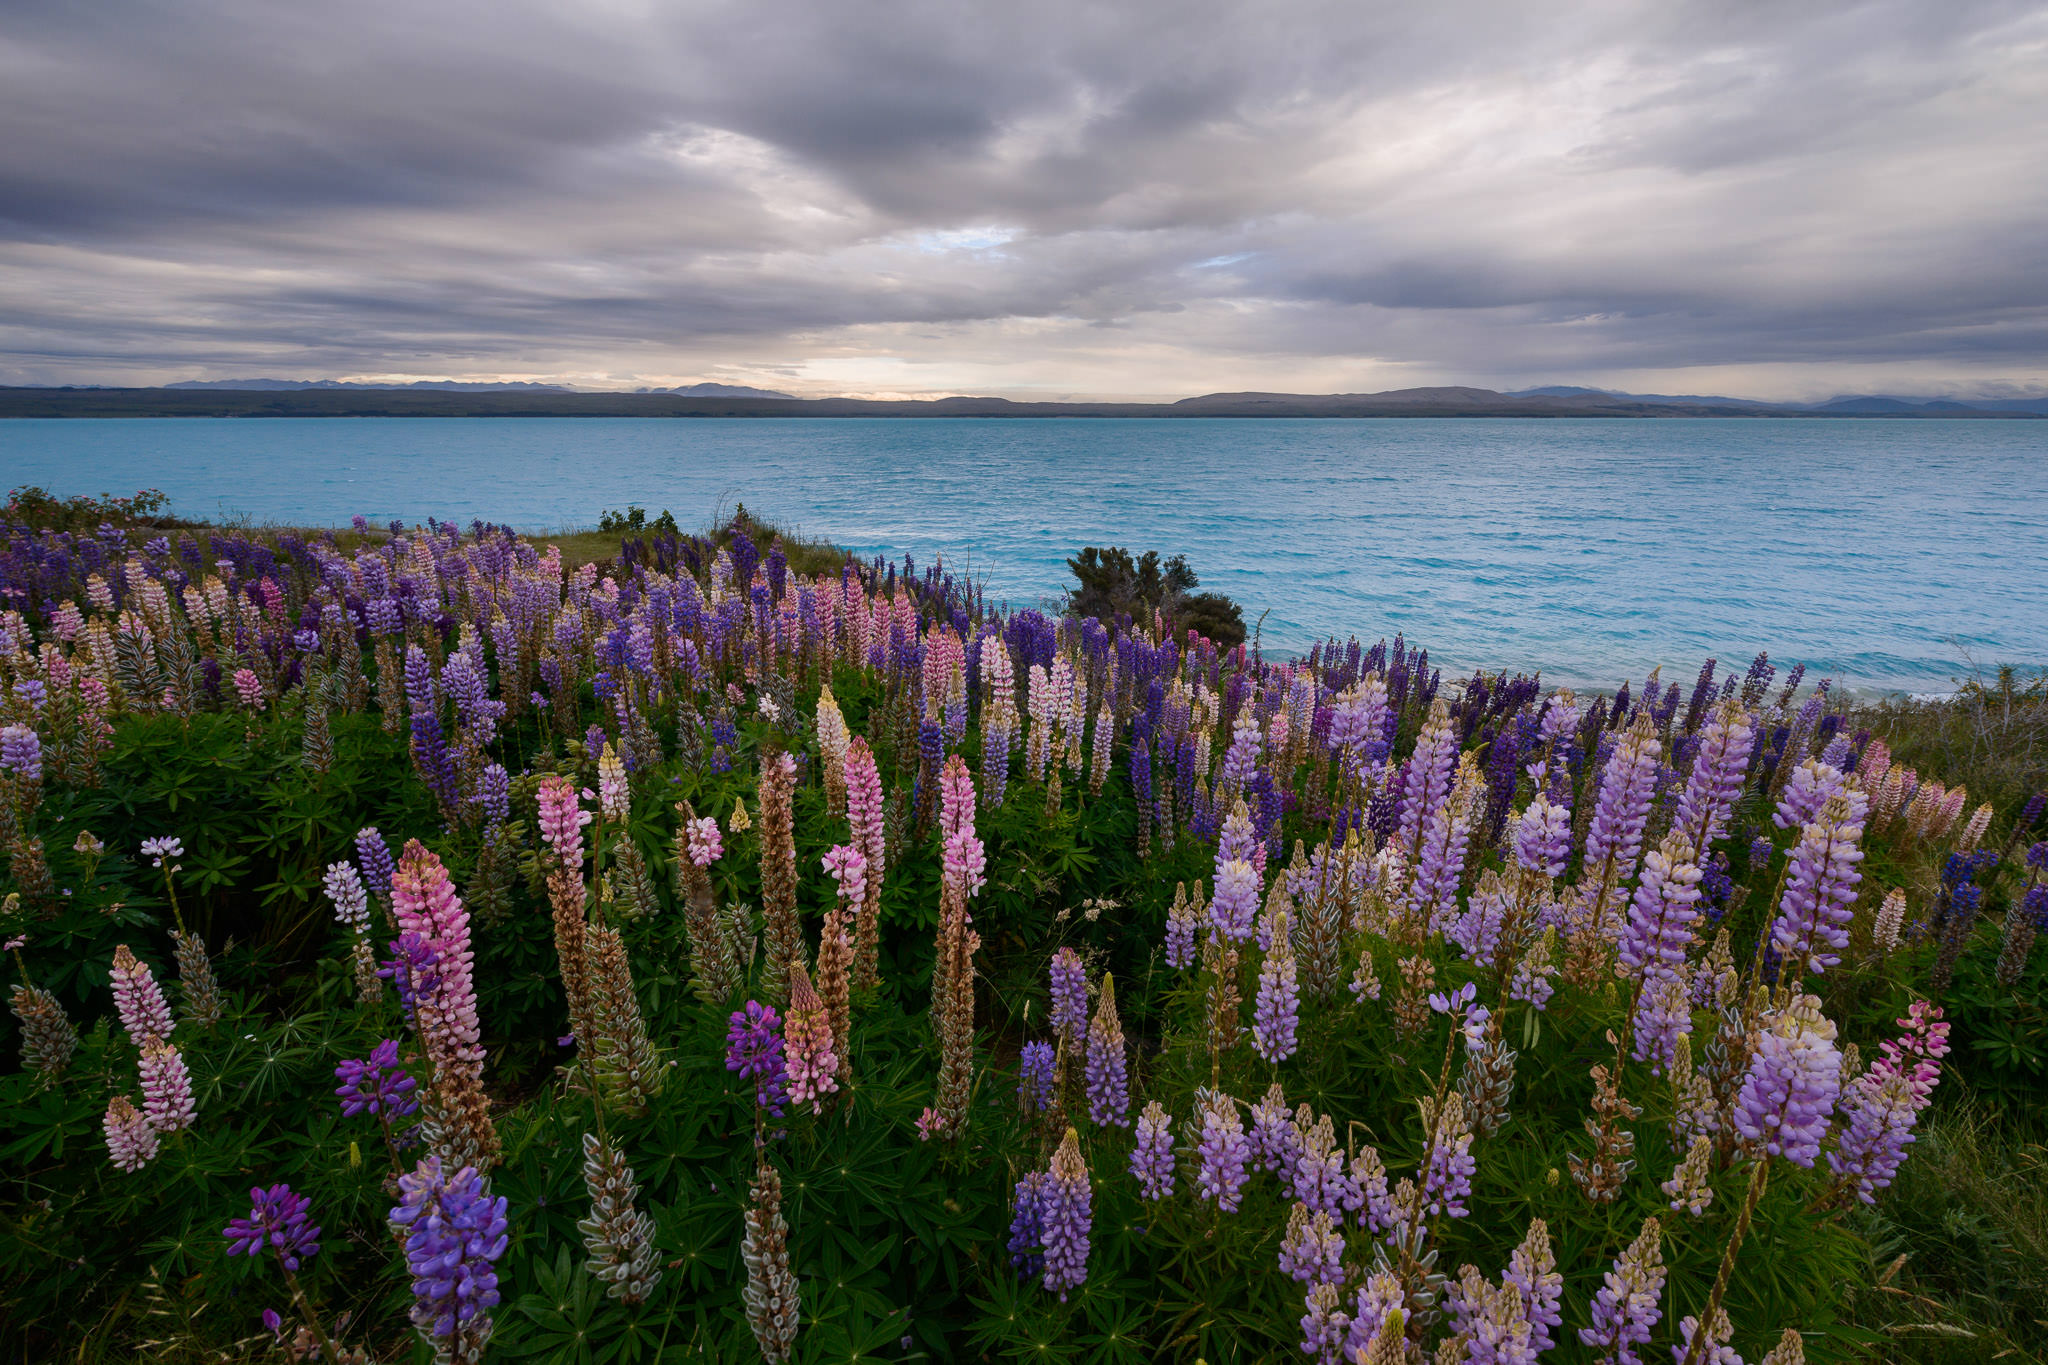 These flowers were very close to my lens. To capture a large enough depth of field, I used a small aperture of f/16.
ISO – Not Part of Exposure
ISO is an interesting one. It brightens your photos, but it is not part of your “luminous exposure,” since it does not affect the amount of light that reaches your camera sensor (the definition of exposure). Instead, it merely brightens a photo in-camera after your sensor has already been exposed to the light.
It is useful to raise your ISO when you have no other way to brighten your photo – for example, when using a longer shutter speed will add too much motion blur, and you are already at your widest aperture. It is a very valuable setting to have, but it is not all good news. When you raise your ISO, your photos will be brighter, but you’ll also emphasize grain (otherwise known as noise) and discolored pixels in the images along the way.
Take a look at the comparison below:
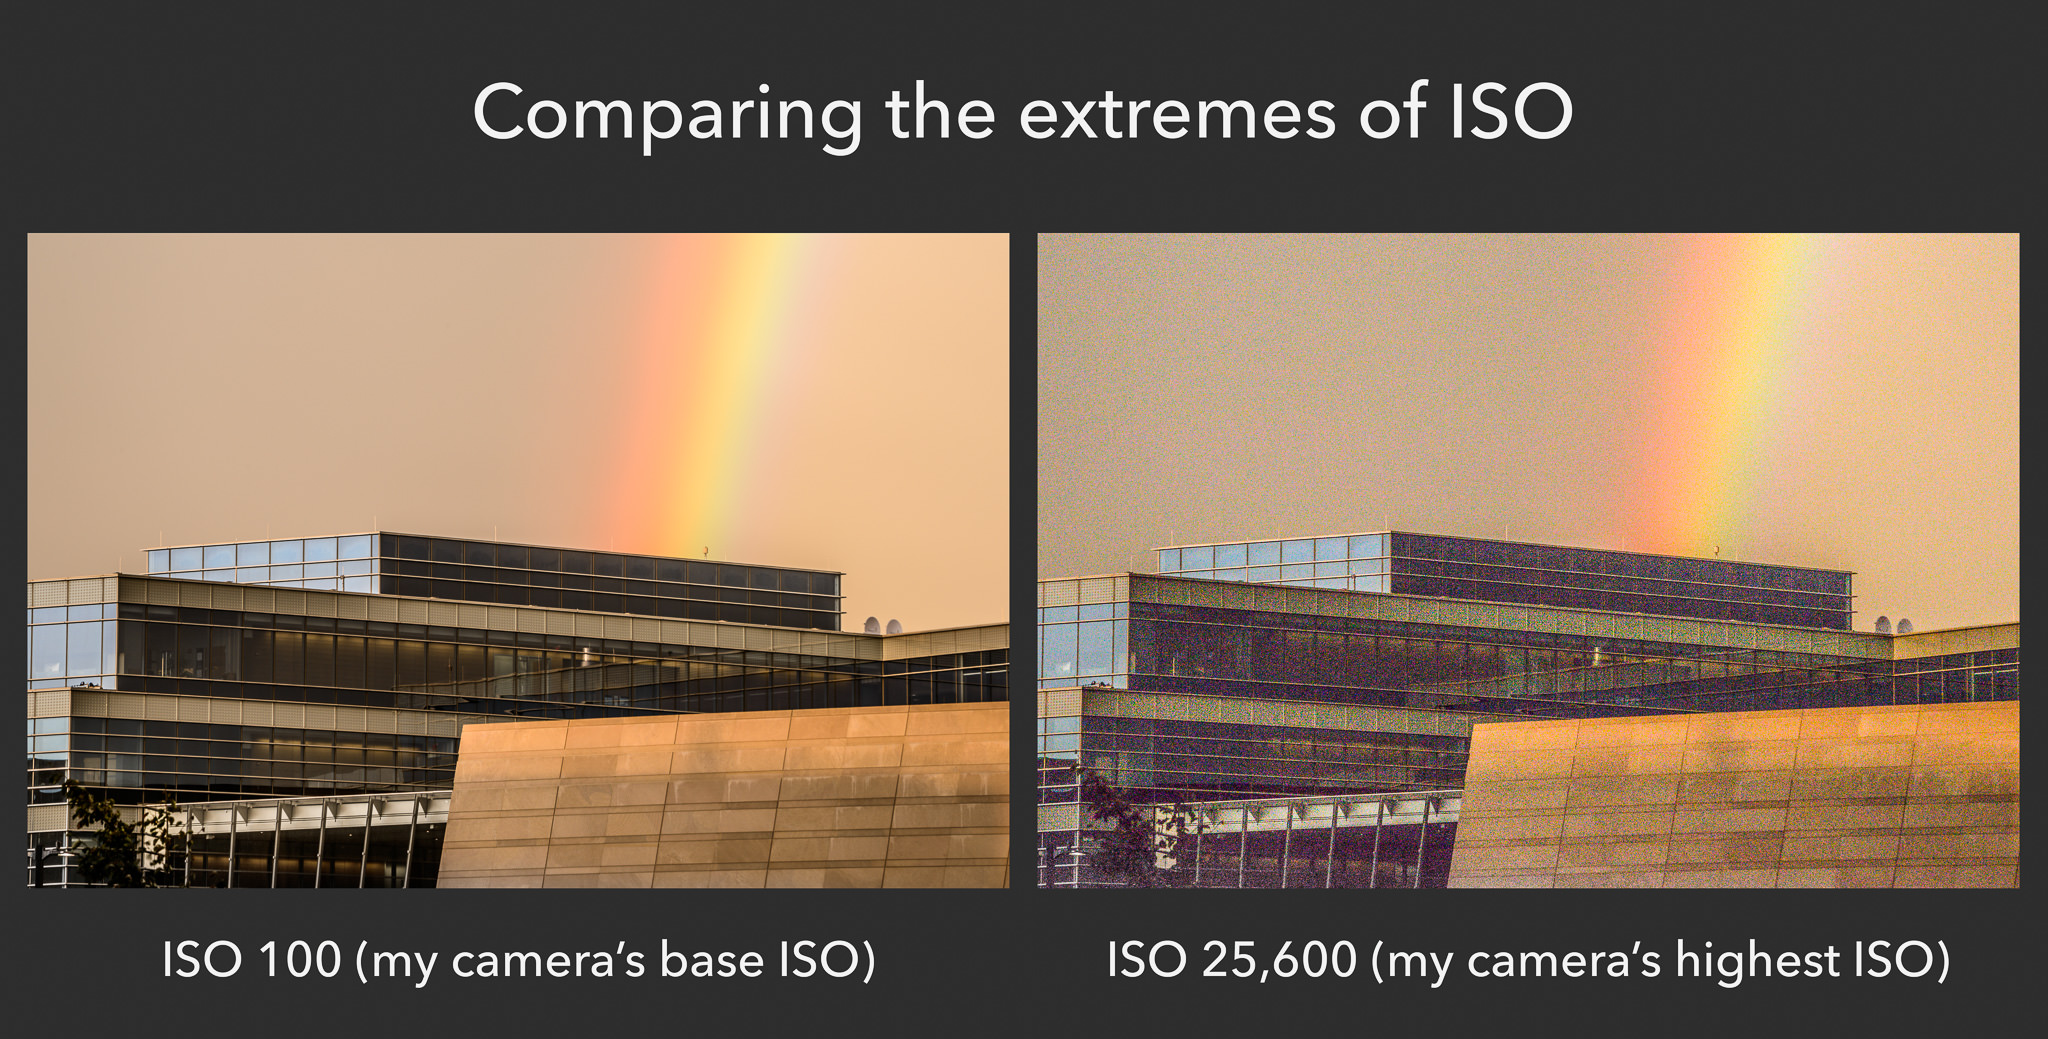 I equalized the brightness with my shutter speed. Otherwise, the ISO 25,600 photo would have been much brighter.
Here, the photo on the right looks way noisier, and it has some strange color shifts in the shadows. That is because it was taken at ISO 25,600, which is an extremely high ISO (more than what most photographers will ever set for normal conditions).
Still, a higher ISO will be necessary when your exposure is too dim and you have no other way to capture a bright enough photograph. In cases like that, raising your ISO is a very valuable technique to understand.
The ISO scale is easy to remember. At higher numbers, your photos will be brighter, but you also will see more and more noise. The main stops on the ISO scale are 100, 200, 400, 800, 1600, 3200, and 6400. Some cameras go beyond this range, in either direction, such as the ISO 25,600 image above. Also, you can set intermediate ISO values at 1/3 or 1/2 stops, such as ISO 640 or ISO 1250.
The lowest ISO on your camera is called the “base ISO.” Typically, the base ISO will be 100, but some cameras have ISO 64, ISO 200, or something else instead. This is the lowest native ISO on your camera. If you set your base ISO and expose your photo properly, you will end up with the best possible image quality and the lowest amount of visible noise.
Note:
Certain cameras have extreme “LO” values for ISO, like ISO 32 or ISO 50. Avoid using those settings, since they are simulated and can lower your image quality. The same is true for simulated “HI” ISO settings. They offer no benefit over just brightening the photo in post-processing, and they even can harm your photograph’s dynamic range (shadow and highlight detail).
Take a look at the series of images below. Here, the photo on the left is at base ISO 100, and it is far too dark. By increasing the ISO, you will see the results continue to improve. Although there is some noise at ISO 1600 if you zoom into the pixels, a noisy photo is better than a picture that is too dark to use.
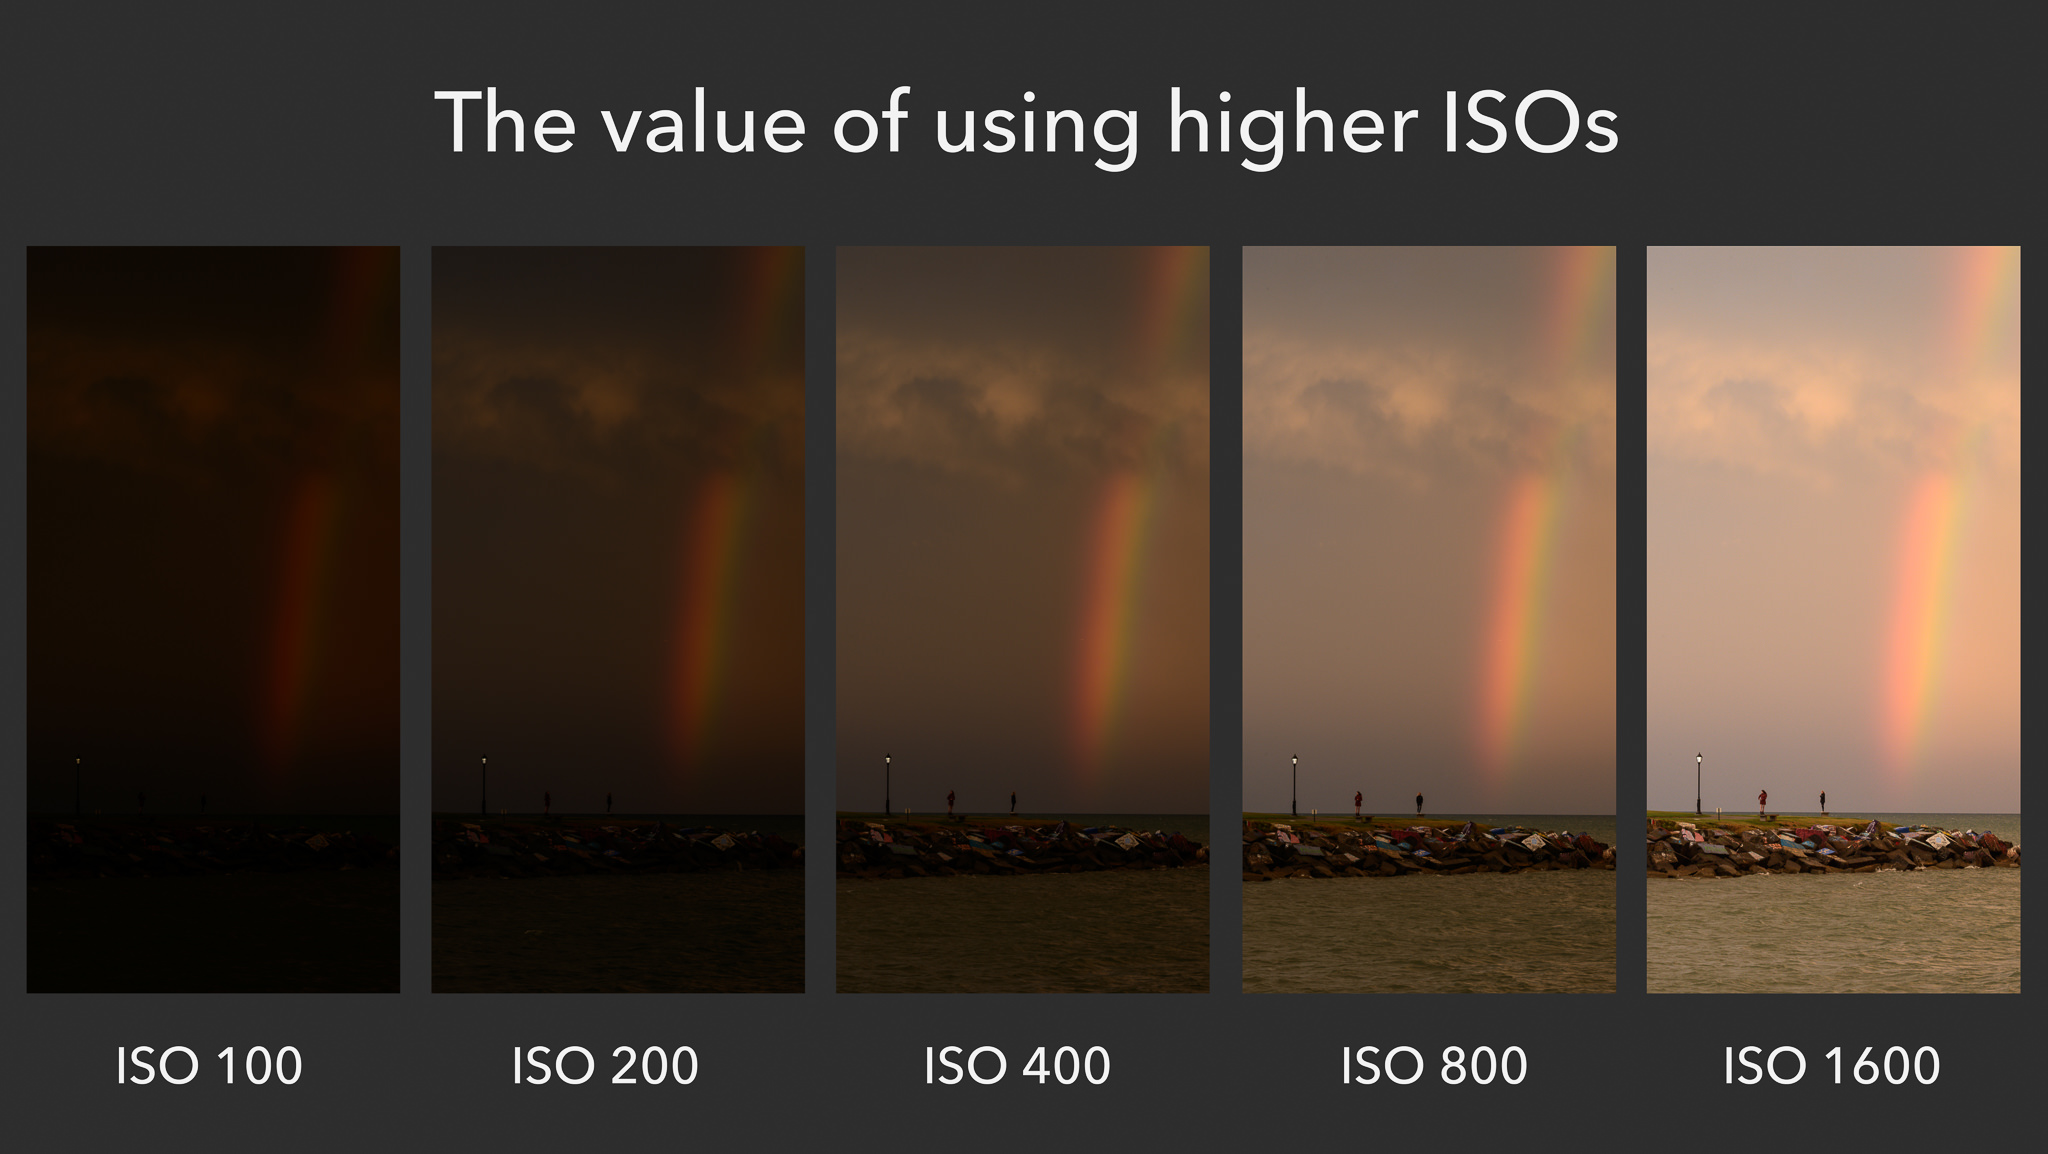 This series demonstrates why you might want to raise your ISO. Although it does make noise more visible, using a high ISO is sometimes the only way to capture a bright photo.
You might be wondering how much noise exists in the ISO 1600 photo above, and the answer is that the overall amount is quite acceptable. Here is a crop from the ISO 1600 photo above:
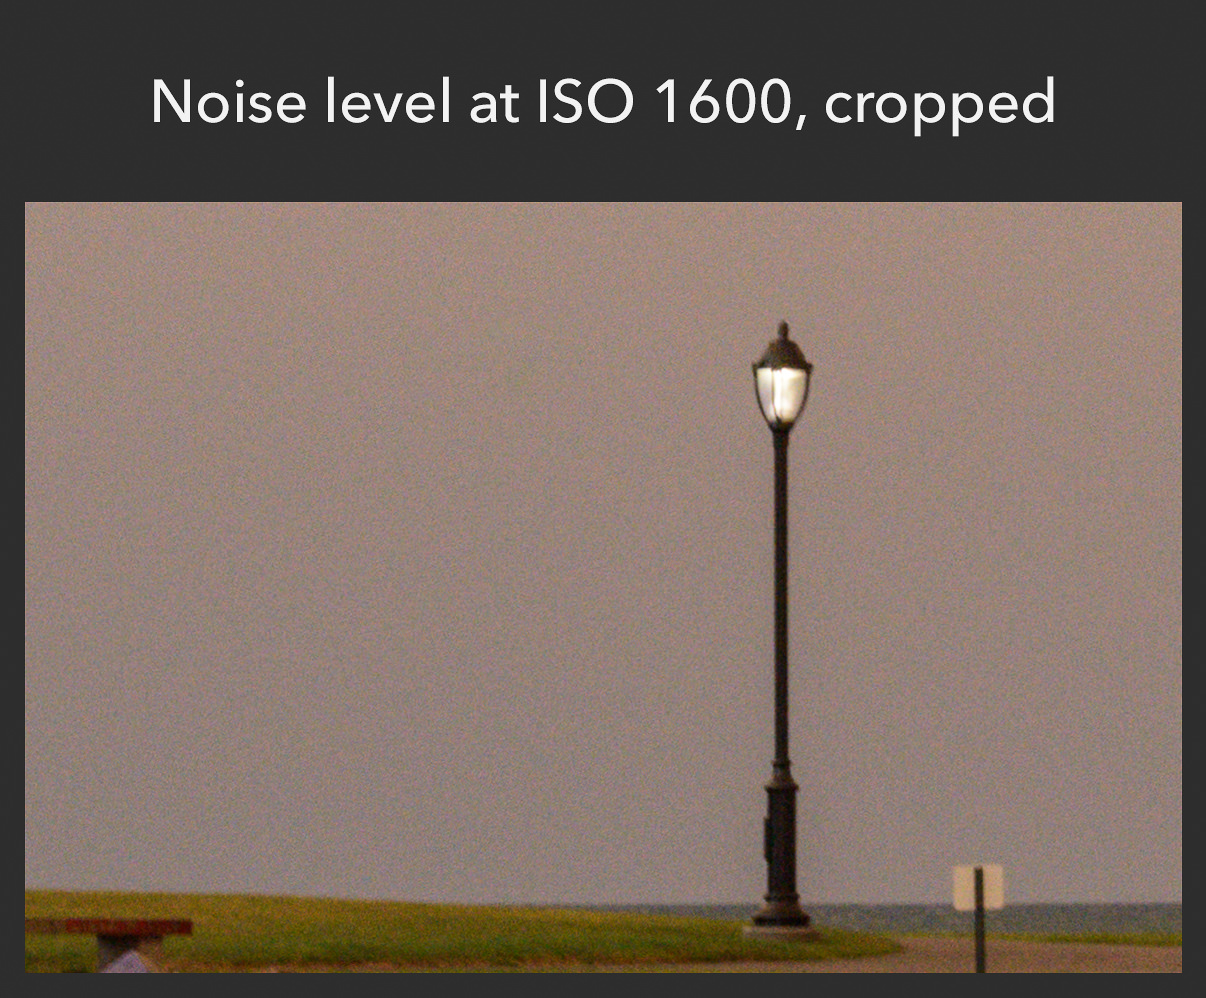
That is quite manageable. At least on this camera – and they do differ – using ISO 1600 should be perfectly fine, especially because it is possible to reduce noise to a degree in post-production. However, it still is best to use your base ISO whenever possible, capturing your photo with a brighter exposure (shutter speed and aperture) instead.
Unfortunately, you have to let in a lot of light in order to capture a well-exposed photo at ISO 100. That is fine in bright conditions, or if you are photographing a nonmoving scene from a tripod (since tripods let you use longer shutter speeds). But it will not always work. That’s why ISO adjustments are so powerful, and why they have such an important effect on your exposure even if they technically are not part of it.
So, don’t be hesitant to use higher ISO values if the scene requires it. With sports or wildlife, for example, you will take pictures at higher ISOs very often. Although that isn’t ideal, it is better than missing the photo because you’re shooting everything at ISO 100.
 This photo, taken at ISO 450, has plenty of details. It would have been too dark at base ISO 100, and this result is absolutely preferable.
ISO is highly technical at the sensor level, but that isn’t important to know when you’re starting out. Instead, just use it like you would expect. Keep your ISO at the base value whenever possible. But, if your exposure (shutter speed and aperture) will not result in a bright enough photo, it is time to raise the ISO. If you follow those suggestions, your photos and image quality will be as good as possible.
A Recommendation for Most Exposures
There are no universal tips for always setting the perfect exposure. Still, many beginners have no clue where to start. If that is true in your case, you will want more than just general advice about shutter speed, aperture, and ISO; you want specific starting points that help you put all this knowledge into practice more easily.
For that reason, you will find our recommended settings below for different genres of photography. Although these are very general suggestions, they should give you a good idea of where to begin if you simply want a few basic tips for capturing a good exposure:
Typical Landscape Photography (Not at Night)
- Use a tripod. You can read more here on how to use tripods and which one to get.
- Switch to aperture-priority mode, where the camera automatically sets the shutter speed, and you manually select the aperture.
- Shoot at f/8 in general, but use f/11 or f/16 instead if you need more depth of field (such as with a nearby foreground, or if you’re using a telephoto lens). This is on a full-frame camera. Use your camera’s equivalent aperture by dividing these numbers by your crop factor.
- Set the ISO to its base value.
- Let your shutter speed fall wherever it needs to be for the proper exposure.
- Watch your highlights. Don’t overexpose any of them. If necessary, use negative exposure compensation to darken the photo. Why? It is simply easier to brighten shadows in post-processing than to darken overexposed highlights.
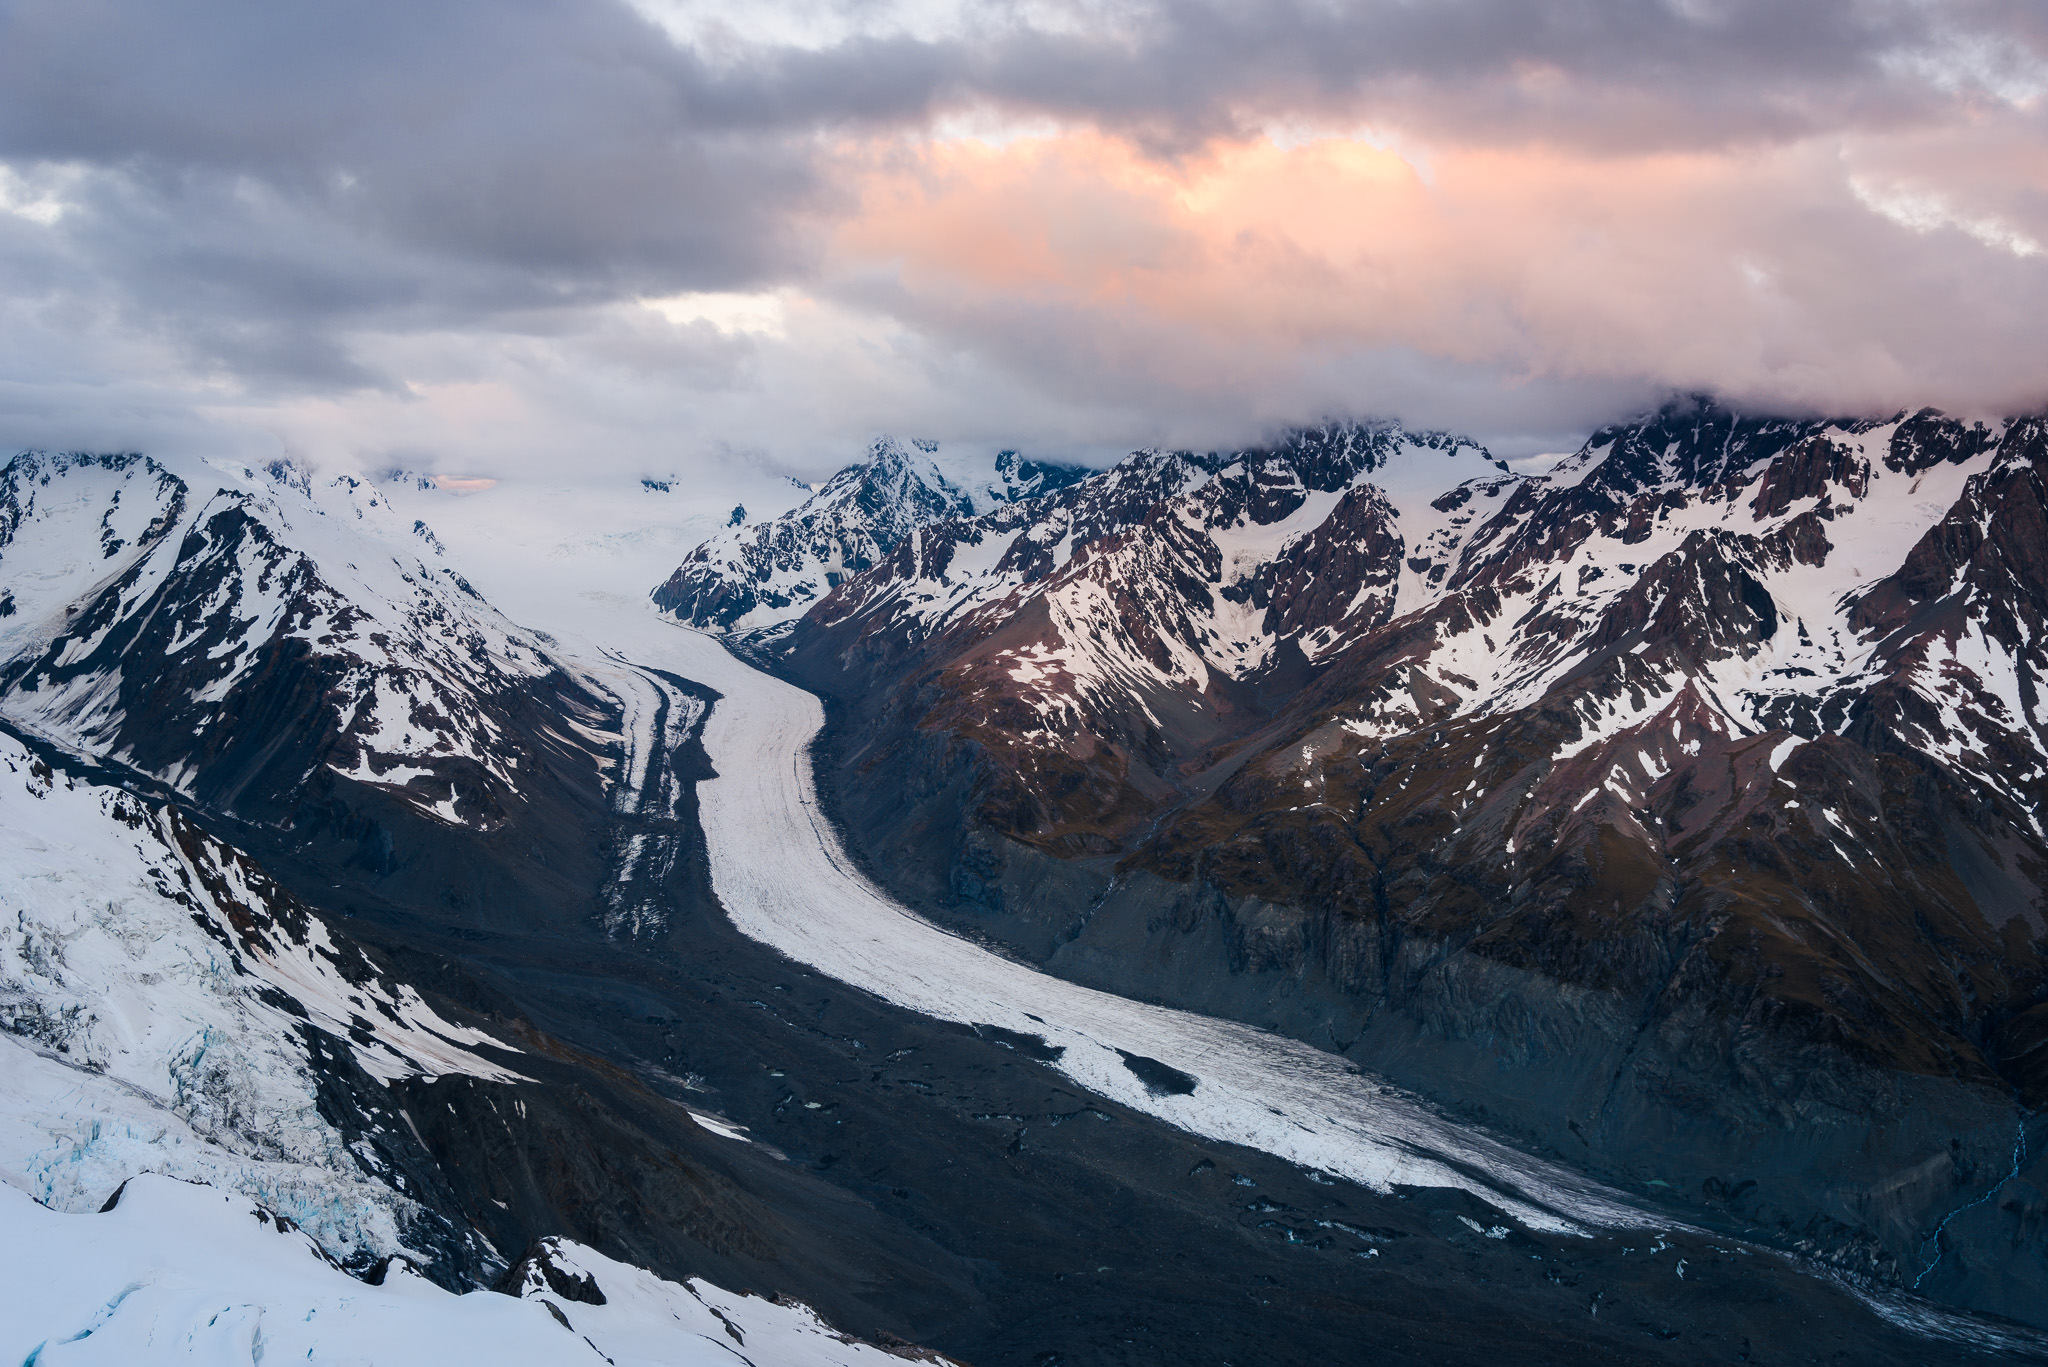 Aperture: f/8. Shutter speed: 1/3 of a second. ISO: 64 (base ISO on this camera). Exposure compensation: -1/3 stop.
Portrait Photography (No Flash)
- Shoot handheld, use a tripod, or use a monopod. In this case, the best option is not set in stone. Use whatever method you are most comfortable with, or pick a setup that works best for your particular photoshoot.
- Use aperture-priority mode.
- Choose an aperture that gives you a pleasing depth of field – typically, something like f/2.8 or f/1.4, but it depends upon the look you want.
- Watch your shutter speed. If you start to notice motion blur, your shutter speed is too long, and you need something quicker.
- Keep your ISO low, but don’t be afraid to raise it if your aperture and shutter speed are not letting in enough light. In darker environments, especially, you likely will need to raise your ISO so that you can use a fast enough shutter speed.
- Once again, don’t overexpose any highlights. Use negative exposure compensation if necessary.
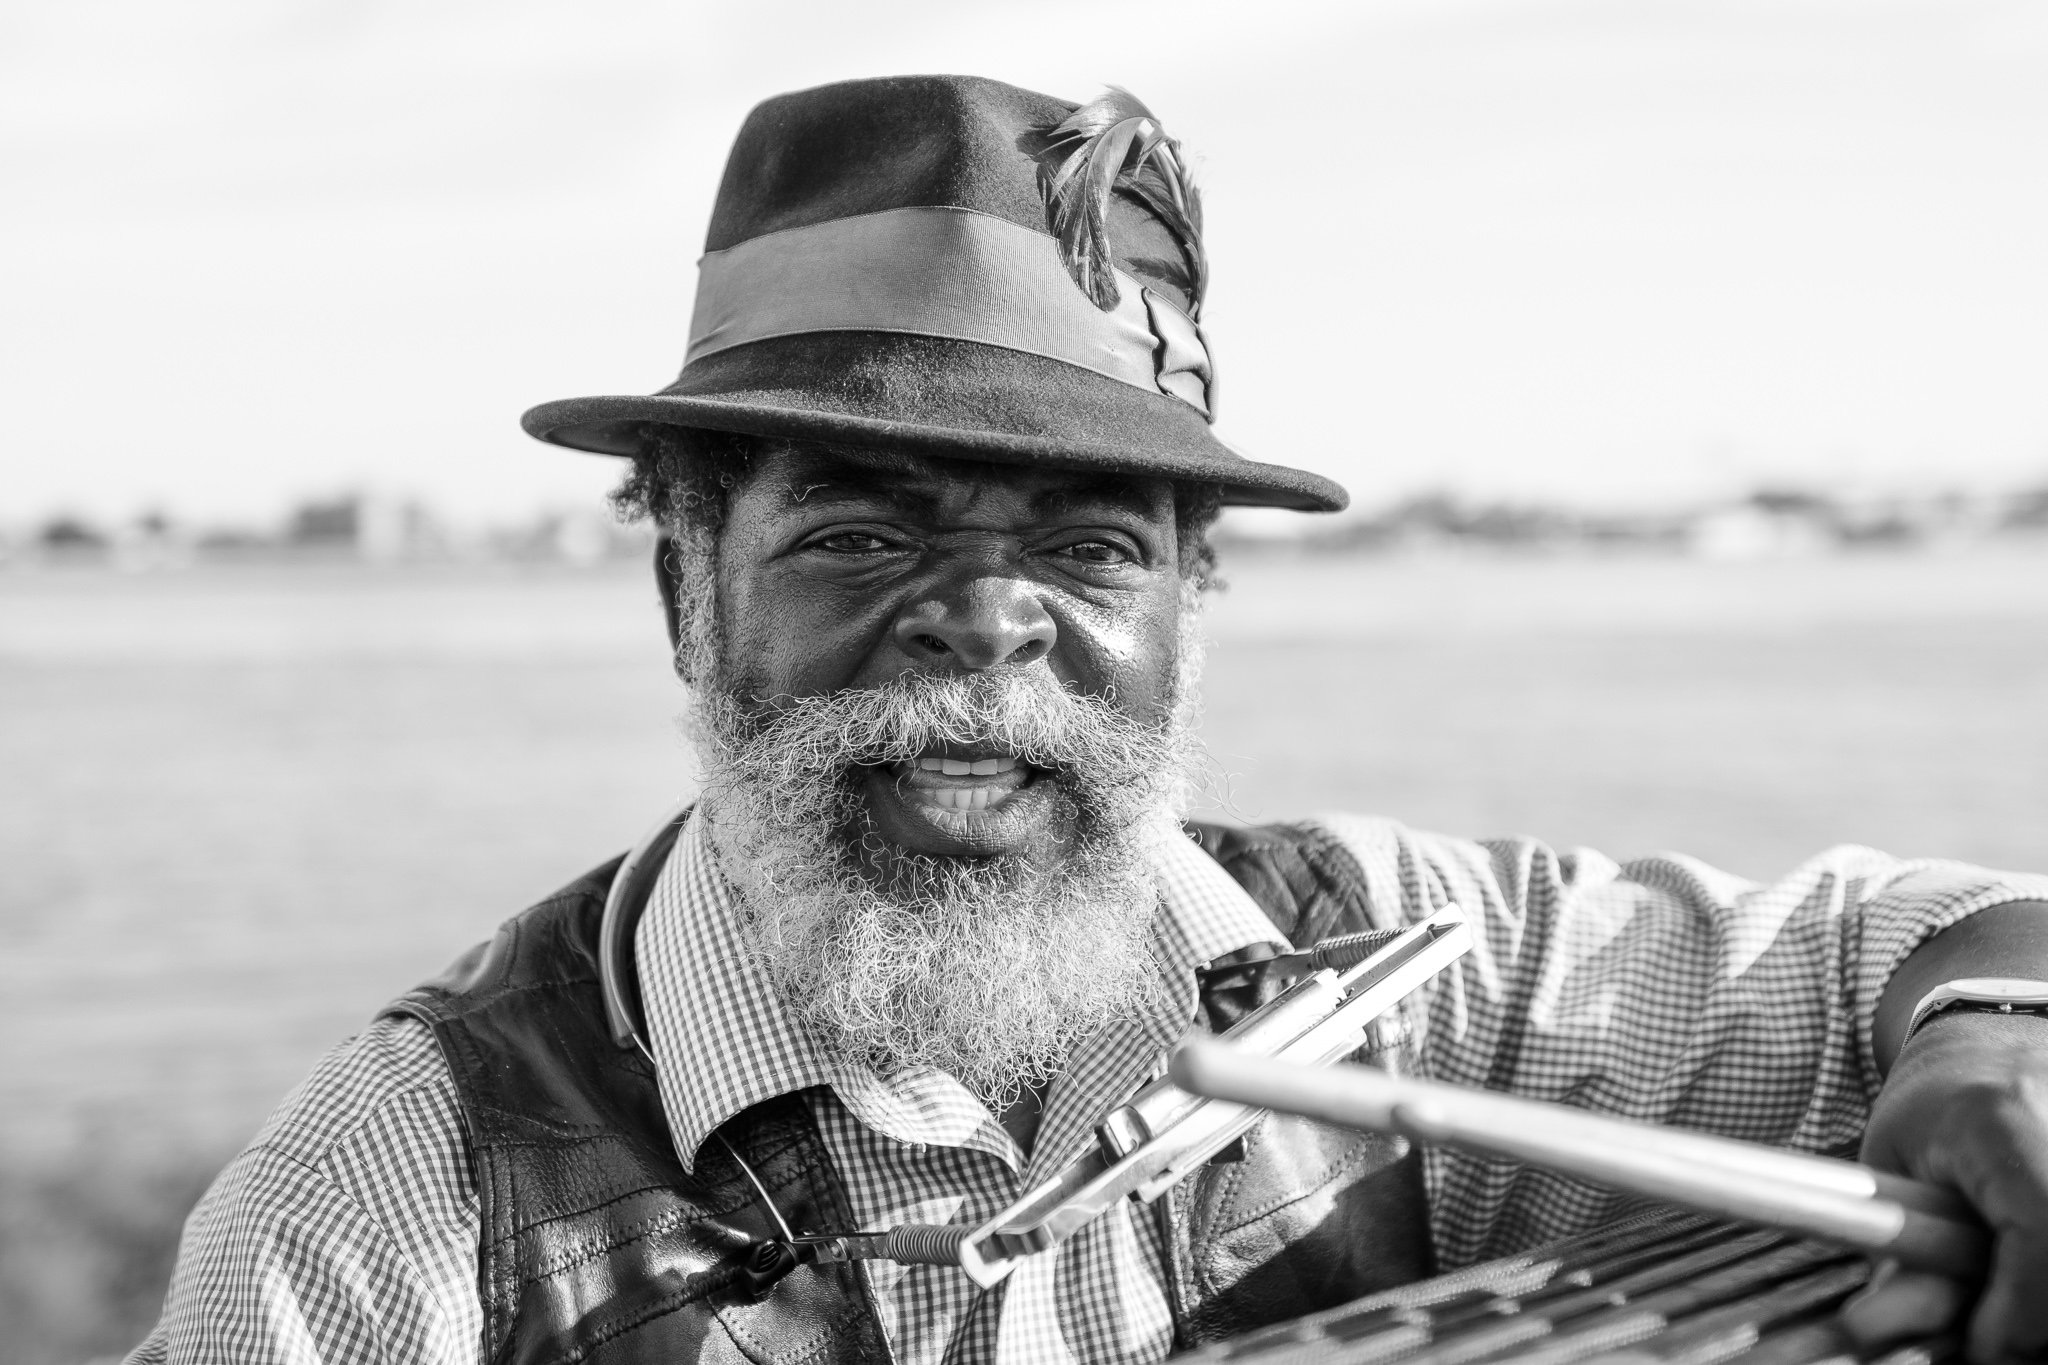 Aperture: f/1.8. Shutter speed: 1/2500 of a second. ISO: 100 (the base ISO on this camera).
The shutter speed in this photo is so fast simply because it was a bright day, and, at f/1.8, the photo would have been overexposed without a fast shutter speed to darken the image.
Sports and Wildlife Photography
- Shoot handheld or use a monopod. For larger lenses in wildlife, you may need to use a tripod.
- In general, use manual mode with automatic ISO.
- Pick a large aperture, such as f/2.8 or f/4, since there often won’t be enough light
- Select a fast shutter speed that will freeze any movement in your photo. 1/500 is a reasonable starting point. You’ll need 1/1000 to freeze fast-moving sports. For birds in flight, expect to use 1/1600 or faster. See this article for more details regarding bird photography.
- Use your exposure compensation as needed so that the camera can adjust your ISO value.
- Do not overexpose any highlights (except possibly for unimportant out-of-focus backgrounds, like if stadium lights are present)
- Instead of using manual mode + auto ISO, an alternative is to use aperture-priority mode with automatic ISO. This technique ensures you will not overexpose the image in very bright conditions, but it requires jumping into the Auto ISO sub-menu periodically to change your minimum shutter speed, so it can take more time in the field. You can read more about it here.
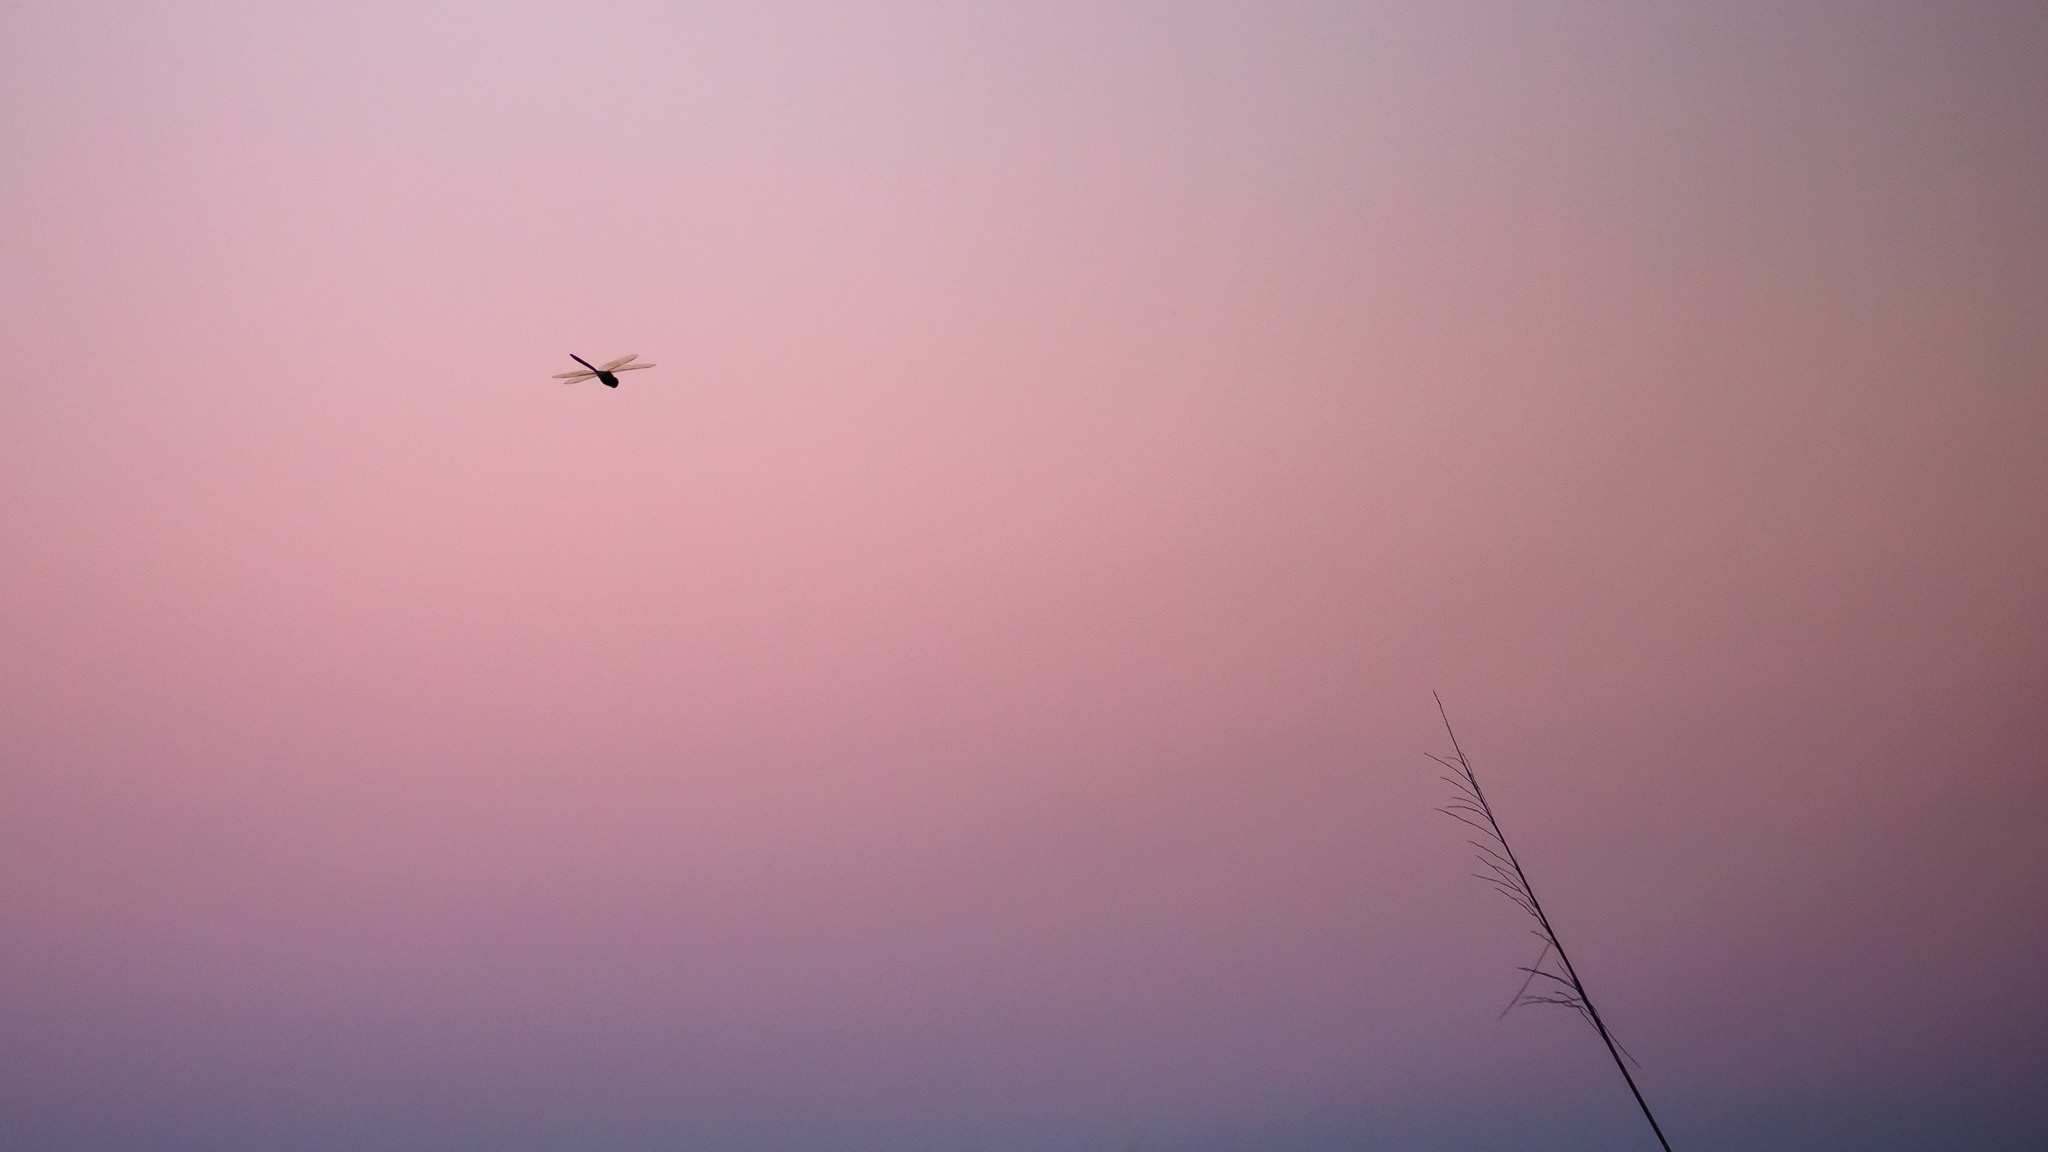 Aperture: f/2.8. Shutter speed: 1/800 of a second. ISO: 1400.
This photograph required a high ISO of 1400 in order to use a fast shutter speed, but it was worth the tradeoff. Although there is some extra noise in this image, even the dragonfly’s winds are very sharp.
Recommended Exposure Settings Roundup
These suggested settings are not universally accurate, but they should be useful for a beginner who wants a starting point for getting the proper exposure. At any rate, they certainly work better than switching to manual mode and attempting to pick the right settings before you know what anything does. (Though, that is still a good way to learn, if you aren’t taking important photos.)
A crucial point is that you will outgrow these starting points organically as you become more and more skilled at exposure in photography. The list above does not cover some rarer scenarios (such as using a large aperture for Milky Way photos), but you will realize them pretty quickly in the field. Eventually, you should add your own points to each of these lists and expand on new exposure techniques over time.
Conclusion
Exposure can seem complicated, but it is one of the most important technical topics to know if you want to take high quality photos. The best thing you can do now is go out and test the suggestions above for yourself. Play around with your exposure settings, as well as ISO. Pay attention to how they affect a photo. Most of all, keep practicing. Exposure is something you will never stop improving, and, without a doubt, it is worth the effort to learn.
If you want further reading on this important topic, take a look at our “photography basics” articles below that go into more detail about exposure and related topics:


About Spencer Cox
I'm Spencer Cox, a professional landscape photographer based in Colorado. I started writing for Photography Life over a decade ago, and now I run the website in collaboration with Nasim. My photos have been displayed in the Smithsonian Museum of Natural History and awarded top honors in prestigious competitions such as the Natural Landscape Photography Awards, Travel Photographer of the Year, and Epson International Pano Awards. You can see more at my personal website and my Instagram page.
Comments
-
Good article, thaaaaaank you<3
-
i just love this article, it really helps me exceed in my photography class!
-
This article really showed me how to put the triangle together more effectively. I appreciate your information.
-
Great fucking advice
-
I will love to have a private class with you
You are so blessed with tutoring
I’m from Nigeria and I can say am
Happy I come accross this lovely article
I started my photography journey two weeks back and it still look so strange reading the terms and all settings that’s needed to bring in a well detailed photograph.God bless you kindly tag me with your IG
-
This article is the best I’ve read. I have tried so hard to understand more about my camera’s manual settings, but most of it went over my head. And I have read many different posts. This is explained so well that everything just clicked! Thankyou and we’ll done
- I’m happy to hear it, thank you!
Reply 07. god tier
-
You explained this so well, thank you!
-
Awesome article !! Thanks
Just one question : for the milky way photo, how does the aperture f/1.8 (to catch more light) didn’t blur the sky (because big aperture capture smaller depth of field if I’m right ) !?
- High ISO and a slower shutter speed I suppose
Reply 10. Fantastic article. Very helpful. Thank you very much
-
Hi Author,
Thanks a lot for giving this useful information; it would come handy as my basic got clear now about photography!
Regards,
Sim
-
Great article. Really appreciate all the great information made available!
-
Actually factually the pupil is the opening of the iris that let’s light in where as the iris determines how much light is let in there for the aperture acts more like an iris and not a pupil.
- “In optical terms, the anatomical pupil is the eye’s aperture and the iris is the aperture stop.”
Reply 14. bruh moment this is epic
-
Thank you very much! I am very interested in shooting film but had no idea about exposure and ISO before coming across this article. Pretty sure I will keep coming back here for refreshers.
-
This is another amazing article for a beginner! These well-written articles have helped me a lot today in taking my first fireworks-photos tonight! Thank you!
-
Hi Spencer,
The statement ‘ISO is not part of expoure’ is of course absolute fact. Or is it? It creates a little paradox in my head. ISO is not part of exposure but can there be any exposure without it? Our old friend film speed was a feature of the medium upon which exposure worked. The sensor is really the same thing i.e. the medium upon which exposure happens. The light hits the sensor, and ISO adjusts the camera’s (according to the D850 manual) sensitivity to light. Can we yet have exposure without it? (If the answer to that is yes, what would a picture look like without ISO?) I am reminded of the old philosophical conundrum of whether there was noise in the forest before there were any ears to hear it. Or what was the sound of one hand clapping? Food for thought, I guess. For me, in a practical sense, ISO feels like an integral part of exposure. Just sayin’. :)
- In my comment above, the the word ‘expoure’ is really ‘exposure’. The letter ‘s’ got lost in the trasfer process when I sent my post. My pride leads me to say that I did spell it right in the first place! :)
- Totally agree Elaine!
In fact, in an article about exposure, why should ISO have an equally large section to shutter speed and aperture, if it is not part of exposure?!
Of course Spencer was being technically correct, but it might be worth him indicating more clearly that no one in the history of photography has considered exposure (the ‘photo’ bit) without contemplating the sensitivity of the light recording medium (the ‘graphy’ bit).
-
Thanks, Burghclerebilly!
I had like most people thought about ISO in the traditional way. I have now learned differently, but I will probably continue to think of it practically while shooting in the same way I always did. I was just taking a little liberty with Spencer by being a little tongue in cheek in tweaking our perceptions of the scientific facts. After all, there is a little mystery in our art. It does us good to remember that. There is also a bit of mystery in the technical side of digital photography, too. Perhaps we can give ISO it’s stature back by saying that it is not part of exposure, but it is part of the exposure process. If, as I hope, that is a true statement. :)
- I think the limiting element is how “exposure” was being used. It can be used to describe the light hitting the sensor part of the process. It can also be used to describe the final result – the capture itself. I would suggest it is wiser to use the later understanding. In that context ISO is a significant part of the tripod, as it directly impacts the quality of the detail in the shot. If I am taking a picture of a pair of leopards mating just after dark in Africa, without flash or external lighting (which I have done), then I’m going to need higher ISO settings to have usable shutter speeds to stop the action in that very low light situation. Even without any real post processing, any web version of the shot is going to look decent because a lot of the noise will be subsample-down minimized. But if I want to make a large print of the same, then that higher ISO choice will influence the quality of the detail and nothing could prevent that – for that camera/subject/light. ISO is absolutely a key factor in the final capture, and it does influence the chosen aperture and shutter speed in the exposure part of the process. In the digital age we have much processing going on in the camera – and much possible out of the camera – and for those that shoot RAW, you really don’t have an image until that data has been interpreted to create one – yet another layer of processing. That said, while there wasn’t too much fancy stuff going on in the camera in the film days – more delicate manipulation could happen in the processing of the film and how a print was exposed and processed – nowhere near the sophistication we now have in software, but all was not just binary in those days either – which is one of the reasons the better photogs tended to work with one lab and one lab tech if possible – to get end results to their preferences, more consistently.
-
Hi Mark,
I agree wholeheartedly. The three are so intimately connected that they really can’t be unravelled from one another. It is the same of anything made up of different parts. There is the connected whole, and then there are the distinct parts. We ourselves are both individuals and part of a society, while we each retain our individuality. We cannot deny the science here, but we can also see the connected whole. Of the three photography elements, ISO is perhaps the most mysterious. How can a sensor become more and less responsive to light? How can that responsivity be dependent upon the very thing that it is influencing – exposure. Even better, how can electricity passing through a grain of sand give us digital photography in the first place? Ah, paradox. It seems that the real weakness lies in our ability to define what defies definition. But that won’t stop us from doing it anyway. But the question is, will we succeed? (And yes, I am being silly).
- Well, I think my background in professional sound sheds some waves on the ISO conundrum people seem to have. In a camera we have a sensor and it’s innate sensitivity is fixed – that rain of sand is however sensitive to light it is. A microphone is the same way different mics use different elements and designs to accomplish sound pick-up, but at the end of the day, each mic has a specified sensitivity. Enter the camera processor – or in the field of sound, the gain knob on a mixer. Electrically I can tweak the innate sensitivity of the camera sensor or the microphone. There are pros and cons to that. In sound I might be able to get enough of a increase in the desired sound that people can better hear it – at the potential price of amplifying frequencies I don’t wish to hear – depending on the design of the system and quality of processing capability, it can be a delicate balance. ISO in a digital camera works similarly. The amount of tweaking I process into the mix has pros and cons. Certainly the best quality and greatest range of tone (or sound) comes from using it as untweaked (pushed) as possible – but that may mean not taking a lot of pictures simply because the camera left at base ISO doesn’t allow me enough other ways to compensate to get a shot with a more demanding variable, be it lack of light or high speed, for two examples. So, I would suggest, that though more challenging to understand, depending on ones subjects, etc. it can be helpful to have a clear sense for how to use ISO as one of the key three variables to maximize each shot. It would be great if all photographable subjects were always in great light and didn’t move so we could shoot everything at base ISO. That’s not the world I live in – especially primarily as a wildlife person.
-
Mark,
You have touched upon another subject that involves mystery and magic. How do we impress sound….sound!…. upon a vinyl disc and then play it back through a needle and amplifier with complete fidelity so that the listener hears every note as if he/she were in the room with the orchestra? And ditto with digital technology? Should you ever write a paper on the subject which explains this magic that a lay person can understand I hope you will send me the link.
I am a little familiar with the term ‘gain’ as applied to sound, but does it have any application to light in the case of our friend ISO? Since ISO has to do with the ‘magnitude of responsivity’ to the other elements of exposure, it sounds as if it might.
- Since this forum is about photography, I won’t get into a long explanation, but the ACCURATE capture of sound is challenging at best. ACCURATE speaker output is even more challenging – most often compromised by the room itself and limited by the budget for the sound system for the facility. In sound, it’s not so much about “mystery and magic”, but is about the budget and knowledge of those crafting the system. With cameras, in general terms, the newer the more companies are doing their best to just handle the dynamic range of light their sensor may see with in camera processing. The more exotic the camera, the more the user can have a hand to choosing how their camera sees and processes what it sees – even in the context of RAW capture. There is a reason the better (and more expensive) cameras have more and more semiconductors and internal processing power – and we are just happy for the results – without wanting to really understanding all the whys and wherefores.
Reply - I am a bit late to this thread, but I’ll say this:
Elaine is quite right to say that ISO is not part of exposure, but it is intimately tied to it, which is why I included so much information on it in this article.
However, I do caution people against thinking of ISO “as if” it is part of exposure simply because it makes a photo brighter. ISO is no more a part of exposure than brightening your photo in post-processing. Neither changes the amount of light that physically reaches your camera sensor. This may seem like a nitpick, but it has major consequences. If you can engrain in your head that light=data, and data=image quality, it becomes clear that the way to capture photos with the highest technical quality is to capture as much light as possible in the field.
The only camera settings that allow you to capture more light are shutter speed and aperture. So, by using them to gather as much light as possible without harming the image in other ways (like excessive motion blur or too thin a depth of field), you’ll end up with the best photos.
Thanks for bringing up this important discussion, Elaine, Mark, and others!
-
The light in the scene is the independent variable. The luminous exposure, Hv, depends on this light and the combination of f-number and shutter speed, filters etc. The required ISO speed depends on Hv.
ISO speed is the relationship between image brightness and Hv: this relationship is the responsivity[1] of the image recording system. It is either the required value or the actual value.
From the above it should be clear that: changing the ISO speed does not change Hv per se; and that changing Hv (via the f-number and/or shutter speed) does not, and cannot, change the light in the scene!
1. The term “sensitivity” is commonly used in place of the term “responsivity” — for many types of sensor, not just image sensors.
- Hi again, Pete.
I can see that you’re passionate and knowledgeable about this subject – and I’d like to properly understand your perspective.
I’m hoping you’re up for a respectful, patient discussion to guide me to this end (?)
Assuming so, may I please seek a basic clarification …
In response to questions related to this article, Spencer has stated:
a) {There definitely is an exposure triangle; it’s just that the three variables are shutter speed, aperture, and light in the scene. All of those do affect the exposure of an image, which is the amount of light that reaches your camera sensor… [but] ISO is not part of exposure, so it’s not part of the exposure triangle.}
and
b) {I do caution people against thinking of ISO “as if” it is part of exposure simply because it makes a photo brighter. ISO is no more a part of exposure than brightening your photo in post-processing. Neither changes the amount of light that physically reaches your camera sensor.}
These statements reflect my understanding of exposure and the contribution of ISO in producing a final image.
So, I have two genuine questions (i.e. with no tricky “set-up” in mind).
1) Do these statements reflect your understanding too ?
2) If not – then how/why does your view differ ?
Regards, John – TKA
-
Hi John,
Science and mathematics are overtly pedantic, which is the very attribute that enables them to be useful and reliable. With that in mind, I hope you can understand that many of your questions and your statements are epistemically flawed. Please don’t take it as a personal criticism because it applies to the vast majority of people, and to the wording of articles aimed at beginners.
Let’s examine the photographic term “exposure”, which by itself is technically meaningless…
1) The term “luminous exposure” does have a definitive meaning:
SI quantity name: luminous exposure
SI quantity symbol: Hv
SI unit name: lux second
SI unit symbol: lx·s
SI dimension symbol: L⁻²·T·J
it is time-integrated illuminance: Hv = Ev· t, where
Ev is the illuminance of the film/sensor measured in lux, and t is the exposure duration in seconds.
Does luminous exposure depend on ISO speed? No!
2) A photograph in which the highlights are blown / clipped is commonly referred to as being overexposed. This is a colloquial, not a scientific, usage of the photographic term “exposure”. The blown highlights could’ve been caused by the exposure being too high for the selected ISO speed setting, or vice versa, or they could’ve been caused by the control settings used in the image editor.
Does the colloquial, subjective, meaning of exposure depend on ISO speed? Yes!
Summary… To say that ISO speed is not part of exposure is totally misleading. ISO speed is not part of luminous exposure per se. But it is very much part of the colloquial meaning of exposure, which is the reason for it being part of the Exposure Triangle.
The selected f-number primarily affects the depth of field; the selected shutter speed primarily affects the blur; the scene lighting affects neither the depth of field nor the blur. However, the f-number and the shutter speed secondarily affect the luminous exposure, therefore to obtain the desired subjective exposure (lightness) the photographer must change the scene lighting and/or select a suitable ISO speed, which is the responsivity of the camera to luminous exposure.
I sincerely hope that you will increasingly appreciate the importance of science, and the correct usage of its field-specific terminology, in technical discussions.
Best regards,
Pete
- Thank you for the scientific background on exposure, Pete … It’s not clear to me, though, that you answered my question.
Again, I’m not trying to be smart-a*sed here … I’m just trying to properly understand your perspective.
Let me put my request for clarification another way;
I get the impression that you do not agree with those two statements by Spencer …
– not that my impression is necessarily correct (?)
– or, perhaps it’s just a matter of semantics – or an issue of scientific/mathematical preciseness ?
Regards John – TKA
- Hi Pete,
I agree with your comment “9.2.1.1.1.2.1)” without issue.
The problem here is that there are several definitions of exposure, including a few different colloquial ones depending upon the context.
1. Your photo as a whole. As in, “I took a few exposures of this scene.”
2. The lightness of the photo. As in, “This photo is overexposed.”
3. Shutter speed only. As in, “This is a long exposure.”
4. The amount of light your camera sensor is “exposed to.” This is the definition I covered above, and it is also the dictionary definition: “The quantity of light or other radiation reaching a photographic film, as determined by shutter speed and lens aperture.” By this definition, the three variables affecting exposure are aperture, shutter speed, and scene luminance.
5. Exposure Value – aperture and shutter speed only. Wikipedia says it well: “Exposure value (EV) is a number that represents a combination of a camera’s shutter speed and f-number, such that all combinations that yield the same exposure have the same EV (for any fixed scene luminance).” My understanding is that Wikipedia is using definition 4 when they say “yield the same exposure.” I know they are not using definition 2, since they do not mention ISO/ASA speed, and it certainly is possible to have two photos at the same EV and scene luminance which have different ISOs, and thus lightness in the final photo (different “exposures” by definition 2). More info: en.wikipedia.org/wiki/…sure_value
6. The luminous exposure – what you mentioned; the illuminance of the sensor × duration of the exposure. (Illuminance of the sensor being due solely to scene luminance and aperture setting.)
I will contend that, among advanced photographers, definitions 4-6 are preferable to definition 2 (and starting to be more common, too). A benefit is that these definitions make it easier to recognize the benefits of increasing the amount of light that falls on a sensor – via aperture, shutter speed, and scene luminance – rather than raising ISO or brightening in post-processing in order to get a photo that is lighter.
If there’s a spot in the article which should be changed to be more accurate, I hope you know that I have no ties to what’s written and am always willing to change things to be as accurate as possible! Perhaps I should add a note at the start that there are so many definitions of exposure? We really do appreciate your technical insights on subjects like this.
- John, It’s a matter of semantics because it would be silly of me, or anyone else, to agree with statements that do not use, or have misused, the relevant field-specific terminology.
It’s also important to remember that not agreeing with, or strongly disagreeing with, a particular statement doesn’t automatically lead to the conclusion that we agree with the opposite of that statement. E.g., discussions about photographic exposure frequently muddle up cause and effect, independent variables and dependent variables, which can lead to pointless disputes over such things as the Exposure Triangle. - “In that context ISO is a significant part of the tripod”
LOL, that’s a wonderful typo.
-
Hello Mark,
Re your comment: {If I am taking a picture of a pair of leopards mating just after dark in Africa … then I’m going to need higher ISO settings to have usable shutter speeds to stop the action in that very low light situation}
When you say: ‘… I’m going to need higher ISO settings … ‘ – it sounds to me like you’re asserting that increasing ISO is the *only* means of achieving an appropriate shutter speed (Unless I’m misunderstanding you?)
How about this alternative approach, tho;
i) Keep ISO at base-ISO for your camera – at which the camera’s ability to capture wide dynamic range is (typically) optimum.
ii) Make your exposure settings as you think best (probably; wide-open aperture and shutter speed as required to stop the action).
iii) Capture the exposure … it will look dark on the back of the camera (because it is reflecting a jpg version of the image, even if you’re shooting RAW).
iv) Brighten the image, as required, during RAW processing.
Notes:
– I am assuming you’re shooting RAW … If not, then your original assertion is almost certainly the best approach.
– Depending on the sensor design of your camera, the results from iv) may not be as good as your (increase ISO) approach.
Regards, John – TKA
- Perhaps I should have stated a priority that I have when capturing images: I aim for the highest quality initial capture – which means pushing pixels hard in post means I failed in the capture process.
Relative to i-iv, I made the choices I felt best for i and ii, since I was already shooting at base aperture f/2.8 and I’m not aware of an f/1.4 300mm (or greater) lens. Relative to iii, the approach you’re suggesting sacrifices the “wide dynamic range” your suggesting you’ll gain from i. Relative to iv, I have rarely found an image that was more than a stop or so improperly shot (especially on the dark side) was salvageable – or at least I wouldn’t put my name one it. And, whether it’s off in the light end is not the same as off at the dark end, relative to the the logarithmic way light is captured.
Relative to your notes, I do shoot RAW, and that allows a little bit of flexibility when it comes to interpreting the data and or minor tweaking in post. When I am in the field, I try to use the best tool for the job, to the degree I have options. I generally use the D5/D750 most, but also lean on the D500 and D810, though now getting a handle on the D850. Each sensor/camera has strengths and weaknesses, so the better I understand their edges (relative to my preferences/priorities) the better I’m able to choose the camera that is best suited for that particular situation.
-
Thank you, Mark.
Using the chart on this page: www.photonstophotos.net/Chart…Shadow.htm to understand the nature of your cameras, I can see that your (increase ISO) approach would be best with your Nikon D5 – – Your other Nikons, though (esp. D750 & D910), should perform very well using the general (tho, not necessarily specific) approach that I suggested.
There’s an excellent example here: photographylife.com/iso-i…-explained where Spencer takes advantage of his D800E using this technique.
Regards, John – TKA
Reply - Fully agree Elaine. I have a vague recollection that my GCSE photography coursebook from back in the 1980s used exactly that delineation! Stupidly, I chucked it away!
-
Burghclerebilly,
You have mystified me. What is GCSE?
- “The General Certificate of Secondary Education (GCSE) is an academic qualification, generally taken in a number of subjects by pupils in secondary education in England, Wales and Northern Ireland. Each GCSE qualification is in a particular subject, and stands alone, but a suite of such qualifications (or their equivalents) are generally accepted as the record of achievement at the age of 16, in place of a leaving certificate or baccalaureate qualification in other territories.”
en.m.wikipedia.org/wiki/…_Education
-
Pete,
Thanks!
Reply 18. As a beginner, I love this article. It manages to explain, at least for me, a rather complicated part of photography.
Can’t speak for others but I would love to see an article with correctly/incorrectly exposed photos, or just comparing a few photos and then explaining what is wrong with each one. That is something I still struggle with; having a bunch of photos of the same subject but different exposure, different light balance, etc. and I’m not sure which one is “the correct” one.
- Thank you, Joe! I do have an article in the works on the refining process – essentially, how to take several photos of a scene and progressively improve them, and to choose the winners when you get back. Still a few reviews to push out first, but you should see it within the next couple months!
-
Looking forward to the article!
Please could you explain how one decides if you should increase iso or dial positive compensation if a photo is underexposed?
- Sure thing – any time you dial positive exposure compensation, the camera can only brighten a photo via these same three variables: aperture, shutter speed, or ISO. So if you are in Manual mode – so that shutter speed and aperture are totally locked down – but you have Auto ISO turned on, increasing exposure compensation will actually increase ISO! So the question as to whether you should increase ISO or dial positive exposure compensation is a bit misleading. Sometimes, dialing positive exposure compensation increases ISO :)
Typically, though, the answer is to dial positive exposure compensation, unless you are in 100% manual mode with manual ISO (in which case exposure compensation physically cannot do anything, because the three variables are all locked down). If you’re finding that your photos are too dark in something like aperture priority mode, increasing ISO won’t brighten the photos, because the camera will correspondingly use a faster shutter speed to darken the image. What exposure compensation tells your camera is that its meter reading of the scene is too dark or too bright. So, dialing positive exposure compensation in aperture priority mode will lead the camera to use a longer shutter speed or a higher ISO (without changing the other variable correspondingly) so your photo is actually brighter.
Hope this helps!
Reply 19. So there is no exposure triangle?
Coming soon.
“How Photoshop really is intuitive.”
- There definitely is an exposure triangle; it’s just that the three variables are shutter speed, aperture, and light in the scene. All of those do affect the exposure of an image, which is the amount of light that reaches your camera sensor. You could also argue that things like neutral density filters affect exposure, although I’m grouping all those under the “light in the scene” component.
But yes, ISO is not part of exposure, so it’s not part of the exposure triangle. It may not be intuitive initially, but I’d say it’s easier than learning Photoshop :)
Reply 20. There’s a sentence in the shutter speed section that looks like it’s got some typos or missing words:
“Second, the only other big effect s the motion blur in your images.”
- Thank you, Mike, I fixed it!
Reply 21. Finally – someone who “gets it” insofar as how ISO works in a digital camera. I get tired of seeing many talking about ISO changing sensor sensitivity. Put that it the dust bin along with “getting more reach” with lenses on smaller sensors. Good article – thanks.
- Respectfully – I think your thinking is limited on both of these points. While technically changing the ISO does not change the sensitivity of the sensor – practically speaking, the internal processing to the data is increasing the risk of noise due to amplifying the native sensitivity of the sensor. It’s like adjusting gain on a cheap to professional sound mixer. Doing so does not change the sensory capabilities of the microphone, but it does amplify that sensitivity to a degree that can invite feedback since you are not only amplifying the desired sound but also lesser frequencies that we might not notice otherwise.
When it comes to “getting more reach” – you are technically correct, but practically missing the point. If I set up my 600mm prime on a tripod focused on a robin nest, as a Nikon shooter, I have three bodies I can choose, FX, DX, or CX. Each provides a different effective focal length, since each sensor uses a different portion of what that 600mm lens is making available. And, I can assure you that shot well, those smaller sensors are can capture a better quality image, relative to desired composition than one would get with teleconverters, or cropping the FX image. That said, the greater effective FOV requires improved shot technique, tripod support, etc. to maintain that quality, without the limitations induced by added TCs instead.
In both scenarios, you are technically correct, but practically I think you are missing the point.
-
I simply said (a) sensor sensitivity is not “variable” and (b) you don’t get “more reach” (i.e. magnification) with a smaller sensor. Both are absolutely correct. How one infers from this that I lack an understanding of the practicality on both issues escapes me.
Reply 22. Great article – there are so many sidebar elements with this topic, it can be easy to get sidetracked. And, I whole heartedly underline your recommendation of field time. The more you shoot your subjects with your camera the more this stuff starts to become second nature – and that’s when you really get to focus on your subjects and story telling images.
The only two side-bars I have added when teaching on this stuff – an option most cameras have is the exposure compensation button/dial/setting. In my experience each camera tends to see the way the manufacturer prefers and that may or may not be in line with how I wish the camera to see. This easy setting is useful for small to larger tweaks without having to make ISO or shutter speed changes if I’m wanting to preserve a chosen aperture to capture a particular depth of field. Exposure compensation is a very handy feature and worth getting comfortable with.
The second element that can be explored is the impact of focal length on exposure. And, to be sure, this is a more advanced topic. That said, shooting at base ISO and the same shutter speed, and aperture, with different focal lengths isn’t getting the same amount of light to the sensor, nor will depth of field, etc. be the same. That is shooting 600mm lens at f/4 and shooting a 24mm lens at f/4 are two different scenarios, when it comes to the capture and the exposure. So, as one gets more comfortable with the elements impacting exposure, I would add the amount of glass between the subject and the sensor as one more. I tend to shoot mostly at the long end, but I have to recalibrate my thinking when I grab a 24mm prime or zoom in this range relative to when I’m shooting at the long end, as when I don’t I often end up with images that are too bright initially – until I remember ALL the variables impacting exposure, and get my settings dialed in.
- Mark, I’m glad you liked the article, thanks! But there are a couple things I think you are misunderstanding, or I’m not interpreting your comment correctly.
You say that exposure compensation is a useful way to make small/large exposure tweaks without making shutter speed, aperture, or ISO changes. Unfortunately, that’s not right – changing exposure compensation works by adjusting those three variables. If you’re in aperture-priority mode with a manual ISO, for example, and you dial in negative exposure compensation, it functions by shortening your shutter speed. (The only exception is with all-manual everything, in which case changing exposure compensation doesn’t do anything except alter the reading your meter tells you; it doesn’t brighten or darken the photo.)
Also, it isn’t true that exposure changes with your focal length. A photo at 1/100 second, ISO 100, and f/8 will be the same brightness regardless of whether you’re at 14mm or 400mm. While it is true that longer focal lengths require faster shutter speeds in order to freeze motion, and that will darken your exposure, the actual act of using a longer focal length has no effect on exposure, assuming your lenses are calibrated equally well. That may be what you were hinting at as well, but I don’t want a beginner to read that and think the same aperture value results in differing brightness levels at different focal lengths.
-
I should have double checked what variables get changed with a change with exposure compensation – I stand corrected. 98% of the time I shoot in aperture priority, with ISO manually set, and from a tripod, so a slight change in shutter speed is normally a non-issue. But, I should have checked this, before making the statement.
RE focal length, I should have just refrained from leaving the comments. Technically – on paper what I’m suggesting is not so. Practically speaking, it does come into play. Most will not see this since it will be rare to go from one extreme to the other, as can be the case for me.
- No worries! My only goal is to ensure that people who are just starting out don’t misinterpret something and learn things incorrectly. I’m glad you brought up these points, because I think a lot of photographers will wonder about them.
I assume the exposure differences you’re referring to with regards to focal length are quite small — less than a stop? My guess is that this is just a function of the particular gear you own, which may have slight differences in “t-stop,” the measured amount of light transmitted, even at the same aperture (f-stop). Although this could be correlated with focal length, it is more related to the number and quality of lens elements. It definitely doesn’t surprise me that you see darker images from your telephoto at the same aperture as your wide angle, although some people will see just the opposite; their particular wide angle will be darker than their telephoto at the same aperture. All of this is usually by quite a small amount, but you’re right, it certainly can be quite noticeable if you switch between lenses and keep your exposure settings the same.
This is a very good discussion to have, as it’s not something I had room to cover in depth in the article!
Reply 23. A subject easily taken for granted. This is a great refresher for all.
- Thank you, Mark, and I couldn’t agree more – if you just take exposure for granted, it’s hard to optimize the way your photos look.
Reply 24. Brilliant article, Spencer !
Not one misleading mention of the (so-called) “exposure triangle” – and very clear explanation of ISO; as being relevant to, but not directly a component of, exposure.
A great example of what makes PhotographyLife such a valuable, worthwhile site.
- Hi John, I am glad you enjoyed it! Absolutely — ISO is a crucial element of photography, but it isn’t specifically part of exposure.
Reply 25. Thanks very much for this succinct summary of exposure, you’ve explained a few things to me in this one article that I have failed to grasp elsewhere. Good job.
- Thank you, Rob, very glad to hear that you found it useful!
Comment Policy: Although our team at Photography Life encourages all readers to actively participate in discussions, we reserve the right to delete / modify any content that does not comply with our Code of Conduct, or do not meet the high editorial standards of the published material.
Leave a Reply Cancel reply
Your email address will not be published.Required fields are marked *
Comment *
Name *
Email *
Δ