On any photographic forum, it doesn’t take much effort to find old or new discussions on how to set the “proper” exposure while shooting, and even what exactly “proper exposure” is. The question of setting exposure was and is one of the most commonly-discussed topics on forums and blogs. Newbies (and not) bring it up again and again and receive all sorts of explanations – long and short, deeply “scientific” and completely “practical”, starting with advice to use the in-camera histogram, “zebras”, manual exposure mode, corrections and compensation, special camera modes to increase the dynamic range and increase the reliability of the histogram and other overexposure indicators, a separate exposure meter, Adams’s exposure formula, metering the incident light, spot measurement, a grey card, the back of one’s hand, green grass, an ExpoDisk, the sunny 16 rule, Magic Cube, etc., etc.
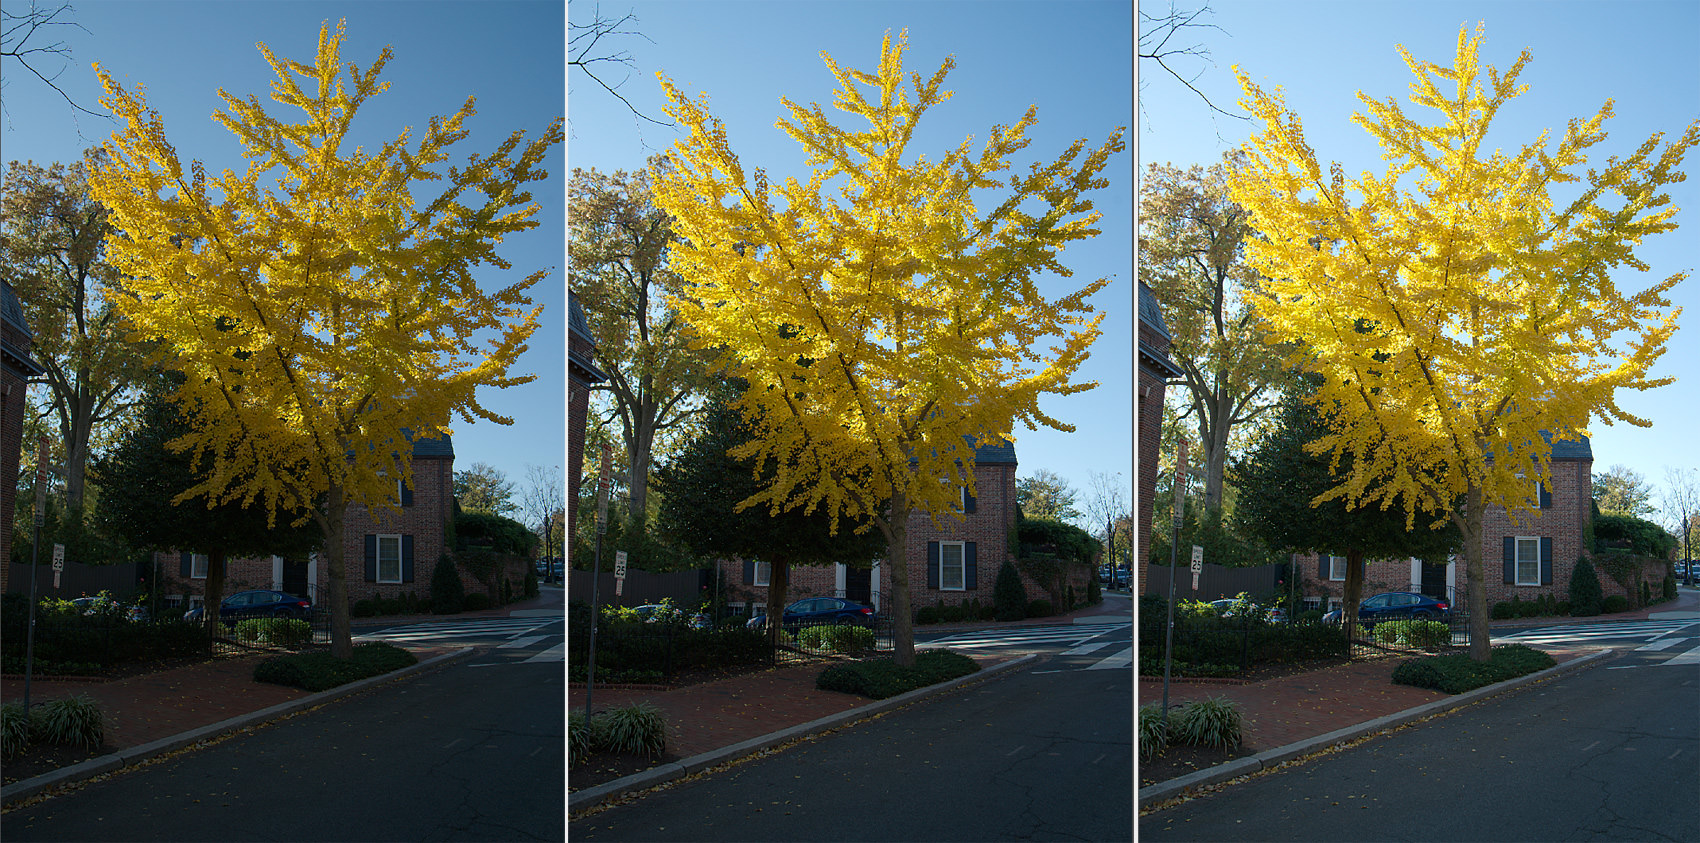 Figure 1
The number, volume, and force of the emotions present in discussions about correctly setting exposure for each shot, the number of gadgets and tricks to achieve the result, as well as the number of articles written on this topic create the impression that the one and only purpose of a photographer is to shoot based on the principle of “one shot, one kill”. The ability to immediately nail the exposure for each shot is viewed by some almost as an indicator of a photographer’s skill.
But if one thinks through the Internet fury, the sheer amount of contradicting advice and the number of gadgets indicate that there is no sure way to set the exposure “correctly” for a general case, especially when the light is not particularly good, and the contrast in the scene is high (often referred to as “high dynamic range”). The logical choice seems to use exposure bracketing, however the use of exposure bracketing by a photographer is often viewed as a “dirty trick”, bordering on bad taste – mauvais ton, the last resort, where it should be the exact first one.
Often, an experienced professional photographer will, upon hearing the question of how one should choose exposure while shooting, respond that you should “ Bracket your shots when the lighting conditions are complex. Or, even better, bracket all of your shots. I do it all the time“. That’s because problems with exposure are not something that only a novice can encounter; of course if one is not a full-time pro, he has more of those.
One of the reasons why is that the camera won’t show you what a raw converter can do in terms of highlights recovery or noise reduction. Worse, even if you are shooting raw, camera will still display a JPEG, and on a rather tiny screen. Essentially, for the aforementioned reason and for others (choices of cropping and the final size being some of those), we know for sure that exposure is good or bad only while processing the raw on a computer.
To illustrate this article, we decided to preform an experiment. It was a sunny day, we set the camera to aperture priority, matrix metering, and the bracketing was set to 5 frames, in a progression 0 EV, -1 1/3 EV, -2/3 EV, +2/3 EV, +1 1/3 EV. To keep the experiment “clean”, the camera was given to a complete novice, the shooting time was limited, and we intervened only once (we will explain why and how a little later). To evaluate the results, we used our FastRawViewer with its raw histogram, exposure statistics, overexposure overlay, shadow boost, highlight inspection, exposure compensation, focus peaking tools.
 Figure 2. series 2556-2560.
On scene 2556 (to the left, auto-exposed with zero exposure correction), the sky is already blown out and has no color; for shots 2559 (+2/3 EV) and 2560 (+1 1/3 EV) the clipping in the sky is obviously worse.
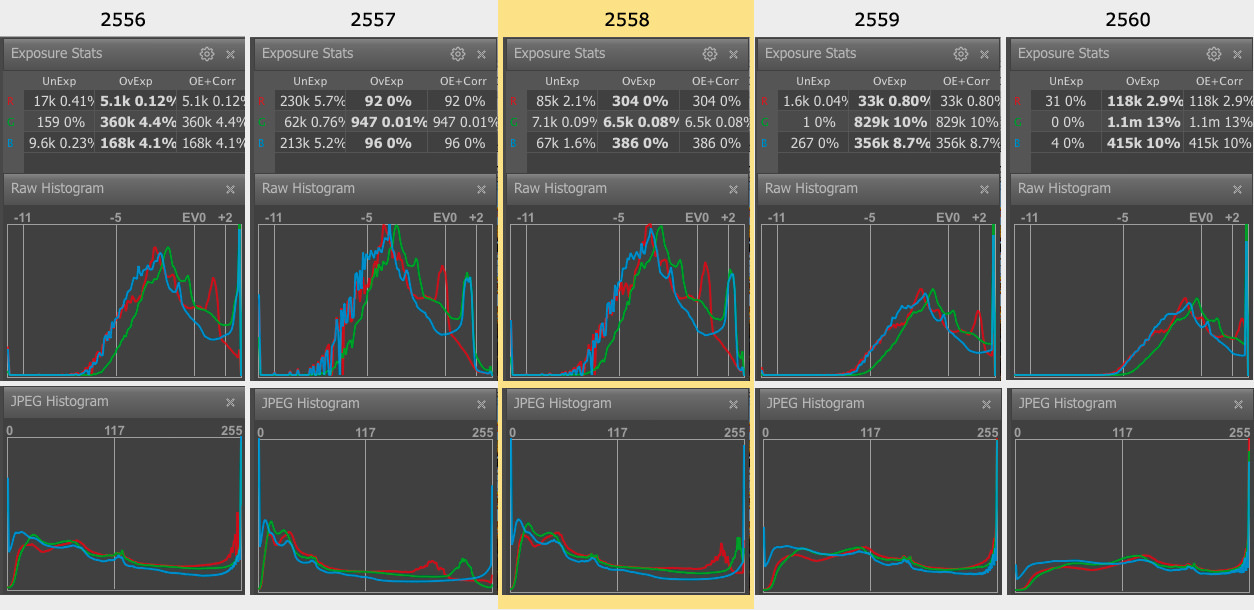 Figure 3
Shot 2557 (-1 1/3 EV): there’s a bit more underexposure in the blue and red channels, as Exposure Stats shows, than would be desired. Notice that the histograms of the embedded JPEGs (bottom row) don’t point to a single useful shot – they’re all underexposed and overexposed at once, according to those JPEG histograms…
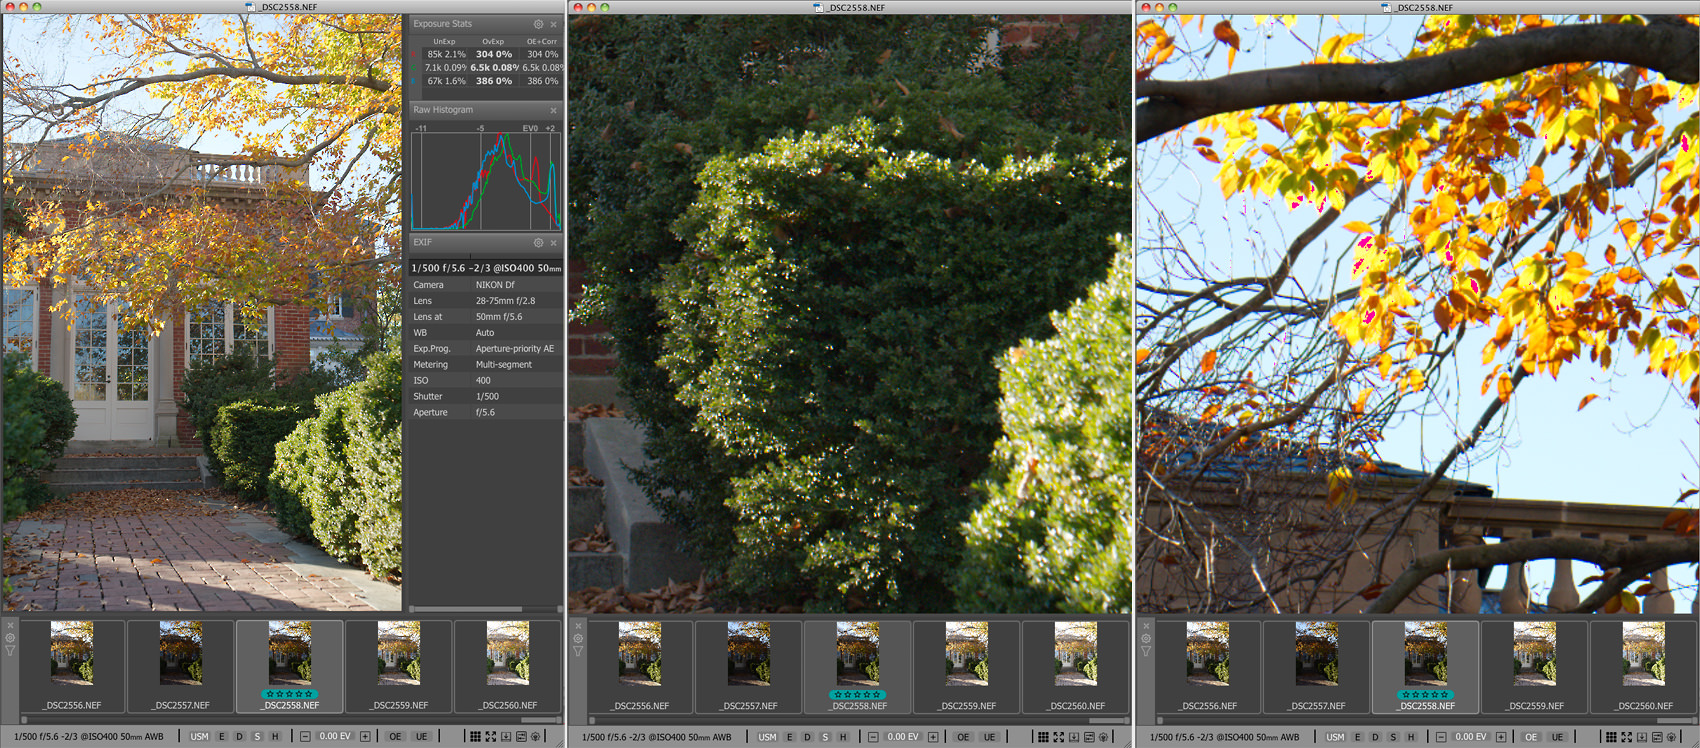 Figure 3
The best-exposed shot of the scene is 2558 (-2/3 EV): using Shadow Boost in FastRawViewer, we can immediately see that the details in the shadows are well-preserved (the image on the left) and that the shadows don’t have much objectionable noise (middle image); furthermore, the sky and highlights are intact, with only a few overexposed pixels on some of the leaves (the image on the right)
In reality, the idea of “one shot, one kill” is, in photography, quite often an artificial constraint, especially considering that, on the one hand, “once in a lifetime” shots generally don’t need excessively precise exposure, and on the other hand the frame rate of cameras is constantly being improved. At a speed of 5 frames per second and more, with ever-expanding flash card volumes, the possibility of missing a moment because of bracketing falls (and is certainly less then the possibility of missing it due to the waste of time while chimping). And when shooting landscapes and landmarks, this probability to miss The Shot because of bracketing falls practically to 0.
Furthermore, exposure bracketing and the review of the results thereof allows one to gain experience over time and learn how to set more accurate exposure immediately when the situation necessitates it. However, despite this hard-won ability to set accurate exposure off the bat, professional photographers continue to use exposure bracketing when the shooting situation permits – if for nothing less than the peace of mind.
During the time of film photography, a professional “wage laborer” photographer knew that he had to turn in useable shots from every shoot. Different organizations had different standards, demanding somewhere between 10 to 30% of useable shots. As a result, as soon as bracketing became possible with cameras, photographers began wasting less time trying to guess or calculate optimal exposure (despite the fact that film and development cost money, with good film and good development costing a pretty penny), and professionals used the results of the exposure meter but often used bracketing as well (especially if the shot had particularly complex light) – that is to say, he’d take several shots above the recommended exposure value and several shots below. After development, he’d pick the best shot. Yes, the number of shots for development and the culling grew, sometimes the price for film (and processing) bracketing demanded came out of the photographer’s pocket, but this way of doing things guaranteed a higher amount of useable shots, better pay, and better career prospects.
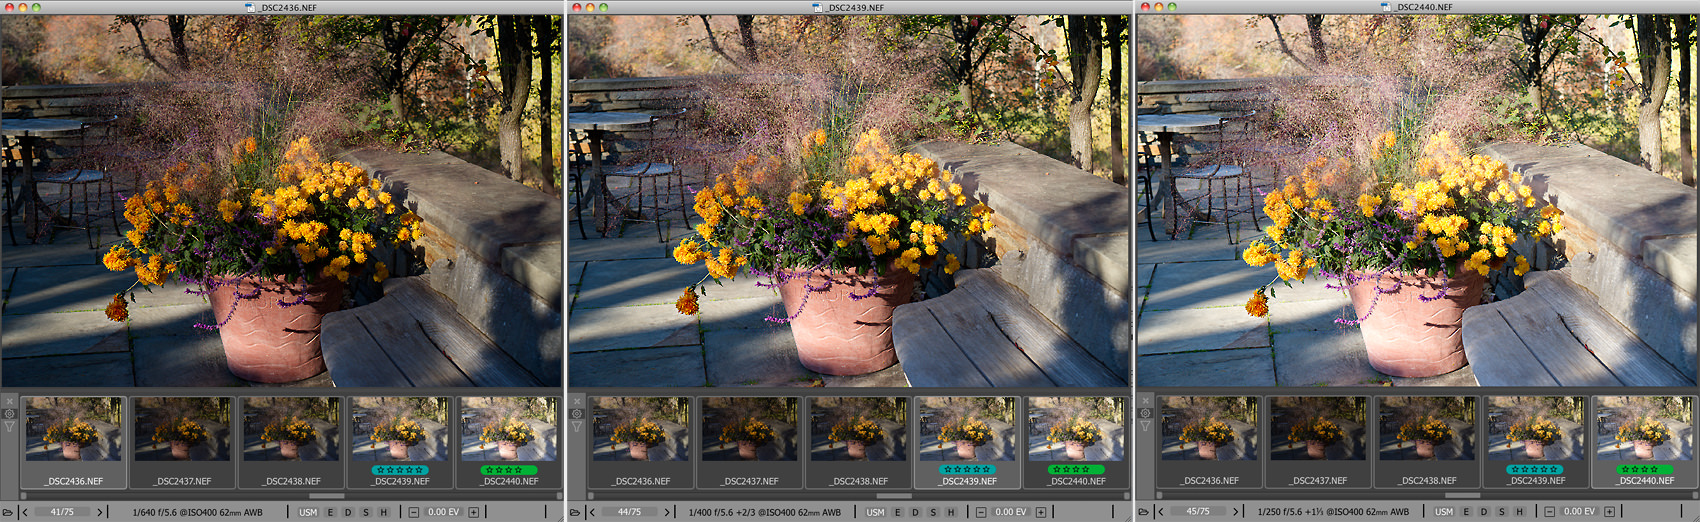 Figure 5. Series 2436-2440: the images shown are 2436 (autoexposure) – left, 2439 (+2/3 EV) – center, and 2440 (+1 1.3 EV) – right
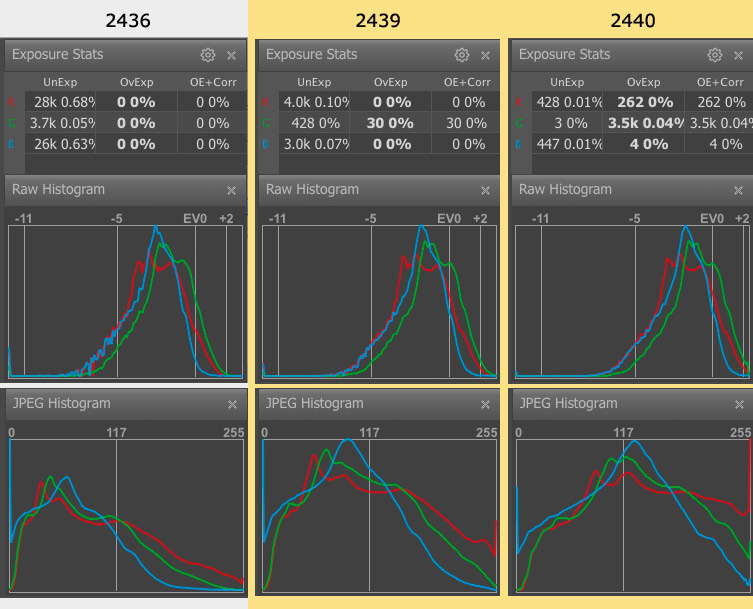 Figure 6
The histogram and RAW statistics show that shot 2440 is exposed almost perfectly, however the histogram for the embedded JPEG insists that it’s underexposed in all channels and is VERY underexposed in the blue channel. The same situation is visible with shot 2439. So much for trustworthiness of JPEG histogram! Depending on the how the image is going to be displayed (in terms of size, media, etc.), and the quirks of the converter being used, one could choose either of the two shots.
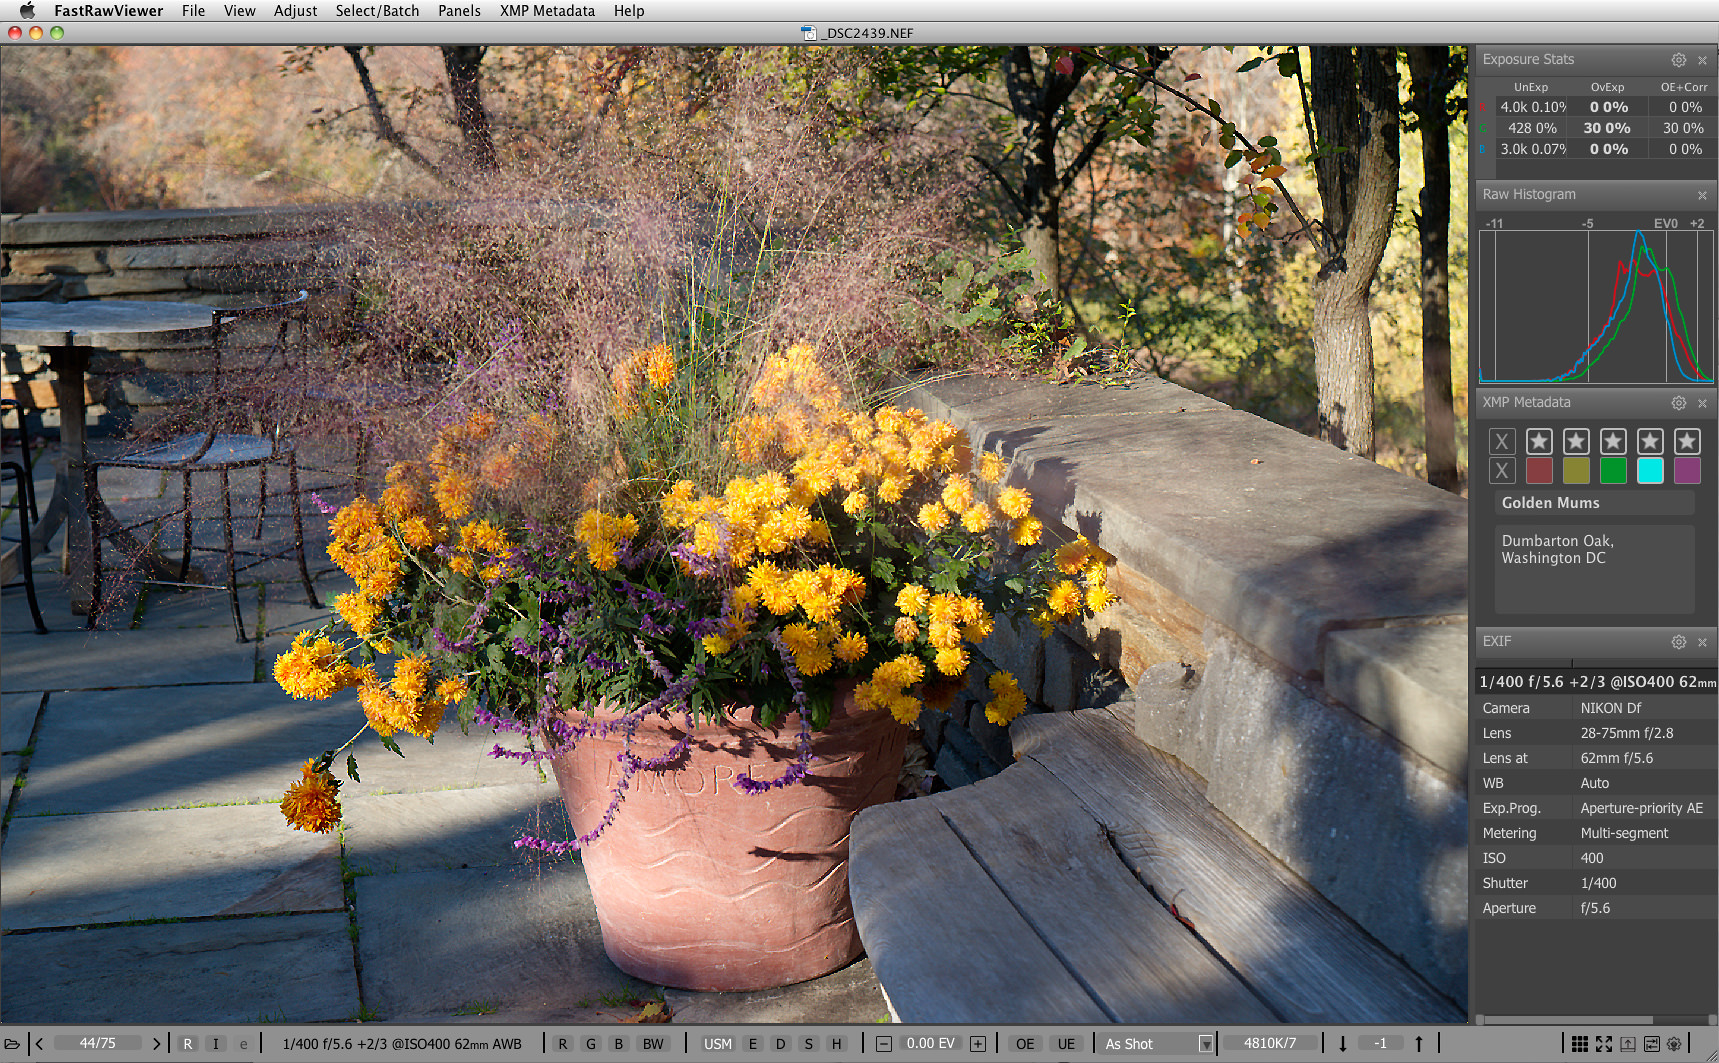 Figure 7
We chose 2439, because we wanted to preserve as much details on the illuminated chrysanthemum petals as possible (those areas that were blown out in shot 2440) and didn’t want to risk those details being poorly reconstructed in a converter. However, as we noted above, depending on the circumstances of conversion and display, shot 2439 could also be chosen.
Furthermore, sometimes the shot picked out of a bracketed series wasn’t the one the exposure of which was the best technically speaking, but rather one that was a bit “over” or “under” exposed, because it better reflected the moment or the photographer’s analysis of the scene. In many places that trained pro photographers, the iron-clad lesson used to be that one always bracketed, even with large format and expensive film.
With the development of digital cameras having the screen on the back, photographers got the idea that the problems that came into being on film cameras were a thing of the past: one no longer needed to take film to be developed to see just one photograph – now, one could look at the camera screen, instantly see the image, and understand whether the exposure was correct or not. This led to the idea that bracketing was unnecessary.
However, let’s consider a situation where you’re not shooting in a studio, but rather in a crowded or uncomfortable place, with changing light, changing scenery, etc. Instead of shooting, shooting, shooting, and then later looking at the images, you’re taking one shot, looking at the screen (damn, the sun has completely covered everything up and you can’t see anything, have to turn or move, which means the composition is now lost and needs to be found again), you’re being pushed around by people walking past you, you’re trying to understand what part of the exposure isn’t what you want, you’re frantically moving the various settings, and finally having set everything “just right” you realize that the scene is gone – the crowd left, or the opposite happened and a crowd blocked your view of something, or the light is different, or that pretty bird flew away… While you were looking at intermediate shots and changing settings, nothing was left to be photographed. When shooting, it’s better to not take away your eye from the viewfinder and have it ready to shoot, not to be in playback mode.
And now let’s remember the sad fact that photographers (and even then, not nearly all) only recently began to realize, that the camera screen shows an already-processed in-camera JPEG and its histogram and not raw, and that the difference between a raw histogram and a JPEG histogram is quite dramatic. Judging one by another is close to impossible, and “optimal” exposure for raw and “optimal” exposure for JPEG almost never coincide and can differ by a stop or more.
Even if by some miracle you manage to quickly judge the quality of the in-camera JPEG by the screen of the camera, and very quickly correct the exposure according to what you saw, the correctness of the exposure of the raw image is still going to be suspect.
 Figure 8. Series 2461-2465. The images shown are 2461 (autoexposure) – left, 2464 (+2/3 EV) – middle, 2465 (+1 1/3 EV) – right
For this scene, we’re going to choose the shot with completely preserved highlights on the elements of the scene that we deem to be the most important – the bright chrysanthemums. It’s easier for a converter to deal with restoring highlights in the sky, than trying to restore small illuminated details that got overexposed.
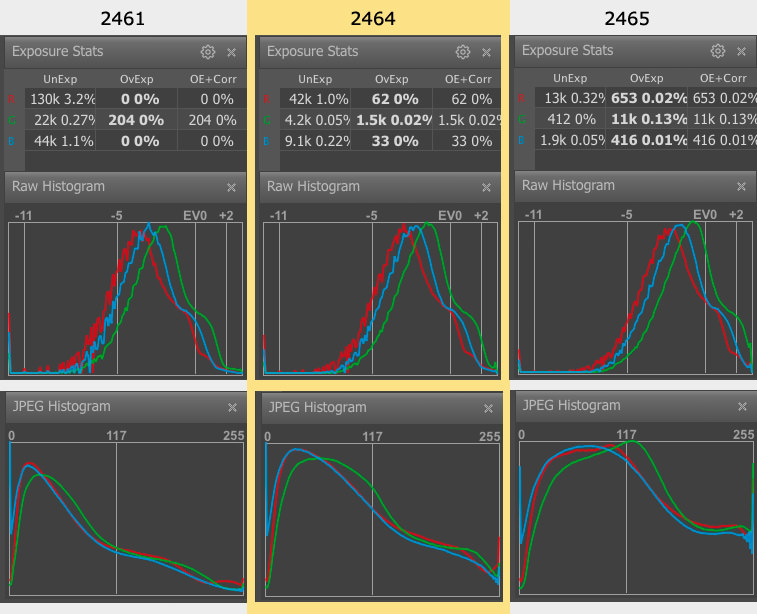 Figure 9
The details on the chrysanthemums in shot 2464 are completely preserved (though the JPEG histogram shows an impressive amount of overexposure in the highlights).
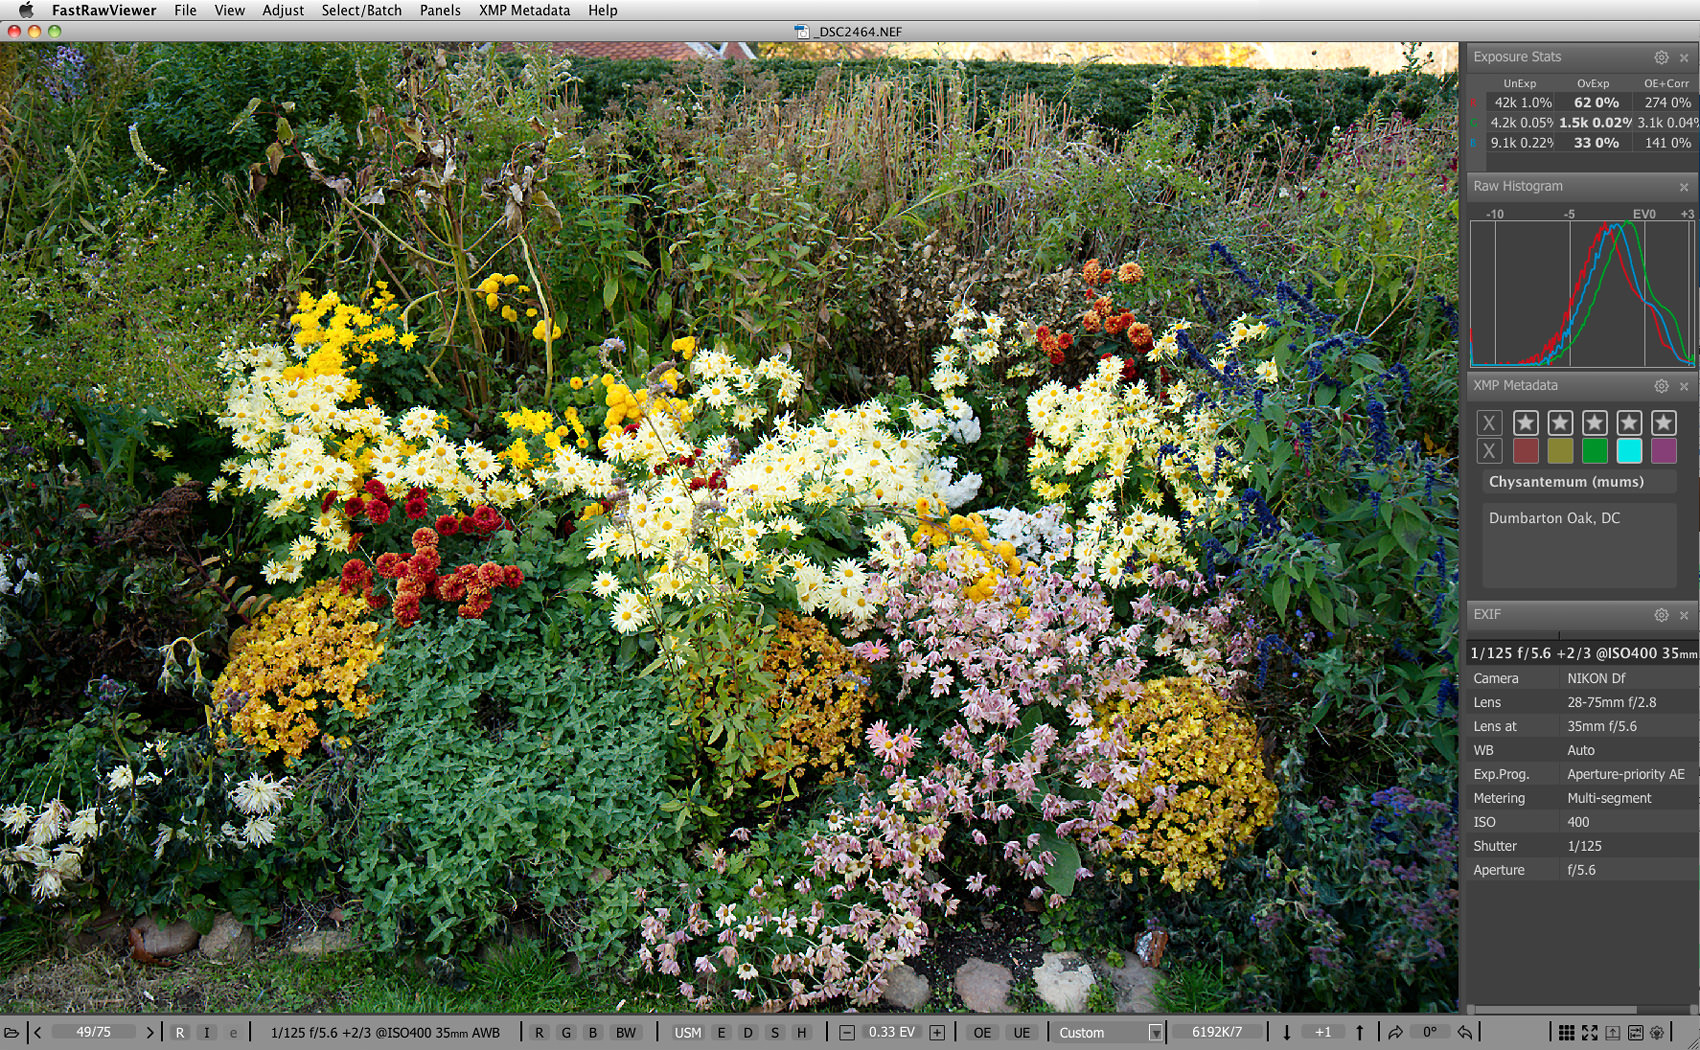 Figure 10
While converting shot 2464, we can apply an exposure compensation of 1/3 EV and not worry about any blowouts at the top-right corner of the image – we were going to crop it off anyway.
Some photographers say that, for their camera, they’ve already calculated the delta between optimal exposures for raw and JPEG, and therefore by looking at the JPEG, they can, considering this delta, set optimal exposure for raw. Unfortunately, this delta can change depending on the ISO setting, the distribution of brightnesses in the scene, white balance, and the colors present in the scene. And this also means that instead of taking pictures, the photographer is spending his time doing math problems in his head and playing with settings.
We sometimes tend to forget that the correctness of the exposure, in the overwhelming majority of cases, can only be judged afterwards, in the comfort of your digital darkroom – for example, all of the highlights are alright, but the shadows are so dark that any attempt to raise them reveals noise, color blotches, stripes. This will only be seen in a converter. Furthermore, different converters deal differently with raising shadows and recovering highlights, and different cameras are differently noisy, and even differently depending on the ISO speed set for them. Another consideration is that those shots that converters can’t deal with today because of their exposure “issues” might become quite doable in a few years – converters with their recovery algorithms and noise reduction methods most certainly progress.
Finally, different noise-suppressing programs have different results, and with different sizes on the display or during printing, the noise can look different. The visibility of the noise is also affected by the texture of the paper. We’ll repeat: exposure can be evaluated when preparing a shot for demonstration, and a shot can’t always be re-taken.
 Figure 11. Series 2401-2405: the images shown are 2401 (autoexposure) – left, 2403 (-2/3 EV) – middle, 2404 (+2/3 EV) – right
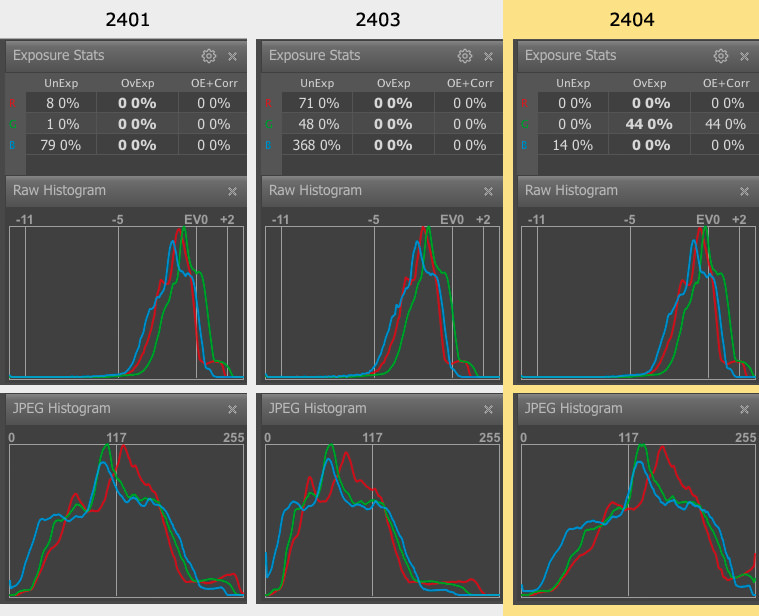 Figure 12
Based on the RAW histogram and statistics, the shot that we like the most is 2404, which is exposed almost ideally to the right (the JPEG histogram, as usual, shows overexposure and slight underexposure).
 Figure 13
Although the last shot in the series (2405, the shot on the right) is exposed much more to the right, we won’t use it because it already has some pretty serious overexposure on the orange, the texture of which it may be impossible to restore in a converter. Shot 2404 can, if we want, have an exposure correction of -1/3 EV applied to it in the converter (shot on the left).
Knowing the light sensitivity of a material isn’t enough to set optimal exposure, because exposure changes for different parts of the scene depending on how they’re illuminated in the scene and the reflectivity of the objects in the scene. The camera’s AI is powerful, but it can’t read minds. It doesn’t know what the photographer’s intention is, and what shadows / highlights in the scene the photographer is willing sacrifice.
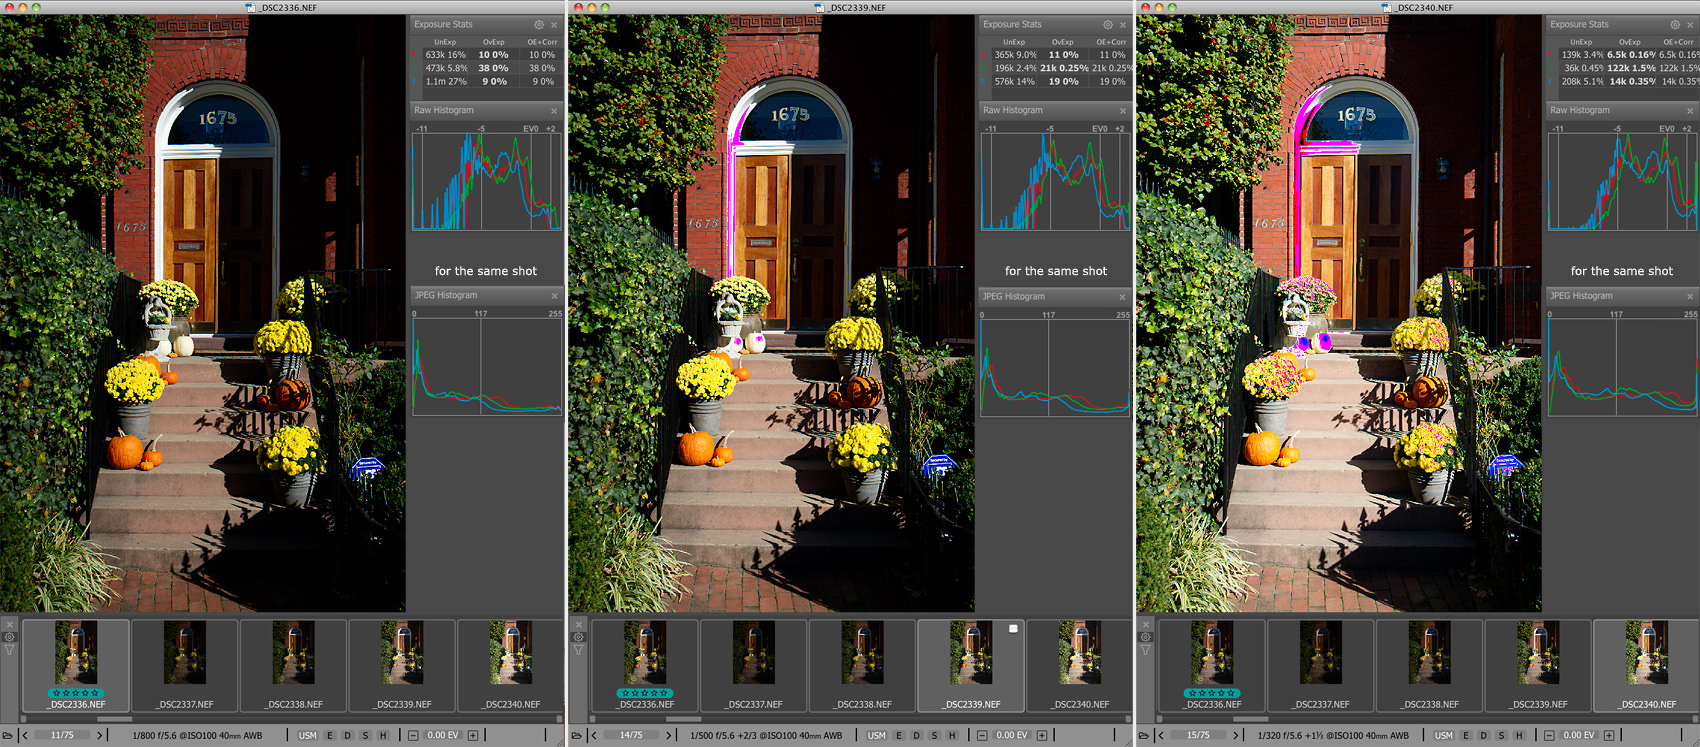 Figure 14. Series 2336-2340: the images shown are 2336 (autoexposure) – left, 2339 (+2/3 EV) – middle, 2340 (+ 1 1/3 EV) – right
Shot 2336 is the best, since the blowout in the highlights in the other two shots turns to the doorframe into a white stain; camera LCD may show the shadows as being completely plugged, however it is not the case.
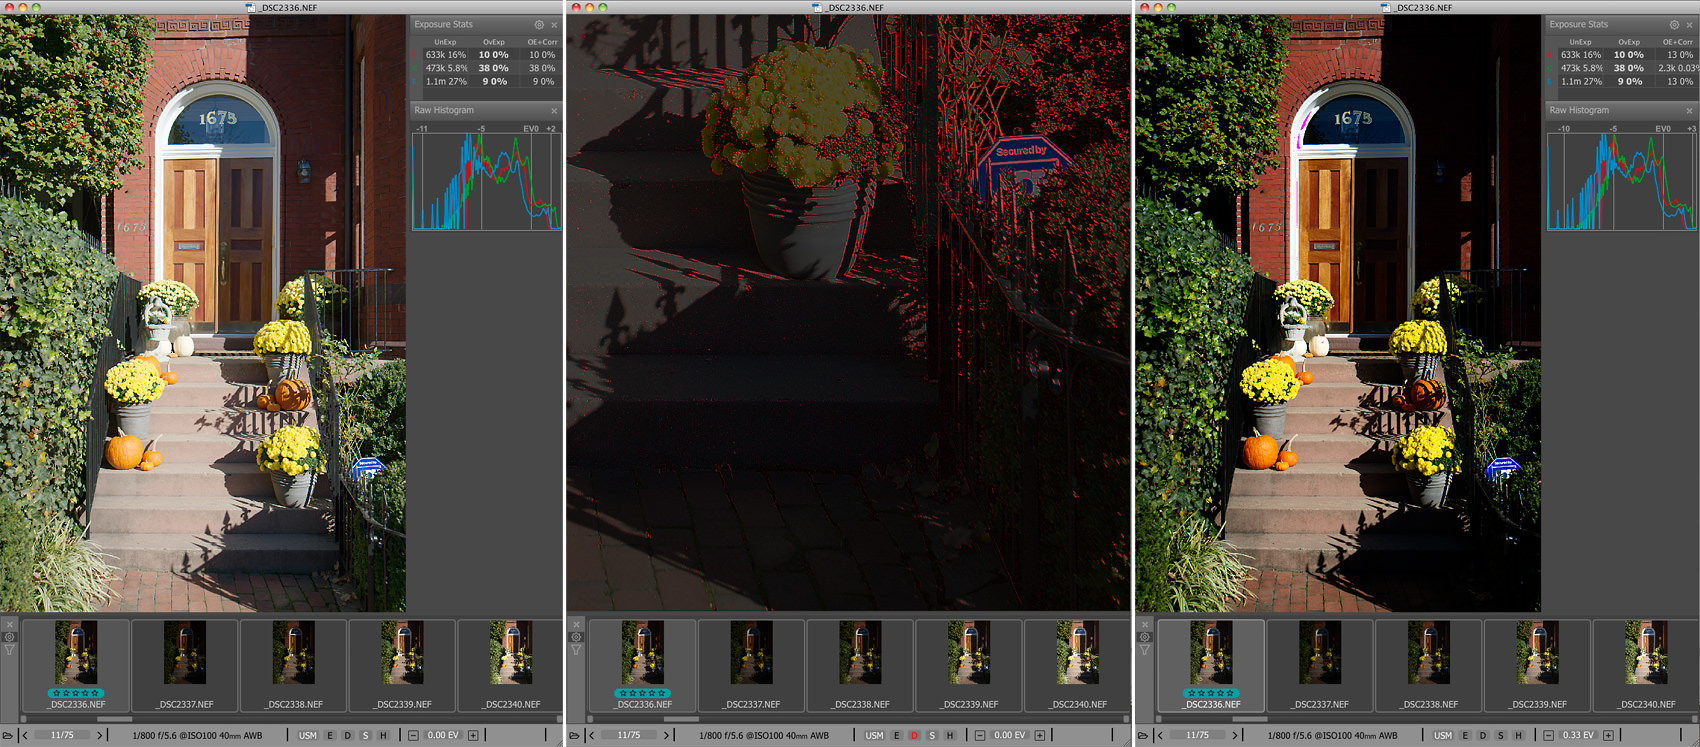 Figure 15
Shot 2336 – Shadow Boost lets us see that the details in the shadows are well preserved (shot on the left), Focus Peaking shows us that the shadows in the foreground have no noise (shot in the middle), and an Exposure Correction of 1/3, preformed during conversion, will not cause blown out highlights (shot on the right).
In general, for scenes like this, it makes sense to put a bracketing step that’s a little smaller – around 1/3 EV. However, again, during a shoot, you don’t know how the converter that you’re using today is going to recover highlights and decrease the noise in the shadows, much less the one that you’re going to use in the near future. Therefore it’s a good idea to not throw out slightly overexposed images. Furthermore, while converting and editing with the use of the “crop” tool, often one manages to remove problematic parts of the shot.
 Figure 16. Series 2361 – 2365: shots shown are 2361 (autoexposure)- left, 2363 ( -2/3 EV) – center and 2364 ( +2/3 EV) – right
In this series, we’re still looking for the shot with the most preserved highlights in the sky.
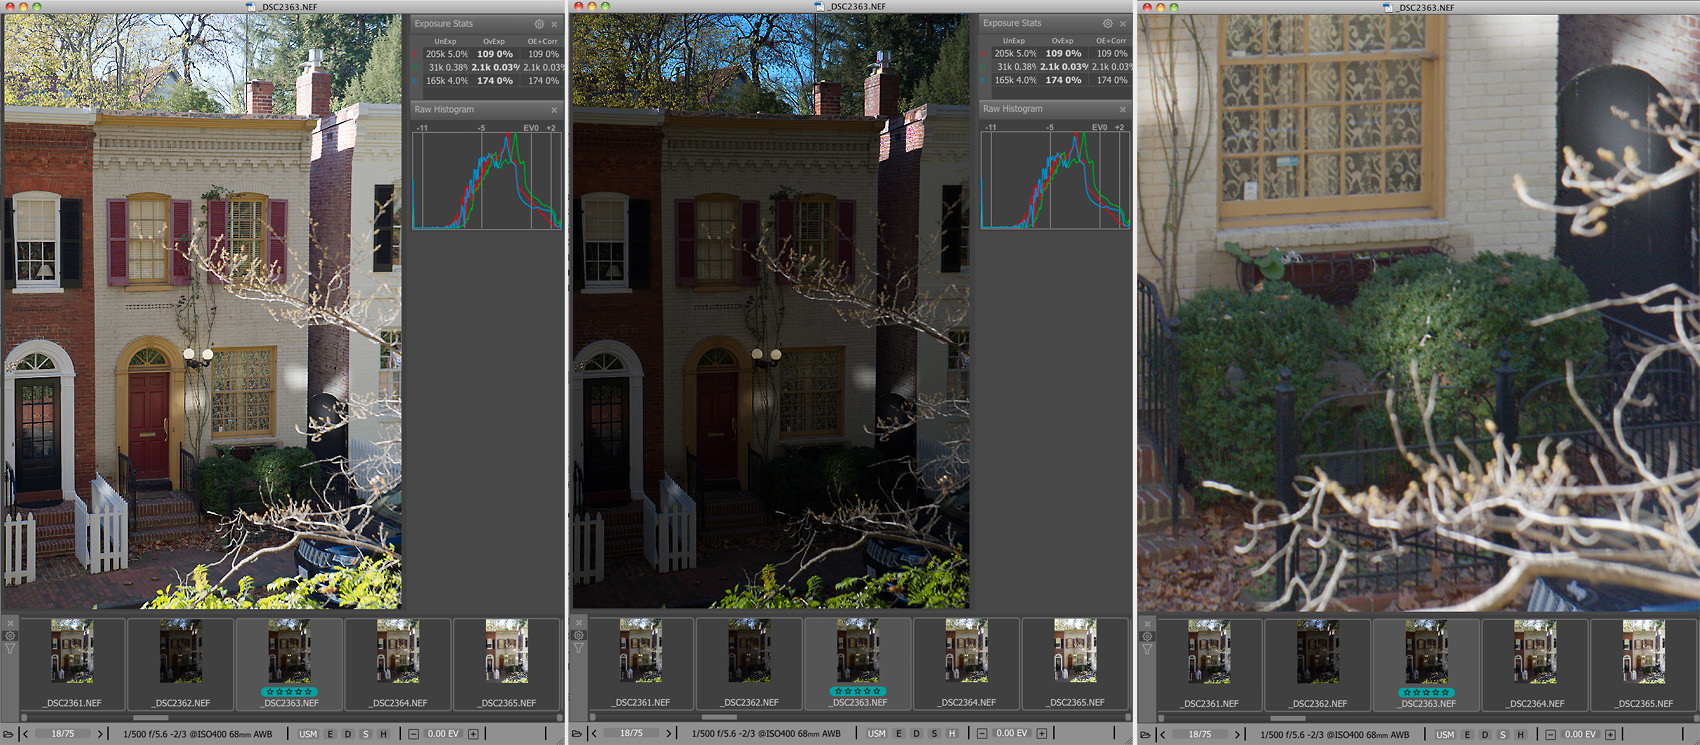 Figure 17
2363 is the best, Shadow Boost allows us to see that the shadows have enough details (shot on the left) and that even in some of the deepest shadows there is very little noise (shot on the right). Highlight Inspection confirms that all of the details and highlights in the sky have been preserved.
The problem of exposure becomes especially unpleasant when the dynamic range of the scene doesn’t fit in the useful dynamic range of the camera. How do we find this out? Some would say that it’s obvious! All we need to do is measure the entire scene with the spot-meter (preferably the one in the camera) and calculate the difference between the minimum and maximum values. If it’s less than the useful dynamic range, you can confidently set the exposure about 3 stops above the spot-meter’s maximum value. Indeed, that works. But what if the range of the scene is more? Furthermore, try performing this exercise and realize how much time it takes (camera manufacturers, we’re looking at you – you could give us the results instantly, it’s known inside the camera, but why exert yourselves eh?).
 Figure 18. Series 2531-2535. OE Indication shows the change in the overexposure in the highlights
As a rule, scenes with a dynamic range that exceeds the dynamic range of the camera and are similar in composition to the photographs below require careful treatment of the highlights. Blown out highlights ruin the atmosphere of such a scene. If there are thin, dark details in the foreground of such highlights, they lose their shape and turn into a mess. As regards to shadows, when making shots such as this one must know their camera and their converter very well, to understand what level of “underexposure” in the shadows will allow one, after conversion, to get shadows with a minimal amount of noise. And of course, it all depends on the size of the shot and the medium on which you’re going to demonstrate it.
 Figure 19
Choose 2532 (-1 1/3 EV) with the least overexposure in the sky. Shadow Boost – there are details even in the deepest shadows, and not much noise is visible (two shots on the left); Focus Peaking – all of the shadows have well-developed details (shot that is third from the left, green overlay represent in-focus detailed areas of the shot)); Highlight Inspection – the sky is completely preserved (shot on the right).
In reality, optimal exposure is the exposure that allows you to preform the conversion of the shot with sufficiently high quality.
The job of a photographer doing exposure bracketing is to decide whether or not they should correct the auto exposure, and if so, by how much, and what bracketing step and spread they should use. Furthermore, it sometimes makes sense to increase the ISO.
The following series is the one where we got involved in the shoot. It was quite obvious that this scene has a very high contrast, so we were sure that autoexposure won’t be a good start at all. That is why we advised to use negative exposure compensation on the camera, -1EV, and it started the bracketing series from that point, resulting in a series -1EV, -2 1/3EV, -1 2/3EV, -1/3EV, +1/3EV. Note, that for some scenes exposure compensation on the camera might go down to -2EV.
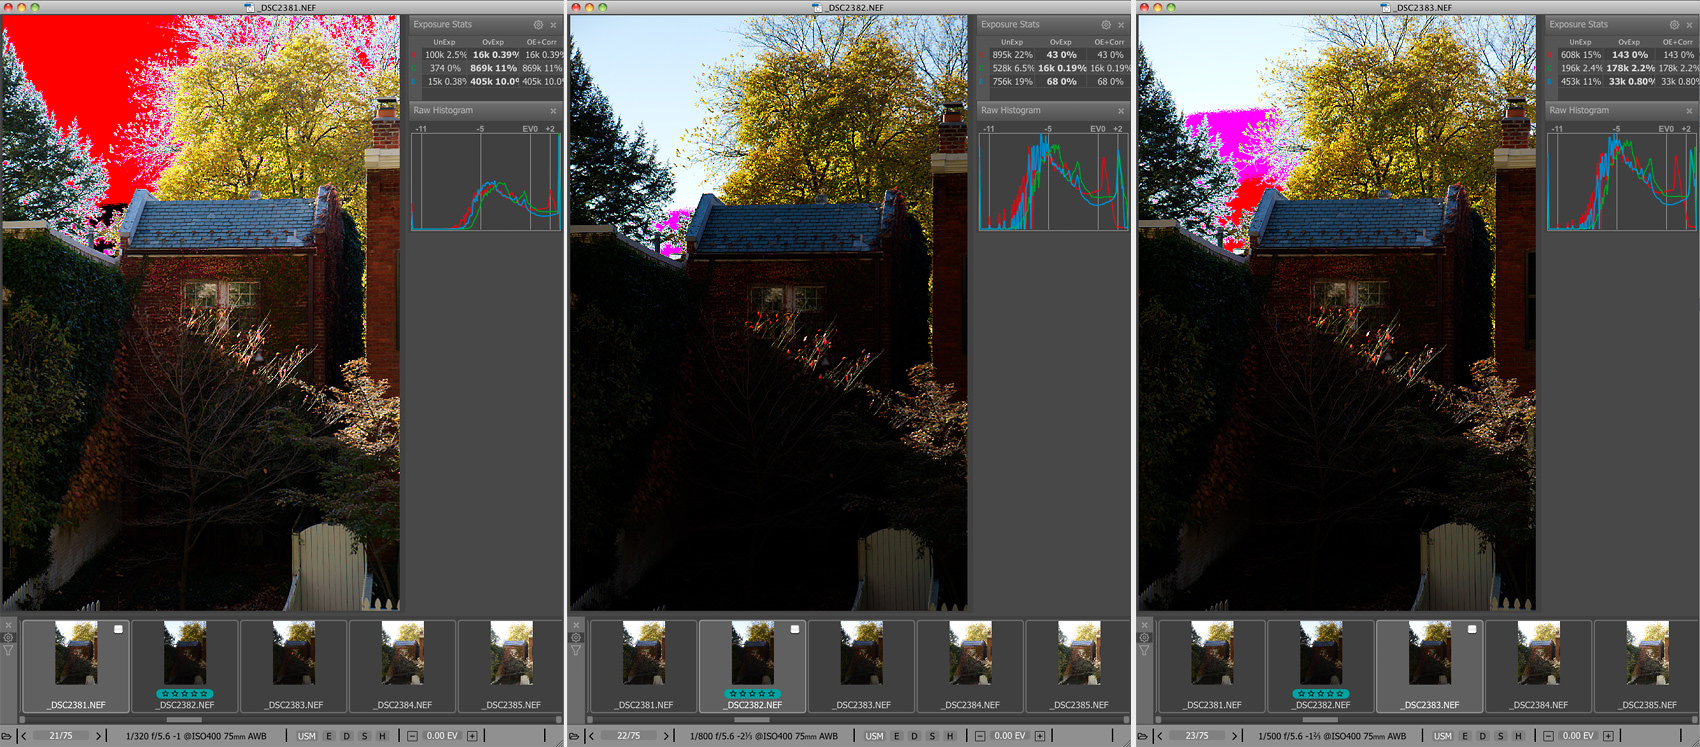 Figure 20. Series 2381 – 2385. Shots shown are 2381 (autoexposure – 1 EV) – left, 2382 (autoexposure – 1 EV – 1 1/3 EV) – center and 2383 (autoexposure – 1 EV – 2/3 EV) – right
We are looking for a shot with the most preserved highlights in the sky. 2382 is the best in this series, but the exposure value is equal to autoexposure – 2 1/3 EV.
 Figure 21
Once again Shadow Boost (we have increased its amount in Preferences) shows that even deep shadows are not so noisy (right); Focus Peaking confirms that we have a lot of details in shadows (center), and Highlight Inspection demonstrates that our highlights are quite safe.
We would like to bring up one last argument in favor of exposure bracketing.
Almost all modern cameras have some bracketing mode. We find it doubtful that camera manufacturers have great nostalgia and include (and even improve) this mode just to follow the tradition and for the sake of their deep respect for their old film cameras. Furthermore, many manufacturers ardently suggest using bracketing on their websites, both as a technical and as an artistic move. This is one more piece of evidence that there is no magical recipe for setting “correct” exposure for any scene while shooting. And no matter how much you may want to turn to yet another “expert” that suggests that his particular batch of serpent-derived animal byproduct will guarantee that long-expected miracle to happen and you will reach those perfectly set “correct” exposures for every shot, remember that maybe it’s not worth it to forget and replace the tried-and-tested proven method of guaranteeing good results, namely exposure bracketing, with some weight-loss-supplement science-seeming-but-actually-wrong methods and suggestions.
And don’t depend too much on the image on the camera back. Culling based on embedded JPEG (whether during the shoot or after it), as we have shown many times both in this article and prior, can be and usually is very, very unreliable. And the saddest thing is that, as Murphy’s Law dictates, it will definitely fail you right when the shoot was the most important for you and can’t be re-taken.

About Iliah Borg
Iliah Borg has been involved in photography since the age of 6. His Father and his grandfather were professional photographers. He is the co-author of the RawDigger software, a RAW image analysis tool.
Comments
-
Excellent practical examples, Iliah
… and this article doubles as a great tutorial on usage & virtues of FastRawViewer.
-
I bracket all the time to get the best shot, and, if I do it well, I get a high dynamic range image! It’s a no brainer.
-
I agree, when in doubt bracket. I am always in doubt so I always bracket (if I can).
There are multiple options for bracketing:
Aperture priority, fixed ISO, variable shutter,
Aperture priority, auto ISO, variable shutter,
Shutter priority, fixed ISO, variable aperture,
etc, etc, ……….
Manual aperture, manual shutter, auto ISO.
I believe there is only one correct way and a couple that are definitely wrong. It’s your article, how should bracketing be done?
Questions. Why is a raw histogram not an option in LR or PS(ACR)? Why is a raw histogram not an option for the display on the back of a camera?
- Dear Dave,
Setting exposure starts with maximizing it, that is with opening the aperture as much as it is reasonable (taking into account depth of filed, background blur, resolution, diffraction, flare) and setting the shutter speed as low as, again, reasonable (considering camera shake, motion blur, wind being too often forgotten, panning, special considerations for shooting special subjects and scenes). Next, one sets ISO as high as reasonable, keeping in mind the point of ISO invariance (that is, the point where increasing ISO does not result in further decrease of noise) and that on many cameras ISO clips the highlights, stop per stop; that is ISO 400 boosts the raw data 2 times compared to ISO 200, and the upper stop present in ISO 200 shot is now gone.
Aperture priority, fixed ISO, variable shutter — mainly when I need to maintain depth of field and resolution (used for the article above, rather typical for shooting outdoors, except for sports or fast action).
Shutter priority, fixed ISO, variable aperture — mainly when I need control motion blur / camera shake (fast action is an example where I want fast shutter speed, geyser is an opposite, slow shutter).
Manual aperture, manual shutter, auto ISO — that, mostly, when light is low (or, in other words, ISO is supposed to be 800+, 1600+, 3200+ – depending on the camera I use, based on the experimentation, for a shortcut please see www.photonstophotos.net/Chart…Shadow.htm ), and aperture / shutter speed combination is already at the limit, set to allow for maximum exposure. I use it with -2 EV exposure compensation on a camera.
Of course I do not have a definite answer to your question, my guess is that they underestimate the intellect of photographers, and we have thousands of FastRawViewer users to suggest that raw histogram is within the comprehension of general public.
-
Thanks for your reply.
Have you considered offering a plugin for Lr that would display a raw histogram? I use FRV but it would still be useful to be able to see the raw histogram in Lr.
Reply 04. Hi Iliah
One further question. Can HDR and Panorama work together without creating problems ?
regards
Luc
- Dear Luc,
photographylife.com/on-co…nd-sensors – the shot is a bracketed panorama.
Reply 05. Although I agree with bracketing in principle, I think that small amounts (like +/- 1ev) might as well be done in post. My usual approach is to retain highlights, and spot meter on a cloud or the like and set exposure to +2.5 – 3 ev. The image looks underexposed, but i correct in ACR .
One area of exposure is tricky when highly saturated colors are involved (or even worse, fluorescent colors like yellow or orange).
- “One area of exposure is tricky when highly saturated colors are involved (or even worse, fluorescent colors like yellow or orange).”
That is actually two areas, which are both tricky, but for different reasons:
1. Photographic light meters are photometric[1] light meters, rather than radiometric meters. Whenever a photometric meter is used in conjunction with a radiometric sensing medium — consumer-grade chemical photographic films and digital camera sensors — it will inevitably result in over-exposed/clipped highlights of all objects that have strongly-saturated colours that spectrally lie far from the peak photometric sensitivity of human vision (green).
2. “fluorescent colors like yellow or orange” are way beyond the colour gamut capabilities of: sRGB; Adobe RGB; CMYK; and every form of printing that does not possess fluorescent inks/dyes.
Reference [1]
“Photometry is the science of the measurement of light, in terms of its *perceived* brightness to the human eye.” — Wikipedia.
- Dear breivog,
IMHO 1 EV is a bit crude. In the article I suggested the step of 2/3 EV, this allows to get the exposure into ballpark, with about half a stop error. After some practice one can reduce the series to 3 shots, but for novices I suggest 5 or 7.
Exposure can’t be changed after it happened in the camera. The control in converters that you refer to is in fact ISO control (that’s what ISO speed setting does, in a camera or in a converter, does not matter, same principle – it controls lightness in a linear fashion). True negative compensation in a raw converter is possible only if highlights are not clipped. Positive compensation in converter results in less quality in shadows (visible noise, artifacts, resolution drop).
As to spot-metering from highlights, I’m a big fan of this method; there are caveats to it however, first of which is that you need to take into account that exposure meter in your cameras may change the calibration point depending on camera settings: ISO and dynamic range, mainly; and it often changes between cameras, even of the same brand. When I have time to carefully spot-meter, more often when not I have time to bracket too.
Reply 06. Hi Iliah
Great article. I use multiple images for landscapes preferably 5 because of the problems of hand-holding the camera for more. As you know from +2 Ev to -2 Ev, the five separated each by 1Ev the speed ratio is 16:1 with a minimum speed for the 0Ev at 1/60 sec for a low speed of 1/15 sec for +2Ev using my Tamron 15-30 F2.8 at 15 mm F8. Using that 1/60 sec the max speed at -2Ev is 1/240 sec. Theses speeds are very manageable.
In your answer at 6.1 . Using 8 images out of 9 all separated by 1 Ev on my D750, the speed ratio is now “128” (1/(8X16)). For instance if I want to have my +4Ev speed at a min of 1/15 sec, the min OEv require a minimum of 1/240 sec and for a -3Ev of 1/2000 sec. Because the D750 is limited to a max speed of 1/4000 sec, its easy to see that the max 0Ev speed is at 1/480 sec. The worst problematic is this camera is slow, it will take close to two seconds to take 8 images in RAW plus all the alignment image problems in HDR. Is there an easy solution to this problem other than using a heavy cumbersome tripod.
Regards
- Dear Luc,
The only thing with bracketing for HDR that may reduce the number of shots to be blended that I know of is doing it in pairs, spread by 4 EV. If one is not very sure of the exposure starting point, he can take several pairs, and chose the right one.
If you remember Fuji S5 camera, it has pixels in pairs, with the effective diameter ratio of 1:4 for “low” and “high” sensitivity pixels (pixels were the same, actually, a sensor with irregular pixel sizes would cost a fortune, but the aperture in front of them changed). 1:4 diameter ratio results in 1:16 light collecting ability. Results from Fuji S5 are quite good in terms of dynamic range, so I think my “4 EV apart” is not far from the truth.
-
Thanks for responding so quickly
Your solution of taking them in pairs does it means using only 2 shots ? what do you think of using 3 shots as below.
1- In bracket mode (3) with the first one shooting for the ETTR (highlights: spot metering +2.5Ev) camera set in manual mode , followed by +2Ev and +4Ev (shadows)? (please explain with an example)
2- With 2 shots does it means the first at ETTR (highlights) and the second at +4Ev (shadows)? (note that in Brkt mode the max between shots is 3Ev on D500-750)
regards
Luc
    - Hi Luc,


      If you don’t want to lug a heavy tripod, I’ve found that using a monopod, or a beanbag-type cushion placed on a suitable rock, wall, railing, etc., allows me to use much slower shutter speeds than when hand-holding a camera (even with VR lenses).


      The limit to what can be achieved using exposure bracketing for HDR photography is the contrast ratio of the camera lens itself. Even the very best lenses suffer from lens flare, which consists of two main artefacts: veiling glare \[aka: overall haze\]; and ghosting.


      Furthermore, HDR landscapes are ultimately limited by atmospheric effects, such as light scattering due to water and other molecules suspended in the air \[haze\], and heat shimmer \[the continually changing refractive index of air due to turbulence as heat passes through it\]. The heat shimmer effect in photography consists of both a static and a dynamic component. The dynamic component causes increased blurriness as the shutter open time increases.


      Apologies if you already know these things. For the readers who don’t: these are the very reasons why the Hubble Space Telescope (HST) uses mirrors rather than lenses, and it was launched into the airless vacuum of space. These two things provided the HST with the ability to capture extreme HDR images of the universe.


      [Reply](https://photographylife.com/when-in-doubt-bracket#comment-227999)


      - Hi Pete

        Thanks for the infos. It is why I take pics of landscapes mostly in fall, and I use a polarizer. Its true that the atmosphere such as humidity plays a major role in the quality of landscapes we take. New softwares tools such as “Clearview in DXo” or “Dehaze from Prolost (LR Presets) ” help greatly in such bad environment, without being a substitute for perfect conditions.

        Pete its not always possible to find something to lean on during shooting. I have tried a cheap monopod without success. Maybe a better one would help me greatly.

        Thanks again

        Luc

        lucp.smugmug.com


        [Reply](https://photographylife.com/when-in-doubt-bracket#comment-228011)
    - Dear Luc,


      Yes, you can get away with 2 shots, try it, one for highlights, and one for shadows. 3EV spread should be close to what the optimum for D750 is, because D750 exhibits slightly more in-chamber flare than usual, this limits the linearity, especially in shadows, and complicates tonemapping.


      [Reply](https://photographylife.com/when-in-doubt-bracket#comment-228000)


      - Iliah

        I will take your advice shortly

        Thanks again

        regards

        Luc


        [Reply](https://photographylife.com/when-in-doubt-bracket#comment-228013)
-
Rather complex but very well researched/written article. It requires lot of work to publish this type of material.
I understand the concept of bracketing. However would like to know what is the adequate # of shots and at what +/- range?
How do you determine the settings. May be it is all based on your experience. Thank you Mr Borg.
- Dear Narendra,
The way I set the camera for this article works most of the time, 5 bracketed shots, 0, -1 2/3, – 2/3 , 2/3, 1 2/3. The starting point is shifted through exposure correction on the camera, -1 EV for a high contrast scene (like the one on fig.20), where you can hardly make out details in shadows when looking at the scene, and -2 EV when the light is very bright to the point where you want to put on sunglasses, but the scene has plenty of contrast, like it is sometimes on a beach.
Reply 08. Dear Mr. Borg,
Thanks very much for your well written article including the graphics. The title was well chosen – When in Doubt, Bracket!
I’ve used the bracket feature on my camera a couple of times, and while it has up to nine settings I never found it that useful, other than playing around with photo merge in software. But that’s about it. Now most of the time I get the results I want without bracketing, and maybe I might need to use fill flash, or filters (ND and polarizing). After 100,000 shots on my Nikon D4S I think I know the camera, what it can do and what it can’t do. You should know your camera inside and out. And I think a lot of it comes down to experimenting, trying new things and yes, making lots of mistakes. For example, what metering mode are using on a particular shot, that does make a difference. I’m sorry, but I think unless you want to use bracketed shots for photo merging you’re basically getting a bit lazy.
I always read these stories on the Internet about photographers that go on a one week trip and come back with 8000 shots! I think they must bracket every shot, hope for best and move on…
- Dear Mr. Brindle,
Knowing one’s camera inside and out can be tricky. When you go from ISO 100 to ISO 1600 on your D4s, how would you characterize the change in shadow noise?
-
That’s a good question Mr. Borg. Actually I never go above 800 ISO, however I’ll give it a try and let you know how the camera performs.
Reply 09. When in Doubt, Bracket! ===> No, when in doubt, use a hand-held light meter, Sekonic or other.
Don’t spray (read: bracket) and pray, instead do it right the first time.
- You are aware of the fact that camera calibration for raw is different from the calibration of hand-held meter, and that camera calibration often changes with ISO setting, right? How about 1 stop difference in calibrations?
-
Quite aware, yes. That is why one should calibrate the meter and the camera together, using the Colorchecker Passport or some other such color chart. The free DTS software provided by Sekonic allows one to do just that, so that the meter knows how the camera “sees the light”.
- Dominique_R,
Please tell us, precisely (using independently verifiable empirical evidence), how a Sekonic meter plus DTS software can so accurately meter a scene — such as depicted in Iliah’s article — that it renders redundant the need for exposure bracketing.
-
Dear Pete,
I found DTS software to be a huge time-saver when setting up a video shot, but not so much if the video camera is capable of recording video in raw, or when shooting stills in raw.
- Dear Iliah,
In the past, I was sometimes given photography assignments by clients who needed the camera JPEGs immediately after the event. I managed to complete the assignments by relying on Nikon Matrix Metering for most of the shots, and by using an incident light meter for the difficult shots. My decades of experience with reversal film [aka slide film] served me quite well.
Your reply has reminded me of a particularly difficult event that caused me to seriously wonder if I should’ve purchased a Sekonic meter with DTS software.
As always, thank you very much indeed for your superbly illustrated articles and for your replies to the readers.
Best wishes,
Pete
Reply - Dear Pete,
Instead of obeying your slightly aggressive diktät, which is formulated in a manner not especially to my liking, I will advise you to watch a couple of the many tutorials on the subject that can be found on Youtube or other similar services. I found those hosted by Joe Brady to be particularly illuminating. Why not try with, for example, “Webinar Mastering Exposure for Landscape Photography”?
- Dear Dominique,
If you do not agree with the factual, scientific, clearly illustrated article, and subsequent comments, written by Iliah Borg, then don’t be surprised when someone challenges you to provide scientifically peer-reviewed evidence of your counterclaims.
“What can be asserted without evidence can also be dismissed without evidence.” — Christopher Hitchens.
en.wikipedia.org/wiki/…%27s_razor
Please do not take my comments personally: facts do not possess emotions.
Reply - Dear Dominique,
As you can see here photographylife.com/how-t…our-camera I have L-758C Sekonic, and of course I compared DTS calibration to what I can get using bracketing and/or spot-metering from highlights.
DTS software analyzes JPEG files, while approach to exposure for raw and JPEGs is seriously different.
In any case, I saw very few novices eager to spend money on DTS-compatible lightmeters, targets, and, most importantly, capable of setting up a target shot evenly lit and with minimum flare, which is very important for proper calibration through DTS.
- Bracketing, meters, etc are obviously just tools. And which tools you use depends on the how you assess the shooting situation. For example, bracketing is so valuable when shooting wildlife! (try holding that meter).
Reply 10. A couple years ago, I visited Yellowstone in February and after hearing about all the problems with exposing for snow, I decided to just bracket every scenic in the entire trip. My D810 was able to accurately expose the majority of scenics, and those that it didn’t, were either blended or I selected the over or under image. It’s amazing how I got a few images where the improperly exposed image looked better than the properly exposed image.
-
While I see the wisdom of setting my camera to bracket mode (as a default) for landscaping and portrait, I don’t think that’s possible for action shots, even if modern cameras give us 5 or even 10 fps. Those fps are used to capture different stages in the action, and if exposure bracketing is thrown in as a requirement, we’d need 30 fps. We than approach video speeds. Forget using DSLRs for action stills.
- Dear KL,
Not saying bracketing is ideally suited for action shots. As to frame rate, it goes up. Olympus E-M1 II allows for up to 18 frames per second in continuous AF/AE mode with electronic shutter, and for 60 frames per second with focus locked.
Reply 12. When in doubt, Bracket and HDR.
-
Very interesting article Iliah, thanks! In practice, bracketing is only feasible in certain situations, but you make a very good case to use it whenever possible. And as an owner of FastRawViewer, I have no excuses to not bracket if the subject allows for it…
- Dear Greg,
Yes, bracketing is not always possible, same as high speed continuous shooting. But (oh, that “but”, sorry ;) here is the thing. In my experience, working in my 20s in what is now called minilabs, and owning a few of those later in my life, most of the ruined shots were ruined because of the exposure. Next reason was motion blur, and the last one was misfocus. We discussed “acceptable exposure” with my colleagues, because ruined shots were driving our profits down: naturally, folks do not want to order prints from bad negs. The article above is essentially a rendition of our booklet which we were handing out to everybody getting film from us, and it worked pretty well.
Reply 14. Great article, thank you! I’m about to try a different convertor (I think it’s ‘RPP’) as well as Lightroom to see if I can get improved quality and workflow performance from Fujifilm raw files. Any views/tips in that direction?
In terms of quality, is a better outcome achieved by use of establishing the best exposed single shot and suitable post-processing, or by ‘HDR’ merging ?
- Dear Pete,
RPP does not apply hidden exposure compensation. Because of that, the same shot opened in RPP and Lr will have different brightness. RPP is much slower, because it works without cutting any corners, and in very high precision. RPP does not make any changes to preview even if you change the controls, until you hit “Apply” (Cmd-R). RPP encourages to use numbers input, not sliders. It’s a different philosophy.
When I bracket for HDR, I start with setting the exposure manually, according to the in-camera spot-meter readings from important highlights (like clouds or white water, whatever is brighter), and dialing somewhere between +2 and +4 EV exposure compensation on my camera.
The exact compensation value for the first shot depends on the camera and sometimes on ISO setting, +3 EV is safe in most cases, as meters are currently calibrated to about 12.7%, which is 3 stops down from the highlights, or even lower (some are even as low as 6..8%) — FastRawViewer and / or our RawDigger will help you to determine the calibration point for your camera at each ISO, please have a look at www.rawdigger.com/howto…amic-range
The first shot is exposed to preserve details in highlights, ETTR-style. Of course, this is not the optimal exposure for dark shadows. To address midtones and shadows, I take 2 additional shots, +2 EV, bringing noise down and improving the resolution just below midtones, and another +2 EV (for +4 EV total), to capture as much of the shadows as possible. This way I arrive with 3 shot that encompass about 12 stops of usable dynamic range, with low noise and good resolution everywhere.
Not every scene warrants 12 stops, and not every scene allows for HDR (even a slight wind can ruin it). But the first shot will still be usable.
With auto-exposure, bracketing for HDR becomes rather intense. As you can see on fig. 20 above, the compensation to auto-exposure for a shot with properly exposed highlights was close to -2.5 EV; and that amount changes not only with the scene, but also with camera model, metering mode, and in-camera dynamic range settings. Resulting bracketing series for HDR may be quite a long one in order to capture ‘everything’, starting from -3 EV exposure compensation set on the camera and going up to +4 EV. Unfortunately, few cameras allow 8 shots in auto-bracketing mode, and you may want to adjust the starting point based on your experience with the camera metering and your practice in scene evaluation.
-
Dear Iliad
Thank you very much for your reply, that’s helpful. The +EV range you suggest is much higher than I thought, do I shall certainly be following your suggestion on calibration.
-
Dear Iliad
Thanks again for your kind replies, your time and experience is greatly appreciated! I’m hoping you will be able to assist further.
As per your suggestion, I’ve used RawDigger for calibration my Fuji xt-2. It shows 3EV difference between spot-metered exposure and max exp where O/exp is visible in Raw data. It also shows that there is, as you suggested, +3EV will still give fully textured highlights (with another ⅓ for raw convertor). The U/exp @ mid-tone is 1EV (mid-tray being 8.77% – i.e. within the range you were suggesting). Further calculation on O/exp shows the practical limit, allowing for headroom highlights is +2/3EV.
I confess to being slightly confused (its an age thing!). Is this telling me that the safe (i.e. practical limit) calibration of my camera is +2/3EV above metered value, whilst I could add a further +2 ⅓ EV (to achieve the total 3EV) and still have those highlights?
So, if my 1st shot (applying ETTR) was as metered for highlights +3EV, my 2nd could be a further +2EV, and 3rd shot a further +2EV. That 3rd shot would thus be +7EV? (I’m not even sure if my camera can go beyond +5EV).
Have I understood RawDigger’s calibration and your answer correctly?
- I perhaps should have added, I checked the photonstophotos web site following your reference – the Photographic Dynamic Range of the xt-2 shows as 10EV @ iso200 falling to 7EV @ ISO2546 and further (not uniformly, of course!). I’m presuming thats why Fuji have a range of +/-5EV on their exp comp dial. I haven’t yet tested whether I can set 1st expo at +3EV, then +5EV, and see what happens if I try to go beyond that. By which I mean, I could attempt to start @ +5EV and set it for +/-2 EV for its maximum of 3 bracketed shots.
- Dear Peter,
Yes, I think you read me right.
Auto-bracketing may be limited, but it is often possible to go manual.
Initial EV correction set on the camera most of the cases is combined (with respect to the sign) with exposure correction set for bracketing. That is, if you have +3EV set on the camera, it is the new zero, bracketing shall happen around this new zero, and full bracketing range specified for the camera must be available. Unless there are firmware errors, of course…
+7EV you’ve counted is in fact sort of a confusion, because initial +3EV is the “common bias” between midtone and highlights. That initial compensation is called “placing the tone”, we need to place the highlights where they belong, on the top of reproduced tonal values. So, our +7EV are composed of placing the highlights, which is +3EV, and +4 EV exposure correction.
Supposedly, if one meters from “mid-gray”, no compensation is necessary, as exposure system places the midtone correctly. If one meters from the highlights, or from shadows, the exposure system does not “know” that, and the exposure reading is still for midtone. So, we need to apply some compensation that depends on the tonal distance (bias, difference) between the reflectivity of the subject under the meter and the midtone. That is what placing the tone is.
If one spot-meters from the face of a pale-skinned child, +1EV is rather common, because the face is about 30 to 40% instead of 18%, highlights are about 100% instead of 18%. There are 2.5 stops between 18% and 100%: log2(100/18)≈2.47EV. For a dark-skinned model, -1EV exposure may be helpful, especially if it is heavily sweating bold jazzmen. That works well if one shoots JPEGs.
When it is raw, current exposure meters are calibrated to about 12.7% (or even lower), log2(100/12.7)≈3EV. Here is where we get that ballpark exposure correction figure for metering from highlights: +3EV because the tonal distance between midtone and highlights is that value, +3EV. When the highlights are at +3EV, midtone automatically falls in place where it belongs.
-
Aha! Got it, great. Thanks again for your generosity.
- Dear Pete,
My pleasure.
Trying to approach the above from a slightly different angle, a meter (if no extended dynamic modes are enabled on the camera) places whatever is under the meter to midtone.
If we metered from something that is not a midtone, we can compensate the readings to get the correct tone placement back. The amount of compensation (sometimes called headroom in highlights) is the (eye-balled, guesstimated, and/or bracketed) difference between the tone we metered from and the midtone.
In case of metering for highlights, if we went through the procedure to determine the how the camera meter places the midtone in respect to highlights clipping point, we just know that compensation.
Metering from something that is lighter then midtone, one can use positive compensation (meter from the snow, set +2.5 to +3 EV…); metering from something darker, one can use negative compensation (meter from the dark skin, set -1 to -1.5 EV).
Why is it so: suppose we metered from a dark object, darker then the midtone in the scene (this is very important, the “relativity” of the midtone, if the scene is composed primarily of the dark objects, 18% gray card may be close to the higher tones in the scene, it is not a midtone anymore, and if we are attempting ETTR, it is a different story with negative compensation alltogether); meter will attempt to place it to middle gray, but we need it darker, so the exposure needs to be less, hence the negative compensation. Suppose we meter from something bright, same story with the opposite sign: meter places that bright to midtone, but we need it brighter then midtone, more exposure is in order to make it brighter then midtone, and we contemplate positive compensation.
Digital cameras allow to drop ISO instead of using negative exposure compensation to make more room for highlights. That’s why when on ISO Auto mode (but manual exposure) and no time to spot-meter, I have -2 EV dialed on the camera most of the cases, extending the room for highlights by 2 EV and with negligible noise penalty.
With Fuji cameras, if you enable dynamic range extension, camera sets ISO to 1 stop lower when DRE is set to 200%, providing 1 stop of extra room in highlights; for 400% it makes the place for 2 stops. (That’s why dynamic range extension is disabled at base camera ISO). In effect, if DRE is 200% and “normal” headroom in highlights is 3 EV, camera makes it 4 EV; and id DRE is 400%, camera makes it 5 EV.
-
Dear Iliad
So, if I was in a hurry for “that shot”, on manual exposure, and Auto ISO was on, say, ISO600, if I decided that the mid-tone needed to be -2EV and dialled that in, the Auto ISO would drop to ISO200? (Or do I have that the wrong way round e.g. if my ISO had been 200 it would then increase to 600).
I think I understand what you’re saying (its a steep learning curve for me!) – that this provides more room for the highlights i.e. much more ‘texture’ to them. Would this compress the shadows too far? Would it then re-introduce noise if lifting them in a convertor – but my understanding of what you’re saying is that the overall dynamic range is extended by this – otherwise the shadows will be to bright and the highlights too compressed/blown?
Am I correct in thinking that the Fuji DRExtensions only apply when the in-camera processes from Raw to JPEG. I don’t yet have any clear idea of how the quality (subjective, I know) of JPEG output compares to Raw when bracketed shots are post-processed. I’m not even sure if the original Raw is left or deleted by the in-camera processing, though I suppose a shot could be taken in Raw & JPEG, but I don’t think the Raw image then has the DRE applied to it. Its too easy to confuse an old ‘duffer’ like me!
-
Hi Iliad
Just thought I’d let you know, I’ve tried shots following your kind advice on establishing those mid-tones. Great! It helped enormously – Thank you so very much, grasping the concept is a leap forward for me! I’ve tried a variety of shots using DRE on the Fuji, but I haven’t had the opportunity yet to figure out (using Fast Raw Viewer) what’s going on.
Can I also thank you for some of the references you have included in your posts to others – they are opening my eyes to greatly improved photography. I’m not in this for profit, at my age, but for the pleasure of gaining knowledge and better quality. Thank you most sincerely.
Reply 15. Hear, hear. Detailed and insightful.
-
Iliah
Thanks for taking the time to show us how you use Fastrawviewer for inspection of your files. I addn’t time to read your article it, but surely tomorrow I will read it and compared it to my own way of doing this.
regards
Luc
-
Right on, thanks Ilah.
-
Thanks for a thoughtful and useful post. The reminder, or new insight, about the unreliability of the histogram based on the camera jpeg is most helpful.
-
Thank you for such a detailed tutorial. I have been an active photographer for over 40 years and learned a lot. Photography Life is consistently excellent with detailed equipment reviews and easy to understand, indepth tutorials. The articles written by guest contributors, like Illiah Borg, have made me a much better photographer by revealing the lessons they have had to learn. Many are so detailed, I feel like I am working with them one-on-one at the same shoot. I have saved every post since I stumbled across the site and go back through my library again and again.
Comment Policy: Although our team at Photography Life encourages all readers to actively participate in discussions, we reserve the right to delete / modify any content that does not comply with our Code of Conduct, or do not meet the high editorial standards of the published material.
Leave a Reply Cancel reply
Your email address will not be published.Required fields are marked *
Comment *
Name *
Email *
Δ